
Orchid Crochet Pattern
Add a handmade floral accent to your space with this…

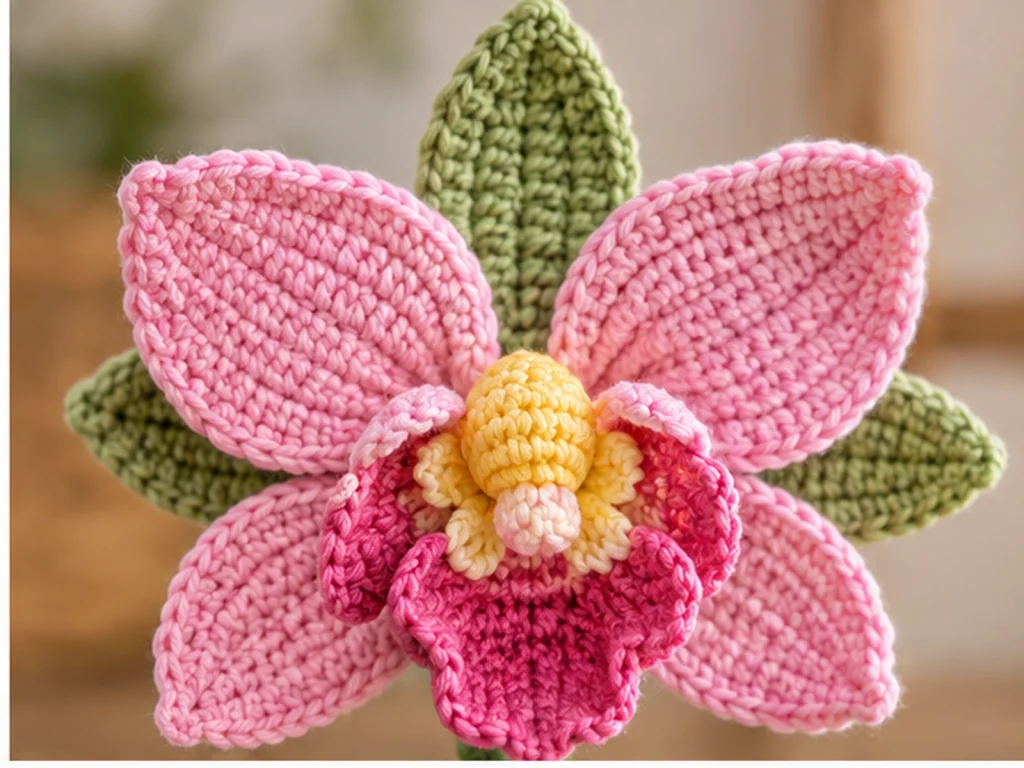
Add a handmade floral accent to your space with this orchid crochet pattern. The design combines layered petals, green sepals, a dimensional flower center, a narrow supported stem, and two leaves to create a decorative crochet orchid.
The finished flower is designed as a crochet interpretation of an orchid rather than an exact botanical replica. With DK or category 3 yarn and a 3.5 mm crochet hook, the flower is approximately 4.5–5.5 inches wide, while the complete stemmed orchid is approximately 7–9 inches tall. Final dimensions can vary with yarn, hook size, tension, stuffing, and individual technique.

Project Overview
This crochet orchid is made from several separate pieces that are assembled at the end.
You will make:
- 3 green sepals
- 2 orchid-colored petals
- 1 orchid lip
- 1 flower center
- 1 crocheted green stem
- 2 green leaves
The small flower center is lightly stuffed. The stem uses floral wire for added decorative support.
This project is intended as a decorative crochet piece rather than a toy.
Materials & Tools
Gather the following supplies:
- DK or category 3 yarn
- Orchid pink yarn
- Soft green yarn
- Warm yellow yarn
- Optional coral or darker pink yarn for accents
- 3.5 mm crochet hook
- Tapestry needle
- Scissors
- Stitch marker
- Polyfill stuffing
- 18–20 gauge floral wire
Safety Note
Because floral wire is used inside the stem, make sure all wire ends are fully enclosed and secured. Do not leave a sharp or exposed wire end anywhere in the finished project.
This decorative project has not been established as baby-safe, child-safe, or suitable as a toy.
Abbreviations
US crochet terminology is used throughout the pattern.
- MR — magic ring
- ch — chain
- sc — single crochet
- inc — single crochet increase
- dec — single crochet decrease
- FO — fasten off
Before You Start
The sepals, petals, lip, and leaves are worked flat in rows. The flower center and stem are worked in continuous rounds.
Count your stitches at the end of every row or round, especially after increases and decreases.
Keep your yarn tails long enough for sewing the individual pieces together.
For the best result, position the flower pieces before sewing them permanently. This makes it easier to balance the petals, sepals, center, and lip.
The stem also contains floral wire, so take care when handling the finished piece.
Original Crochet Orchid Pattern
Sepals — Make 3
Use soft green yarn and work each sepal flat.
Foundation: Ch 9.
Row 1: Sc in 2nd ch from hook and across. (8)
Row 2: Inc, sc 6, inc. (10)
Row 3: Sc across. (10)
Row 4: Inc, sc 8, inc. (12)
Row 5: Sc across. (12)
Row 6: Dec, sc 8, dec. (10)
Row 7: Sc across. (10)
Row 8: Dec, sc 6, dec. (8)
Row 9: Dec, sc 4, dec. (6)
Row 10: Dec twice. (4)
Row 11: Dec once. (2)
Row 12: Dec once. (1)
FO and leave a sewing tail.
Repeat twice more for a total of 3 sepals.
Petals — Make 2
Use orchid pink yarn and work each petal flat.
Foundation: Ch 12.
Row 1: Sc in 2nd ch from hook and across. (11)
Row 2: Inc, sc 9, inc. (13)
Row 3: Sc across. (13)
Row 4: Inc, sc 11, inc. (15)
Row 5: Sc across. (15)
Row 6: Dec, sc 13, dec. (13)
Row 7: Sc across. (13)
Row 8: Dec, sc 11, dec. (11)
Row 9: Sc across. (11)
Row 10: Dec, sc 9, dec. (9)
Row 11: Sc across. (9)
Row 12: Dec, sc 7, dec. (7)
Row 13: Sc across. (7)
Row 14: Dec, sc 5, dec. (5)
Row 15: Dec, sc 3, dec. (3)
Row 16: Dec, sc 1. (2)
Row 17: Dec once. (1)
FO and leave a sewing tail.
Repeat once more for 2 petals.
Orchid Lip — Make 1
Use orchid pink or coral yarn and work flat.
Foundation: Ch 10.
Row 1: Sc in 2nd ch from hook and across. (9)
Row 2: Inc, sc 7, inc. (11)
Row 3: Sc across. (11)
Row 4: Inc, sc 9, inc. (13)
Row 5: Sc across. (13)
Row 6: Dec, sc 11, dec. (11)
Row 7: Sc across. (11)
Row 8: Dec, sc 9, dec. (9)
Row 9: Dec, sc 7, dec. (7)
Row 10: Dec, sc 5, dec. (5)
Row 11: Dec, sc 3, dec. (3)
Row 12: Dec, sc 1. (2)
Row 13: Dec once. (1)
FO and leave a sewing tail.
The lip sits at the front of the flower center during assembly.
Flower Center — Make 1
Use warm yellow yarn and work in continuous rounds.
Round 1: 6 sc in MR. (6)
Round 2: (Sc, inc) × 3. (9)
Round 3: Sc around. (9)
Round 4: (2 sc, inc) × 3. (12)
Round 5: Sc around. (12)
Round 6: (2 sc, dec) × 3. (9)
Round 7: Sc around. (9)
Round 8: (Sc, dec) × 3. (6)
Round 9: Sc around. (6)
Lightly stuff the center.
FO and leave a sewing tail.
Stem — Make 1
Use soft green yarn and work in continuous rounds.
Round 1: 6 sc in MR. (6)
Rounds 2–18: Sc around. (6)
Round 19: (2 sc, inc) × 2. (8)
Round 20: Sc around. (8)
FO, leaving a long sewing tail.
Secure the Floral Wire
The finished stem has a closed lower end and an open upper end.
Prepare a length of 18–20 gauge floral wire that fits inside the completed stem and extends into the flower base without protruding from the finished project.
Before inserting it, bend the flower-end of the wire into a small closed loop or smooth hook. The end should have no sharp point exposed.
Insert the wire through the open top of the stem. Position the bent end so it remains inside the base of the flower when the flower is attached.
When sewing the flower to the stem, sew securely through the lower flower layers so the wire is captured inside the connection. Check the finished connection carefully to make sure the wire cannot move outward or become exposed.
Leaves — Make 2
Use soft green yarn and work each leaf flat.
Foundation: Ch 17.
Row 1: Sc in 2nd ch from hook and across. (16)
Row 2: Inc, sc 14, inc. (18)
Row 3: Sc across. (18)
Row 4: Inc, sc 16, inc. (20)
Row 5: Sc across. (20)
Row 6: Dec, sc 18, dec. (18)
Row 7: Sc across. (18)
Row 8: Dec, sc 16, dec. (16)
Row 9: Sc across. (16)
Row 10: Dec, sc 14, dec. (14)
Row 11: Dec, sc 12, dec. (12)
Row 12: Dec, sc 10, dec. (10)
Row 13: Dec, sc 8, dec. (8)
Row 14: Dec, sc 6, dec. (6)
Row 15: Dec, sc 4, dec. (4)
Row 16: Dec, sc 2, dec. (2)
Row 17: Dec once. (1)
FO and leave a sewing tail.
Repeat once more for 2 leaves.
How to Assemble the Crochet Orchid
Step 1: Arrange the Sepals
Place the 3 green sepals around the back of the flower center.
Spread them naturally around the center and sew their lower sections together.
Avoid pulling the stitching too tightly so the sepals can keep some shape.
Step 2: Attach the Petals
Place the 2 orchid-colored petals between the sepals.
Position one toward each side of the flower, slightly above the center.
Check the flower from the front before sewing them permanently.
Step 3: Add the Flower Center
Place the yellow flower center over the lower portion of the petals.
Sew around its lower edge while keeping the center slightly raised.
Step 4: Attach the Orchid Lip
Place the lip directly in front of the flower center.
The wider section should sit beneath the center.
Sew the attachment area securely while allowing the lip to remain slightly dimensional.
Step 5: Attach the Flower to the Stem
Insert the top of the prepared stem into the underside of the flower.
Use the long stem tail to sew the flower securely to the stem and capture the supported wire inside the flower base.
Before finishing the stitches, check that the flower sits upright and that no wire is visible.
Step 6: Attach the Leaves
Place one leaf lower on the stem and the second slightly higher.
Compare the two sides before sewing so the leaves face outward naturally.
Make sure the stem remains balanced and the wire stays completely concealed.
Finishing
Weave in the remaining yarn tails with a tapestry needle and trim the excess.
If desired, use coral or darker pink yarn to add a few small embroidered accents near the flower center.
Keep the embroidery subtle so the petals remain the main visual feature.
Once assembly is complete, gently shape the petals, sepals, lip, and leaves with your fingers.
A few small adjustments can help create a softer, more dimensional flower silhouette.
Helpful Tips
Count as You Crochet
The petals and leaves depend on gradual increases and decreases. Checking your stitch count after every row helps prevent shaping errors from carrying into the next section.
Arrange Before Sewing
Lay out the flower pieces before committing to the final placement.
This makes it easier to balance the petals, sepals, and lip.
Use Light Stuffing
The flower center only needs a small amount of stuffing. Overstuffing can make the center too bulky and interfere with the surrounding flower pieces.
Shape After Assembly
Once the flower is assembled, gently lift and curve the petals and lip into a natural-looking arrangement.
Check the Wire Before Finishing
Before trimming any yarn tails, inspect the stem and flower connection from every angle.
The floral wire should remain completely enclosed with no sharp or exposed end.

Troubleshooting
The flower looks flat
Gently reshape the petals and lip after assembly. Make sure the flower center is only lightly stuffed and that the petals have not been sewn too tightly against the center.
The petals look uneven
Before sewing the pieces permanently, arrange them side by side and compare their positions from the front.
The center looks too bulky
Remove a small amount of stuffing if necessary. The center is intended to be lightly stuffed rather than firm.
The leaves are pointing in awkward directions
Unpick the attachment stitches carefully, reposition the leaves, and check the silhouette before sewing them again.
The stem feels unstable
Check the wire position and the flower-to-stem connection. The wire should remain fully enclosed and securely captured inside the stem and flower base.
Customization Ideas
Changing the flower colors is an easy way to create different orchid-inspired looks.
Try combinations such as:
- soft pink with a warm yellow center
- white with a coral center
- lavender with a yellow center
- deeper pink with a contrasting lip
You can also use a different accent color for the lip to create more contrast around the center.
For a fuller decorative display, multiple finished orchids can be arranged together with their leaves placed at different heights.
Frequently Asked Questions
How large is the finished crochet orchid?
With DK or category 3 yarn and a 3.5 mm hook, the flower is designed to be approximately 4.5–5.5 inches wide, while the stemmed orchid is approximately 7–9 inches tall. Final dimensions vary with yarn, hook size, tension, stuffing, and individual technique.
What yarn weight is used for this orchid crochet pattern?
The pattern is designed for DK or category 3 yarn.
What crochet hook size do I need?
Use a 3.5 mm crochet hook.
Does the orchid require stuffing?
Only the flower center is lightly stuffed. The petals, sepals, leaves, and stem are not stuffed.
Does the stem use wire?
Yes. The stem uses 18–20 gauge floral wire for decorative support. The wire should be completely enclosed and securely captured inside the finished stem and flower connection.
Can I change the orchid colors?
Yes. The petal, lip, and center colors can be changed to create different decorative combinations.
Is this a realistic botanical orchid?
It is a crochet interpretation inspired by the structure of an orchid. The design uses layered petals, a central lip, sepals, leaves, and a supported stem to create a decorative floral silhouette.
Can I make the orchid without floral wire?
The design was created with internal floral wire as part of the stem construction. Removing the wire may change the structure and stability of the finished flower.
Final Thoughts
This orchid crochet pattern combines individually crocheted petals, sepals, a flower center, a central lip, a supported stem, and two leaves into one handmade decorative flower.
The most important part of the final assembly is taking your time with the flower placement and making sure the stem wire remains completely enclosed.
The approximate finished size and final appearance can vary with yarn, hook size, tension, stuffing, and individual technique.
This pattern has been mathematically reviewed and constructionally checked, but it has not been physically crocheted and tested yet.
