
Crochet Whale Amigurumi Pattern
Meet a tiny ocean friend with a rounded body, split…

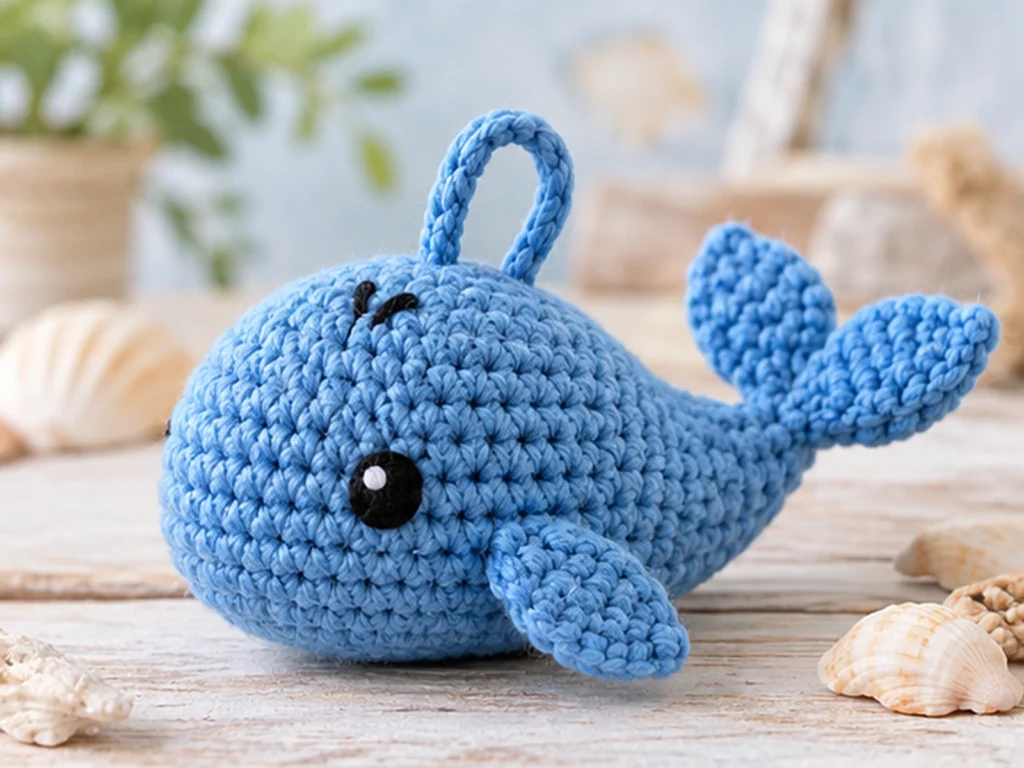
Meet a tiny ocean friend with a rounded body, split tail, little side fins, and a simple dorsal loop for turning the finished whale into a keychain. This original crochet whale amigurumi pattern is designed as a compact project with clear construction and straightforward assembly.
The finished whale is approximately 3–3.5 inches (7.5–9 cm) long, excluding keychain hardware. This is an approximate design size and can vary with yarn, hook, tension, stuffing, and individual crochet technique.
Project Overview
This mini whale is made from one main body, two small side fins, and two flat tail flukes. The body is crocheted in continuous rounds, stuffed gradually, and closed before the separate pieces are sewn into place.
The base design uses embroidered facial details and includes a reinforced yarn loop at the top for attaching a keyring or similar hardware.
Project Details
- Project: Mini crochet whale amigurumi keychain
- Approximate finished size: 3–3.5 inches long
- Yarn: Category 3 / light or DK-weight yarn
- Main color: Ocean blue or another whale-inspired color
- Accent: Black for embroidered details
- Hook: 2.75 mm
- Stuffing: Polyester fiberfill
- Construction: One-piece body with separate fins and tail flukes
The pattern has been mathematically reviewed and constructionally checked, but it has not been physically crocheted and tested yet. Final size and appearance may vary according to yarn, hook, tension, stuffing, and individual technique.
Materials & Tools
Yarn
Use a tightly crocheted Category 3 / light or DK-weight yarn.
You will need:
- Ocean blue or another main color
- A small amount of black for embroidered details
The exact amount of yarn required has not been established.
Crochet Hook
- 2.75 mm crochet hook
Other Supplies
- Polyester fiberfill
- Yarn needle
- Stitch marker
- Scissors
- Keyring or similar hardware, if you are making the whale as a keychain
Crochet Abbreviations
These are the US crochet terms used throughout the pattern.
| Abbreviation | Meaning |
|---|---|
| MR | Magic ring |
| ch | Chain |
| sc | Single crochet |
| inc | Increase — 2 sc in the same stitch |
| dec | Decrease — sc 2 stitches together |
| sl st | Slip stitch |
| FO | Fasten off |
Before You Start
Work the Body in Continuous Rounds
The main body is crocheted in continuous rounds rather than joined rounds. Use a stitch marker to identify the first stitch of each round.
Keep Track of Stitch Counts
The stitch count at the end of every round is included in parentheses. Check your count as you work, especially after rounds containing increases or decreases.
Stuff as You Go
Add small amounts of stuffing as the body begins to taper. The goal is a firm, smooth shape without stretching the stitches enough to expose the stuffing.
Compare Paired Pieces
The fins and tail flukes are made as matching pairs. Before permanently sewing them in place, compare both sides of the whale so the finished silhouette stays balanced.
Crochet Whale Pattern
Main Body — Make 1
Color: Ocean blue
Work the body from the rounded front toward the tapered rear.
Round 1
6 sc in MR. (6)
Round 2
6 inc. (12)
Round 3
(sc, inc) × 6. (18)
Round 4
(2 sc, inc) × 6. (24)
Round 5
(3 sc, inc) × 6. (30)
Round 6
30 sc. (30)
Round 7
30 sc. (30)
Round 8
30 sc. (30)
Round 9
30 sc. (30)
Round 10
30 sc. (30)
Round 11
30 sc. (30)
Round 12
(3 sc, dec) × 6. (24)
Round 13
24 sc. (24)
Round 14
(2 sc, dec) × 6. (18)
Round 15
18 sc. (18)
Round 16
(sc, dec) × 6. (12)
Begin checking the shape and add small amounts of stuffing as needed.
Round 17
6 dec. (6)
Fasten off and close the remaining opening.
Leave enough yarn to reinforce the closure if needed.
Stuffing the Body
Begin stuffing after Round 11.
Continue adding small amounts through Rounds 12–16. The body should feel firm enough to hold its rounded silhouette without becoming overly hard.
Before finishing the closure, check that:
- the front remains rounded
- the middle is the widest area
- the rear tapers smoothly
- no stuffing is visible
- the stitches are not stretched excessively
Side Fins — Make 2
Color: Ocean blue
Each fin is worked in continuous rounds.
Round 1
6 sc in MR. (6)
Round 2
(sc, inc) × 3. (9)
Round 3
(2 sc, inc) × 3. (12)
Round 4
12 sc. (12)
Round 5
(2 sc, dec) × 3. (9)
Round 6
(sc, dec) × 3. (6)
Fasten off, leaving a sewing tail.
Do not stuff the fins.
Gently flatten each one before attaching it to the body.
Tail Flukes — Make 2
Color: Ocean blue
The tail flukes are worked flat.
The narrow 2-stitch end will be attached to the rear of the whale.
Tail Fluke 1
Row 1
Ch 5.
Starting in the 2nd chain from the hook, sc across. (4)
Row 2
Ch 1, turn.
Inc, 2 sc, inc. (6)
Row 3
Ch 1, turn.
Inc, 4 sc, inc. (8)
Row 4
Ch 1, turn.
8 sc. (8)
Row 5
Ch 1, turn.
Dec, 4 sc, dec. (6)
Row 6
Ch 1, turn.
Dec, 2 sc, dec. (4)
Row 7
Ch 1, turn.
2 dec. (2)
Fasten off, leaving a sewing tail.
Tail Fluke 2
Repeat the same instructions for the second tail fluke.
Fasten off, leaving a sewing tail.
Do not stuff the tail flukes.
Facial Details
Embroidered Eyes
Use black embroidery thread or a small amount of black yarn.
Place one eye on each side of the upper portion of the body, approximately around the Round 4–5 area.
Use the first eye as the visual reference for the second. Check the placement from the front and both sides before securing the embroidery so the eyes remain balanced in relation to the body.
Blowhole Detail
Use black embroidery thread or yarn.
Add two very short embroidered stitches near the top center of the whale, slightly behind the eye line.
Keep the detail small so it complements the body instead of dominating the face.

Assemble Your Whale
Step 1: Attach the Tail Flukes
Use the narrow 2-stitch Row 7 end of each fluke as the attachment edge.
Attach one fluke to each side of the rear closure.
Position them so that:
- they spread outward
- the two sides look balanced
- the broad portions create a recognizable split tail
- neither side points sharply downward
Before sewing everything permanently, look at the whale from above and compare both sides.
Step 2: Attach the Side Fins
Place one fin on each side of the body around the middle, slightly behind the face.
Angle the pointed end subtly toward the rear.
Sew through the fin and into several body stitches so the attachment is secure.
Compare the left and right sides before weaving in the yarn ends.
Step 3: Finish the Facial Details
With the whale’s orientation established, complete the embroidered eyes and blowhole.
Step 4: Add the Keychain Loop
Attach ocean-blue yarn to the dorsal, or top-center, area of the whale.
- Ch 10.
- Sl st back into the attachment point to form a loop.
- Fasten off.
- Weave the yarn tails securely through nearby body stitches.
- Reinforce the attachment with several passes of yarn.
- Attach your keyring through the finished loop.
The loop should sit near the center of the whale rather than too close to the tail so the whale can hang more naturally.

Final Finishing Tips
Before adding the keyring, inspect the whole whale.
Check that:
- the body is evenly stuffed
- the tail sits centered at the rear
- both fins appear balanced
- the eyes are visually level
- the blowhole sits on the center line
- the keychain loop is firmly attached
- all yarn tails are secured and hidden
Gently reshape the body with your fingers if the stuffing has shifted during assembly.
Because the pattern has not yet been physically prototyped, treat the first sample as an opportunity to evaluate the proportions and how the finished whale behaves with your chosen yarn and tension.
Helpful Troubleshooting
My whale looks too narrow.
Check your stitch counts first. The body should reach its widest point at 30 stitches before the taper begins.
Tight tension can also make the finished body smaller than the approximate target.
The body looks lumpy after stuffing.
Add stuffing gradually rather than pushing in one large amount. Small amounts are easier to distribute evenly around the body.
One fin sits differently from the other.
Do not permanently sew the second fin until you compare both sides. Use the first attached fin as your visual reference.
The tail looks uneven.
Lay the two flukes flat beside each other and compare their shape before sewing. Then compare their attachment points on the rear of the body.
The whale loses its shape after assembly.
Check the stuffing level before changing the crocheted structure. The body should be firm enough to hold its rounded form without excessive stuffing stretching the stitches.
My stitch count is off.
Stop at the end of the round and recount before continuing. For shaping rounds, verify both the repeated group and the final stitch count shown in parentheses.
Customization Ideas
Try Different Colors
Instead of ocean blue, experiment with:
- soft gray
- navy
- muted teal
- lavender
- pale blue
- charcoal
Change the Facial Expression
The base design uses small embroidered eyes and a subtle blowhole. You can experiment with different embroidery styles to create a softer, more playful, or more minimalist expression.
Use the Whale as a Small Accessory
The reinforced dorsal loop allows the finished piece to work as a keychain or similar hanging accessory when paired with suitable hardware.
Before relying on it for regular use, physically check the loop and its attachment on your finished sample.
Care
For a small crocheted amigurumi, handle the finished piece gently and keep it away from excessive moisture, rough surfaces, and anything that could pull on the embroidered details or keychain loop.
Because the exact yarn and hardware can vary, follow the care recommendations appropriate to the materials you choose.
Frequently Asked Questions
How big is the finished crochet whale?
The design target is approximately 3–3.5 inches (7.5–9 cm) long, excluding keychain hardware.
This is an approximate size rather than a physically tested measurement. Your finished whale can vary depending on yarn, hook, tension, stuffing, and crochet technique.
What yarn is used for the whale?
The design is intended for Category 3 / light or DK-weight yarn.
What hook size is used?
The pattern is designed around a 2.75 mm crochet hook.
Does the whale use safety eyes?
No. The base pattern uses embroidered eyes.
Is the whale stuffed?
Yes. The main body is stuffed gradually beginning after Round 11.
The fins and tail flukes are not stuffed.
Can I make the whale into a keychain?
Yes. The design includes a reinforced yarn loop at the top for attaching keychain hardware.
Because the loop has not been physically stress-tested, check the attachment on your finished sample before regular use.
Can I change the colors?
Yes. Changing the main yarn color is a straightforward way to customize the finished whale without changing its stitch structure.
Has this crochet whale pattern been physically tested?
Not yet.
The pattern has been mathematically reviewed and constructionally checked, but it has not been physically crocheted and evaluated.
Final Thoughts
This crochet whale is built around a simple silhouette: a rounded body, compact side fins, and a wide split tail that gives the project its recognizable whale shape.
The small size also makes the design well suited to a keychain-style finish. Once you crochet your first sample, you can experiment with different colors and facial styles while keeping the basic construction intact.
For the most consistent result, pay close attention to stitch counts, gradual stuffing, eye placement, and symmetry during assembly.
