
S’mores Amigurumi Crochet Pattern
Turn a classic campfire treat into a tiny crochet project…
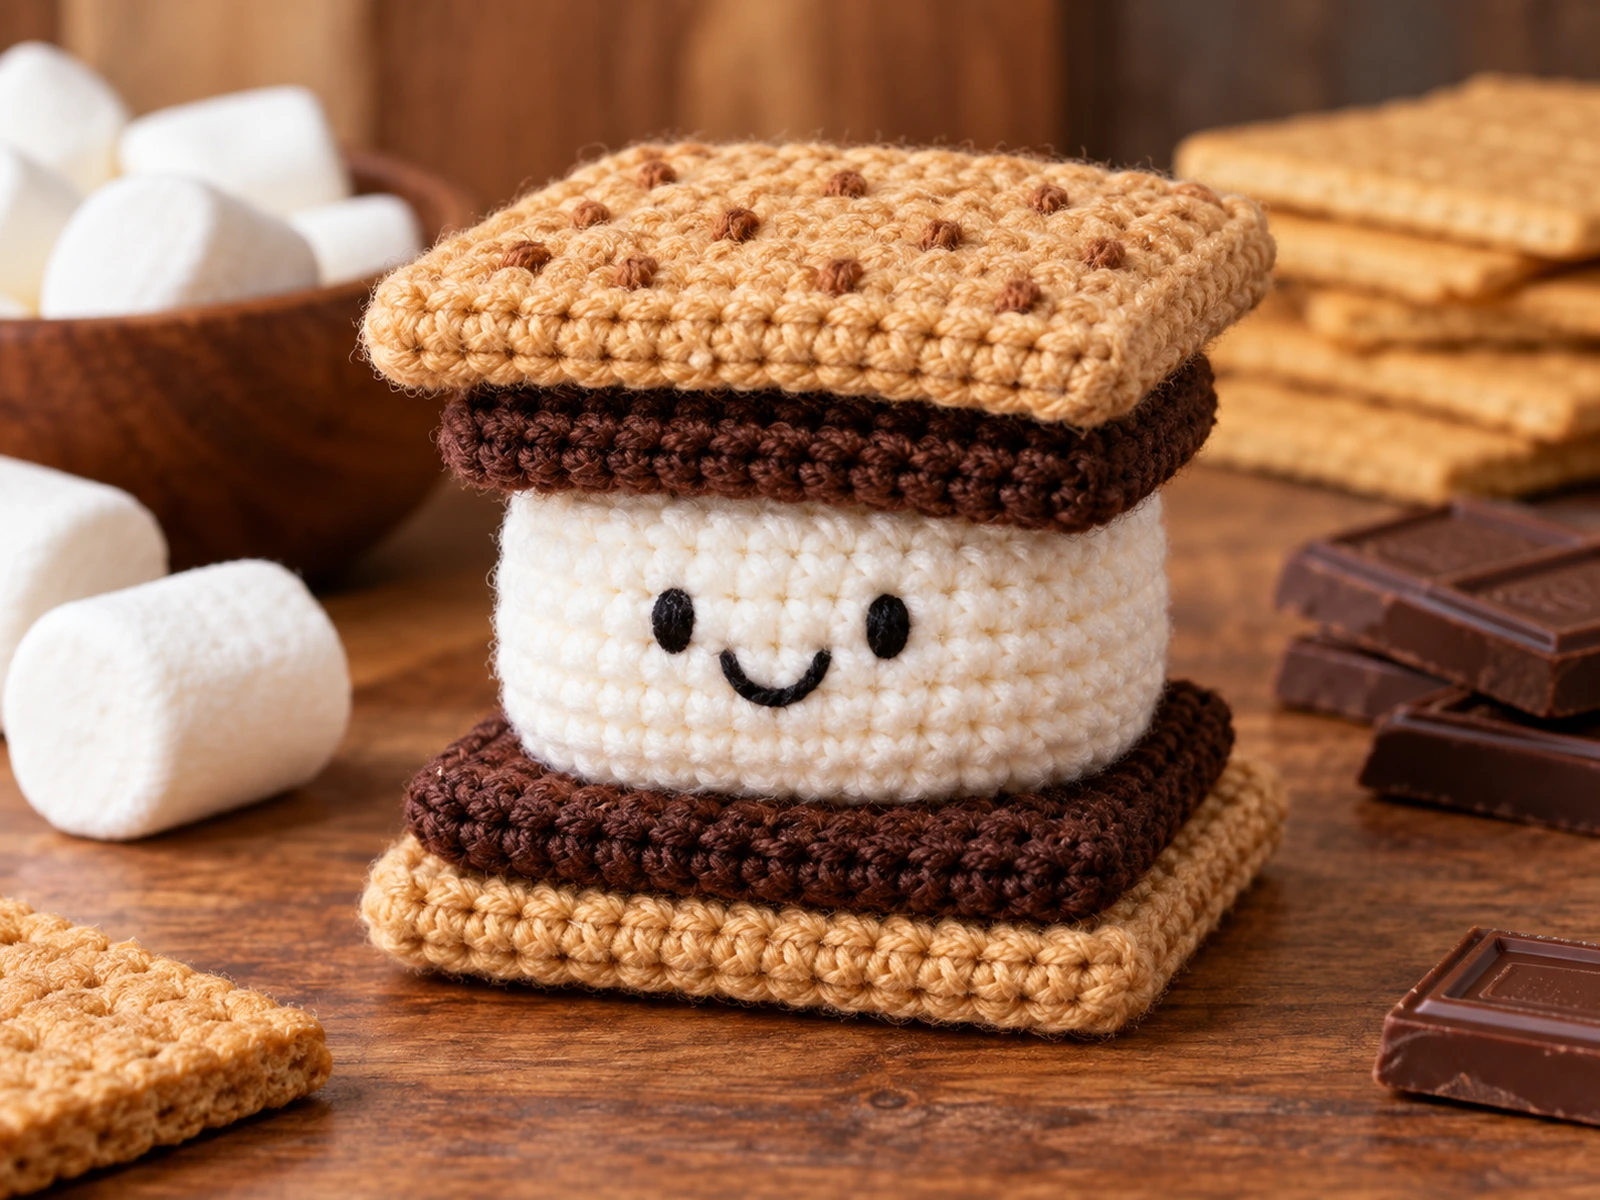
Turn a classic campfire treat into a tiny crochet project with this s’mores amigurumi crochet pattern. The design combines a soft stuffed marshmallow, two graham-cracker pieces, and two chocolate layers into one stacked little character.
The finished s’mores is approximately 3.5–4.5 inches tall, depending on your yarn, hook, tension, stuffing, and individual crochet technique. The pattern has been mathematically reviewed and constructionally checked, but it has not been physically crocheted and tested yet.

Project Overview
What You’ll Make
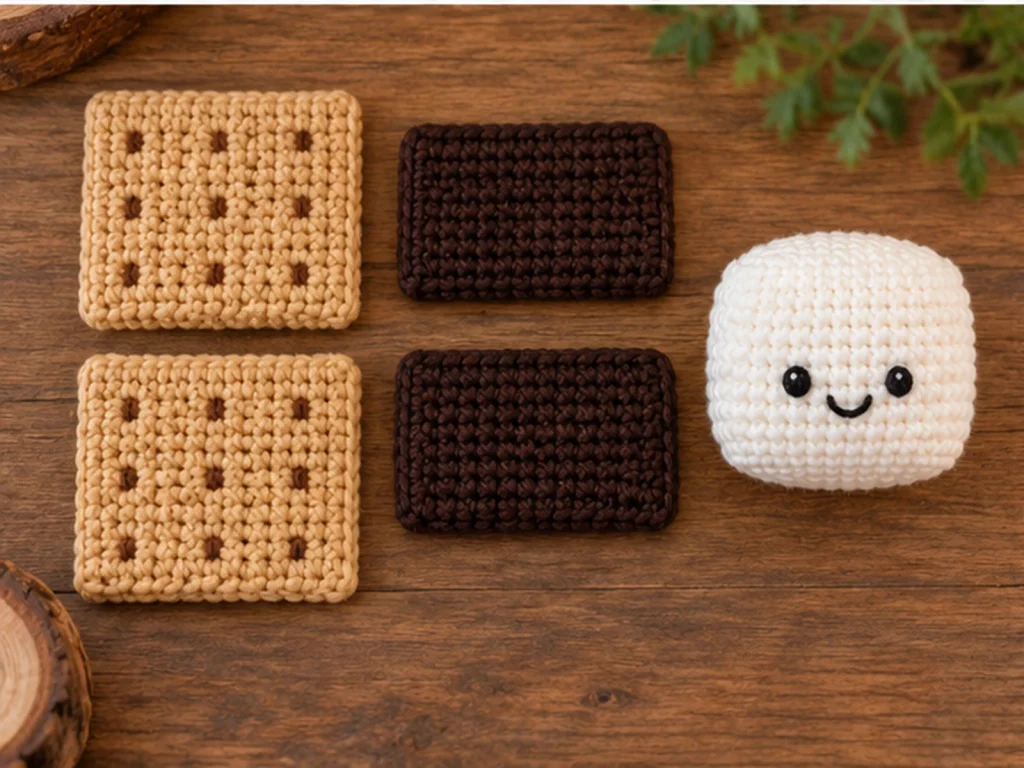
This s’mores amigurumi is built from five main crocheted pieces:
- 1 stuffed marshmallow
- 2 graham-cracker panels
- 2 chocolate layers
The marshmallow is worked in continuous rounds and stuffed before it is closed. The graham crackers and chocolate are worked as flat pieces, then the components are layered and secured together.
The face is embroidered directly onto the marshmallow, so no safety eyes are needed.
Project Details
- Project: S’mores amigurumi
- Technique: Crochet amigurumi
- Yarn: Medium/Worsted #4
- Hook: 3.25 mm
- Finished size: Approximately 3.5–4.5 inches tall
- Filling: Fiberfill
- Eyes: Embroidered with black embroidery thread
Because the finished size has not been physically tested, treat the measurement as approximate.
Materials & Tools
Yarn
Use medium-weight #4 worsted yarn in:
- Graham-cracker tan
- Dark chocolate brown
- White or cream
- Darker tan for cracker details
- Black embroidery thread for the face
Tools
- 3.25 mm crochet hook
- Fiberfill stuffing
- Yarn needle
- Stitch marker
- Scissors
Abbreviations
- MR — magic ring
- ch — chain
- sc — single crochet
- inc — increase, 2 sc in the same stitch
- dec — decrease, sc 2 stitches together
- sl st — slip stitch
- FO — fasten off
Before You Start
The marshmallow is worked in continuous rounds, so a stitch marker can help you keep track of the beginning of each round.
The cracker and chocolate pieces are worked in rows. Keep track of your stitch count as you work, especially on the first row of each flat piece.
For assembly, place the finished pieces together before sewing them permanently. This makes it easier to check the alignment of each layer.
The overall construction order is:
Bottom cracker → chocolate → marshmallow → chocolate → top cracker
S’mores Amigurumi Crochet Pattern
Marshmallow — Make 1
Use white or cream yarn.
Work in continuous rounds.
Round 1
6 sc in MR. (6)
Round 2
6 inc. (12)
Round 3
(sc, inc) × 6. (18)
Round 4
(2 sc, inc) × 6. (24)
Round 5
sc around. (24)
Round 6
sc around. (24)
Round 7
sc around. (24)
Round 8
sc around. (24)
Round 9
(2 sc, dec) × 6. (18)
Round 10
(sc, dec) × 6. (12)
Add fiberfill before closing the piece. Shape the stuffing evenly so the marshmallow stays rounded without stretching the stitches.
Round 11
6 dec. (6)
Fasten off, leaving a yarn tail. Thread the tail through the front loops of the remaining stitches, pull the opening closed, secure, and weave in the end.
Graham Cracker — Make 2
Use graham-cracker tan yarn.
Foundation
Ch 15.
Row 1
Sc in the 2nd ch from the hook and across. (14)
Row 2
Ch 1, turn, sc across. (14)
Row 3
Ch 1, turn, sc across. (14)
Row 4
Ch 1, turn, sc across. (14)
Row 5
Ch 1, turn, sc across. (14)
Row 6
Ch 1, turn, sc across. (14)
Row 7
Ch 1, turn, sc across. (14)
Row 8
Ch 1, turn, sc across. (14)
Row 9
Ch 1, turn, sc across. (14)
Row 10
Ch 1, turn, sc across. (14)
Row 11
Ch 1, turn, sc across. (14)
Row 12
Ch 1, turn, sc across. (14)
Row 13
Ch 1, turn, sc across. (14)
Row 14
Ch 1, turn, sc across. (14)
Fasten off and weave in the end.
Repeat the complete pattern once more to make the second graham cracker.
Cracker Texture
Using darker tan yarn, add small surface stitches across each cracker to create a simple grid-like texture.
Keep the marks evenly distributed and similar on both pieces for a balanced finished look.
Chocolate Layer — Make 2
Use dark chocolate-brown yarn.
Foundation
Ch 11.
Row 1
Sc in the 2nd ch from the hook and across. (10)
Row 2
Ch 1, turn, sc across. (10)
Row 3
Ch 1, turn, sc across. (10)
Row 4
Ch 1, turn, sc across. (10)
Row 5
Ch 1, turn, sc across. (10)
Row 6
Ch 1, turn, sc across. (10)
Row 7
Ch 1, turn, sc across. (10)
Fasten off and weave in the end.
Repeat the complete pattern once more to make the second chocolate layer.
Embroidered Face
Add the face to the front-facing side of the marshmallow using black embroidery thread.
Eyes
Embroider two small eyes with balanced spacing.
Before securing the stitches permanently, look at the marshmallow straight on and make sure both eyes appear level.
Smile
Add a small curved smile beneath the eyes.
Keep the face centered on the visible front surface of the marshmallow.
Assemble the S’mores
Before sewing, lay out all five main pieces so you can check the proportions and alignment.
Step 1: Attach the First Chocolate Layer
Place one graham cracker flat.
Center one chocolate layer on top, leaving a similar amount of cracker visible around the outside.
Secure the chocolate layer to the cracker.
Step 2: Add the Marshmallow
Center the stuffed marshmallow on the first chocolate layer.
Check the visible space around the marshmallow from all sides before securing it.
Sew the marshmallow in place.
Step 3: Add the Second Chocolate Layer
Place the second chocolate layer on top of the marshmallow.
Check that it is visually centered with the lower chocolate layer, then secure it.
Step 4: Add the Top Cracker
Place the second graham cracker over the upper chocolate layer.
Align it with the lower cracker as closely as possible before sewing it into place.

Step 5: Shape the Finished Stack
Gently adjust the finished layers by hand.
Straighten the crackers, center the chocolate pieces, and shape the marshmallow so the finished s’mores has a clean stacked silhouette.
Finishing
Before trimming the remaining yarn tails, check the whole project carefully.
Make sure:
- The two crackers are aligned.
- The chocolate layers remain centered.
- The marshmallow face is clearly visible.
- All attachment points are secure.
- No stuffing is exposed.
- Loose yarn ends have been woven in.
Helpful Tips
Keep the cracker pieces consistent
The two cracker panels are designed to match. Try to keep your tension consistent when making both pieces.
Count as you go
The flat cracker and chocolate pieces maintain their stitch counts from row to row, so checking your count before turning each row can prevent small errors from carrying forward.
Assemble before sewing
Place all the pieces together first. This lets you make small alignment adjustments before the layers are permanently attached.
Avoid overstuffing
The marshmallow should hold its rounded shape without stretching the stitches. Too much stuffing can make the surface look uneven.
Check alignment from several angles
Look at the stack from the front and side before finishing the attachment points. Small corrections are much easier before the final stitches are secured.
Troubleshooting
My cracker pieces look different from each other.
Check your tension and confirm that both pieces contain all 14 rows with 14 stitches in each row. Differences in tension can affect the shape and size of the panels.
My marshmallow looks too firm.
Remove a small amount of stuffing and reshape it before closing the final opening. The goal is a rounded shape without stretched stitches.
My chocolate layer looks off-center.
Place it on the cracker or marshmallow without sewing it first. Adjust it visually until the surrounding edges look balanced, then secure it.
The finished stack looks uneven.
Place the project on a flat surface and inspect each layer. Straighten the crackers and recenter the chocolate pieces before making additional stitches.
My embroidered face looks crooked.
Check the marshmallow from straight on. If the embroidery is not yet fully secured, adjust the thread placement so the eyes appear balanced around the center of the face.
Customization Ideas
Change the face
Try a slightly different embroidered smile or expression to give your marshmallow a different personality.
Use a warmer marshmallow shade
Cream can create a softer toasted appearance while keeping the same basic construction.
Change the cracker-detail color
A lighter or darker tan can create more or less contrast against the cracker base.
Create a small food-amigurumi collection
The same playful character approach can inspire a collection of crocheted treats with different expressions and color combinations.
Keep structural changes proportional to the original design rather than assuming that changing one component will automatically preserve the same fit.
Frequently Asked Questions
What yarn is used for this s’mores amigurumi?
The design uses medium-weight #4 worsted yarn in tan, dark brown, white or cream, plus darker tan and black embroidery thread.
How many pieces are needed?
The main project uses 1 marshmallow, 2 graham crackers, and 2 chocolate layers.
How big is the finished s’mores?
The finished piece is approximately 3.5–4.5 inches tall. The exact size can vary with yarn, hook size, tension, stuffing, and individual technique.
Does this pattern use safety eyes?
No. The eyes are embroidered with black embroidery thread.
How is the s’mores assembled?
The layers are arranged in this order:
bottom cracker → chocolate → marshmallow → chocolate → top cracker
The pieces are then secured and shaped into the finished stack.
Has this crochet pattern been physically tested?
Not yet. The pattern has been mathematically reviewed and constructionally checked, but it has not been physically crocheted and tested yet.
Can I change the colors?
Yes. You can customize the colors while keeping the underlying stitch structure unchanged.
Final Thoughts
This s’mores amigurumi turns a familiar sweet treat into a small layered crochet character. The tan crackers, dark chocolate, and soft marshmallow create a recognizable silhouette, while the embroidered face adds a simple personality detail.
Take your time with the assembly, especially when centering the chocolate and cracker layers. A few careful adjustments before sewing can make the finished shape look much cleaner.
The finished size will vary with your materials and crochet tension, and this pattern has not yet been physically crocheted and tested.
