
Caterpillar Crochet Pattern: A Step-by-Step Amigurumi Tutorial
Create a colorful crochet caterpillar with this original amigurumi pattern…

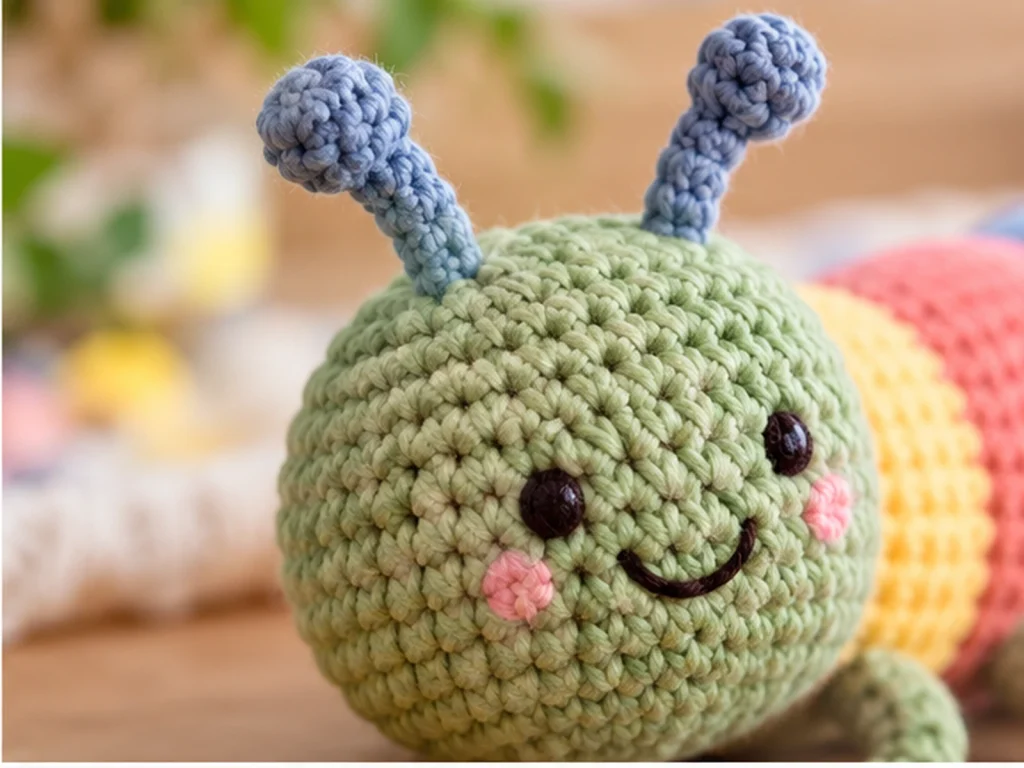
Create a colorful crochet caterpillar with this original amigurumi pattern from Tiny Yarn Tales. The head and body are crocheted as one continuous piece, then finished with six surface-crocheted legs, two antennae, and simple embroidered facial details.
The design features a rounded head, a fuller middle section, and a gradually tapered tail, with alternating color blocks that give the finished caterpillar its cheerful segmented look.

Project Overview
What You’ll Make
This caterpillar is worked as one continuous head-and-body piece rather than as separate stuffed sections. After the main body is complete, the legs and antennae are added with surface crochet, and the face is embroidered.
The finished caterpillar is approximately 6–7 inches (15–18 cm) long. Final size can vary depending on yarn, hook size, tension, stuffing, and individual crochet technique.
Project Details
- Project: Caterpillar amigurumi
- Technique: Crochet in continuous rounds with surface crochet and embroidery
- Yarn: Worsted-weight cotton yarn
- Hook: 3.0 mm crochet hook
- Colors: Sage green, warm yellow, coral, and dusty blue
- Filling: Polyester fiberfill
- Eyes: Embroidered
- Approximate finished size: 6–7 inches (15–18 cm)
The finished size is approximate rather than guaranteed.
Materials & Tools
You will need:
- 3.0 mm crochet hook
- Worsted-weight cotton yarn in:
- Sage green
- Warm yellow
- Coral
- Dusty blue
- Small amount of black or dark brown embroidery thread
- Polyester fiberfill
- Stitch marker
- Tapestry needle
- Scissors
Safety Note
This design uses embroidered eyes rather than safety eyes.
Abbreviations
US crochet terminology is used throughout the pattern.
- MR — magic ring
- ch — chain
- sc — single crochet
- inc — 2 sc in the same stitch
- dec — invisible single-crochet decrease
- sl st — slip stitch
- FO — fasten off
Before You Start
Work in Continuous Rounds
The main head and body are worked in a continuous spiral. Use a stitch marker to identify the first stitch of each round.
Count Your Stitches
Each round ends with a stitch count. If your count is off, stop and find the mistake before moving on to the next round.
Stuff as You Go
Begin stuffing the head after Round 8 and continue adding stuffing as the body grows. Aim for an even, rounded shape without packing the filling too tightly.
Color Changes
The body is divided into several color blocks. Follow the color plan below so the finished caterpillar has the intended striped appearance.
Construction Order
The main body is crocheted first. The six legs and two antennae are added afterward with surface crochet, followed by the embroidered face and final shaping.
Color Plan
- Rounds 1–10: Color A — sage green
- Rounds 11–15: Color B — warm yellow
- Rounds 16–22: Color C — coral
- Rounds 23–27: Color D — dusty blue
- Rounds 28–32: Color B — warm yellow
- Rounds 33–36: Color A — sage green
- Rounds 37–39: Color D — dusty blue
- Rounds 40–43: Color A — sage green
At each color transition, finish with the previous color and join the new color in the next stitch.
Original Caterpillar Crochet Pattern
Head Shaping
Using Color A:
Round 1: 6 sc in MR. (6)
Round 2: 6 inc. (12)
Round 3: (sc, inc) × 6. (18)
Round 4: (2 sc, inc) × 6. (24)
Round 5: (3 sc, inc) × 6. (30)
Round 6: (4 sc, inc) × 6. (36)
Round 7: (5 sc, inc) × 6. (42)
Round 8: 42 sc. (42)
Round 9: 42 sc. (42)
Round 10: 42 sc. (42)
Begin lightly stuffing the head after Round 8. Keep the filling even so the head remains rounded.
Front Body Section
Change to Color B.
Round 11: (6 sc, inc) × 6. (48)
Round 12: 48 sc. (48)
Round 13: 48 sc. (48)
Round 14: 48 sc. (48)
Round 15: 48 sc. (48)
Continue adding stuffing as the body grows.
Center Body Section
Change to Color C.
Round 16: 48 sc. (48)
Round 17: 48 sc. (48)
Round 18: 48 sc. (48)
Round 19: 48 sc. (48)
Round 20: 48 sc. (48)
Round 21: 48 sc. (48)
Round 22: 48 sc. (48)
Keep the middle section softly but evenly stuffed.
First Taper
Change to Color D.
Round 23: (6 sc, dec) × 6. (42)
Round 24: 42 sc. (42)
Round 25: 42 sc. (42)
Round 26: 42 sc. (42)
Round 27: 42 sc. (42)
Second Taper
Change to Color B.
Round 28: (5 sc, dec) × 6. (36)
Round 29: 36 sc. (36)
Round 30: 36 sc. (36)
Round 31: 36 sc. (36)
Round 32: 36 sc. (36)
Tail Taper
Change to Color A.
Round 33: (4 sc, dec) × 6. (30)
Round 34: 30 sc. (30)
Round 35: 30 sc. (30)
Round 36: 30 sc. (30)
Change to Color D.
Round 37: (3 sc, dec) × 6. (24)
Round 38: 24 sc. (24)
Round 39: 24 sc. (24)
Change to Color A.
Round 40: (2 sc, dec) × 6. (18)
Round 41: 18 sc. (18)
Round 42: (sc, dec) × 6. (12)
Round 43: 6 dec. (6)
Add the final amount of stuffing before closing. Avoid overstuffing the narrow tail.
Cut the yarn, leaving a tail. Thread the tail through the front loops of the remaining 6 stitches and pull gently to close the opening. Weave the end securely into the body.
Add the Six Legs
Make 6 legs, arranged as 3 mirrored pairs underneath the body.
For each leg:
- Insert the hook into a stitch on the underside of the body.
- Pull the yarn through to form a working loop.
- Ch 4.
- Slip stitch back down the chain, working into each of the 3 chains.
- Slip stitch into the neighboring body stitch.
- Fasten off and weave the yarn end inside.
Place the three pairs progressively from the front half toward the rear half of the body. Compare the left and right sides as you work so the legs remain visually balanced.
Add the Two Antennae
Use a contrasting yarn color.
For each antenna:
- Insert the hook into a stitch near the upper side of the head.
- Pull the yarn through to create a working loop.
- Ch 5.
- Slip stitch into each chain back toward the head.
- Slip stitch into a neighboring head stitch.
- Fasten off and weave in the end.
Place the antennae as mirror images of one another. Check their orientation before securing the yarn ends.
Embroidered Facial Details
Use black or dark brown embroidery thread.
Eyes
Embroider two small rounded eyes on the front of the head. Keep them visually level and symmetrical, and compare both sides before securing the stitches.
Smile
Add a small curved smile below the eyes using short embroidery stitches.
Exact eye spacing is not specified because the best visual placement can vary with tension, stuffing, and the surface of the finished head.
Finishing
Before finishing the project:
- Weave in all remaining yarn ends.
- Check that no stuffing is visible.
- Gently smooth the body with your fingers.
- Reshape the head and body into a rounded, segmented silhouette.
- Compare the two antennae for symmetry.
- Check the leg placement from both sides.
- Make sure the embroidered features are secure.

Helpful Tips
Keep the stuffing even
Add small amounts of stuffing as you go rather than trying to fill the entire body at the end. This makes it easier to maintain a smooth shape.
Check stitch counts frequently
The increase and decrease rounds create the caterpillar’s silhouette. A missed stitch can affect the shape of later rounds.
Compare paired details before finishing
Before weaving in the ends of the antennae and legs, look at the caterpillar from the front, top, and underside. This makes it easier to adjust uneven placement.
Let the color blocks stand out
The alternating colors already give the caterpillar plenty of visual character, so a simple embroidered face works well with the design.
Troubleshooting
My stitch count is off. What should I do?
Stop before continuing to the next round. Check the previous round for a missed stitch, extra stitch, or increase or decrease worked in the wrong location.
My stuffing is showing through.
Your stitches may be too loose, or the piece may be overfilled. Remove a small amount of stuffing if needed and aim for firm, consistent tension.
My body looks lumpy.
Check that the stuffing is spread evenly instead of concentrated in one area. Gently massage the filling through the fabric to smooth the shape.
My antennae or legs don’t match.
Compare both sides before weaving the ends in permanently. Small differences are much easier to correct while the yarn is still adjustable.
My head doesn’t look round.
Check the stuffing first. The head should be filled gradually and shaped with your fingers rather than packed extremely tightly.
Customization Ideas
Try a different color palette
Keep the same construction and replace the suggested sage, yellow, coral, and blue palette with colors you enjoy.
Make a monochrome caterpillar
Using one main color throughout creates a softer, more minimal version.
Change the expression
A different embroidered eye or mouth shape can give the same caterpillar a different personality.
Create a color collection
Make several versions using different palettes such as pastels, bright colors, or earthy neutrals.
Any size modification should be treated as a redesign rather than an exact scaling formula because changing yarn, hook, tension, or stitch architecture can affect the final proportions.
Frequently Asked Questions
What size will this crochet caterpillar be?
The finished caterpillar is approximately 6–7 inches (15–18 cm) long. Actual size can vary with yarn, hook, tension, stuffing, and individual crochet technique.
What yarn should I use?
The pattern was designed around worsted-weight cotton yarn. The main colors are sage green, warm yellow, coral, and dusty blue, with a small amount of dark embroidery thread for the face.
Do I need safety eyes?
No. This design uses embroidered eyes, so safety eyes are not part of the pattern.
Is the caterpillar made in separate body sections?
No. The main head and body are worked continuously as one piece, then the legs and antennae are added afterward.
How many legs does the pattern have?
There are six surface-crocheted legs arranged as three mirrored pairs underneath the body.
Can I change the colors?
Yes. The color blocks can be adapted to your own palette while keeping the stitch architecture unchanged.
Why are my color changes uneven?
Make sure you are changing yarn at the planned round transition and keeping your stitch tension consistent. Because the body is worked in a continuous spiral, the transition can naturally create a slight step rather than a perfectly horizontal stripe.
Can I use a different yarn?
A different yarn can change the finished size and fabric density. If you substitute yarn, expect the final dimensions and appearance to vary.
More Crochet Animal Patterns
Explore more animal-inspired crochet projects and amigurumi patterns from Tiny Yarn Tales.
Pattern Note
This pattern has been mathematically reviewed and constructionally checked, but it has not been physically crocheted and tested yet.
