
Sushi Crochet Pattern: Maki Sushi Amigurumi
This sushi crochet pattern creates a small maki-style sushi roll…

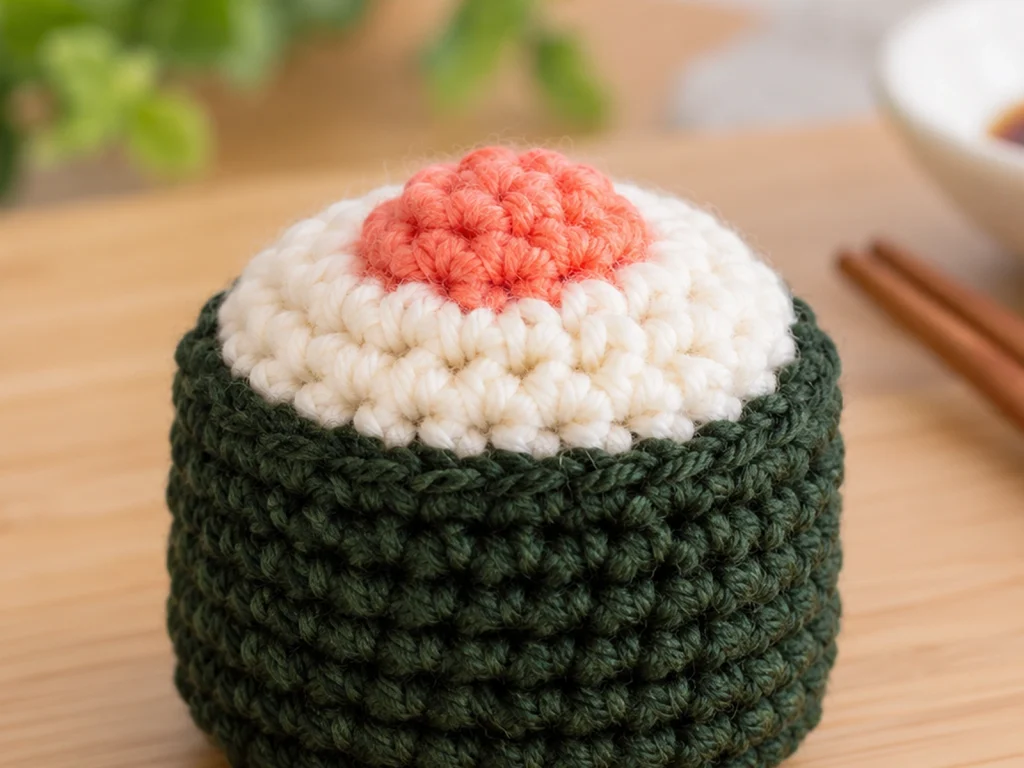
This sushi crochet pattern creates a small maki-style sushi roll with a dark nori exterior, a soft rice-colored dome, and a coral filling accent. The project is made in three crocheted pieces and finished with simple sewing and shaping.
The finished design is approximately 2–2.5 inches across and 1.75–2.25 inches tall, depending on your yarn, hook, tension, and stuffing. This original design has been mathematically reviewed and constructionally checked, but it has not been physically crocheted and tested yet.

Project Overview
What You’ll Make
You’ll crochet a compact maki-style sushi roll from three main pieces:
- a dark green nori body
- a cream or off-white rice cap
- a small coral or salmon-pink filling accent
The Nori Body forms the cylindrical base. The Rice Cap is crocheted separately and sewn to the open top, and the Coral Filling is attached to the center of the rice dome.
Project Details
Finished size: Approximately 2–2.5 inches across × 1.75–2.25 inches tall
Yarn: Medium/Worsted weight (#4)
Hook: 3.5 mm crochet hook
Colors: Dark green, cream or off-white, and coral or salmon pink
Stuffing: Polyester fiberfill
Eyes: None
Construction: Three crocheted components assembled with sewing
The finished size is approximate. Your result can vary depending on yarn, hook size, crochet tension, stuffing, and individual technique.
Materials & Tools
- Medium/Worsted weight (#4) yarn in dark green
- Medium/Worsted weight (#4) yarn in cream or off-white
- Medium/Worsted weight (#4) yarn in coral or salmon pink
- 3.5 mm crochet hook
- Polyester fiberfill
- Yarn needle
- Scissors
- Stitch marker, if desired
No safety eyes are used for this design.
Abbreviations
This pattern uses standard US crochet terminology.
- MR — magic ring
- sc — single crochet
- inc — increase; work 2 sc in the same stitch
- dec — decrease; work 1 decrease over 2 stitches
- FO — fasten off
Before You Start
Work the pattern in continuous rounds unless otherwise noted.
A stitch marker can help you keep track of the beginning of each round.
Count your stitches carefully, especially when moving from the increase rounds into the 30-stitch sections and when beginning the decreases on the Rice Cap.
The construction order is:
- Crochet the Nori Body.
- Stuff the Nori Body.
- Crochet the Rice Cap.
- Lightly stuff and close the Rice Cap.
- Sew the Rice Cap to the Nori Body.
- Crochet the Coral Filling.
- Sew the Coral Filling to the rice dome.
- Shape and finish the sushi.
Sushi Crochet Pattern
Nori Body
Color: Dark green
Work in continuous rounds.
Round 1
6 sc in MR. (6)
Round 2
6 inc. (12)
Round 3
(sc, inc) × 6. (18)
Round 4
(2 sc, inc) × 6. (24)
Round 5
(3 sc, inc) × 6. (30)
Round 6
30 sc. (30)
Round 7
30 sc. (30)
Round 8
30 sc. (30)
Round 9
30 sc. (30)
Round 10
30 sc. (30)
FO, leaving a long sewing tail.
Do not close the top opening. The 30 stitches around the top edge will be used to attach the Rice Cap.
Stuff the Nori Body
Add polyester fiberfill through the open top.
Use moderate stuffing so the body keeps its cylindrical shape without becoming overly firm or distorted.
Keep the upper edge even and accessible for assembly.
Rice Cap
Color: Cream or off-white
Work in continuous rounds.
Round 1
6 sc in MR. (6)
Round 2
6 inc. (12)
Round 3
(sc, inc) × 6. (18)
Round 4
(2 sc, inc) × 6. (24)
Round 5
(3 sc, inc) × 6. (30)
Round 6
30 sc. (30)
This 30-stitch round forms the attachment edge.
Round 7
(3 sc, dec) × 6. (24)
Round 8
(2 sc, dec) × 6. (18)
Round 9
(sc, dec) × 6. (12)
Round 10
6 dec. (6)
Add a small amount of polyester fiberfill before closing so the piece forms a soft dome.
FO, leaving a sewing tail.
Thread the tail through the front loops of the remaining 6 stitches and gently pull to close the opening.
Weave the end toward the underside.
Coral Filling
Color: Coral or salmon pink
Work in continuous rounds.
Round 1
6 sc in MR. (6)
Round 2
6 inc. (12)
Round 3
12 sc. (12)
Round 4
6 dec. (6)
Add a small amount of stuffing before closing.
FO, leaving a sewing tail.
Thread the tail through the remaining 6 stitches and gently pull to close.
Avoid overstuffing this small piece.
Assembly
Step 1: Prepare the Nori Body
Make sure the Nori Body is evenly stuffed and maintains a short cylindrical shape.
Keep the 30-stitch top edge accessible.
Step 2: Position the Rice Cap
Place the Rice Cap over the open top of the Nori Body.
The attachment edges should align as follows:
- Nori Body top: 30 stitches
- Rice Cap Round 6: 30 stitches
Hold the pieces together and check the alignment before sewing.
Step 3: Sew the Rice Cap
Using the Rice Cap sewing tail or a coordinating strand of yarn, sew around the complete attachment edge.
Work evenly around the circumference.
Avoid pulling the seam too tightly, since excessive tension can distort the rice dome.
Secure the yarn and weave in the end.
Step 4: Position the Coral Filling
Place the Coral Filling approximately in the center of the Rice Cap.
Use visual centering rather than an exact measurement. Look at the project from above and adjust the piece until it appears balanced.
Step 5: Sew the Coral Filling
Use the remaining coral sewing tail to attach the filling securely around its base.
Avoid compressing the rice dome excessively.
Secure and weave in the end.
Step 6: Shape the Finished Sushi
Gently shape the completed roll so that:
- the Nori Body remains cylindrical
- the Rice Cap sits evenly
- the Coral Filling is centered
- the seams are secure
- no stuffing is visible
- all yarn ends are tucked away

Finishing
Give the finished sushi a final check before trimming or securing any remaining yarn ends.
Make sure the Rice Cap is firmly attached, the Coral Filling is secure, and the overall silhouette remains compact and balanced.
The final shape should resemble a small maki-style sushi roll with a dark outer layer, rounded rice top, and centered filling accent.
Helpful Tips
Keep the Nori Body evenly stuffed
Add stuffing gradually instead of packing the body all at once. This makes it easier to maintain the cylindrical shape.
Check the Rice Cap before sewing
Place the cap over the body and inspect the alignment around the entire opening before beginning the seam.
Use even sewing tension
Work around the attachment edge with consistent tension rather than tightening one section heavily.
Center the filling visually
Position the Coral Filling, view the sushi from above, and adjust before permanently sewing it in place.
Troubleshooting
The Nori Body looks too round
Check your stitch count first. The body is designed to remain at 30 stitches for several rounds after the increases.
If the count is correct, review your tension and stuffing. Overstuffing can push the sides outward.
The Rice Cap looks uneven
Redistribute the stuffing before closing the cap.
A small amount of shaping can help create a smoother dome.
The Rice Cap does not sit evenly
Confirm that both attachment edges contain 30 stitches.
Hold the pieces together before sewing and adjust the alignment around the entire circumference.
The Coral Filling looks off-center
Loosen or reposition the filling before the attachment is fully tightened.
Check the project from directly above before securing it permanently.
Stuffing is visible through the stitches
Redistribute the stuffing rather than immediately adding more.
Your crochet tension also affects how much stuffing shows through the fabric.
You lost track of the stitch count
Stop and recount before continuing.
The main stitch-count progression is:
6 → 12 → 18 → 24 → 30
for the expanding sections, followed by:
30 → 24 → 18 → 12 → 6
for the Rice Cap decreases.
Customization Ideas
Change the filling color
The Coral Filling can be crocheted in another color while keeping the same stitch structure.
Try shades such as:
- golden yellow
- soft pink
- light green
- orange-red
Make a small sushi collection
Create several rolls using different filling colors while keeping the same nori and rice palette.
Experiment with the palette
You can also change the dark outer color or use a warmer or cooler rice shade for a more stylized look.
Changing yarn weight or hook size will affect the finished dimensions and fabric tension.
Care
This design has not been physically tested for washing or use, so specific care performance has not been established.
For general preservation, keep the finished crochet piece clean and avoid exposing it to conditions that could distort the yarn or stuffing.
Frequently Asked Questions
What is the finished size of this sushi crochet pattern?
The design target is approximately 2–2.5 inches across and 1.75–2.25 inches tall. Actual dimensions can vary with yarn, hook size, tension, and stuffing.
What yarn should I use?
The design is drafted for medium/Worsted weight (#4) yarn.
The planned colors are dark green for the nori, cream or off-white for the rice, and coral or salmon pink for the filling.
What crochet hook size is used?
Use a 3.5 mm crochet hook.
A different hook size can change the finished dimensions and fabric tension.
Does this sushi pattern use safety eyes?
No. This design does not have a face, so no safety eyes are needed.
How is the sushi assembled?
The project has three crocheted pieces: the Nori Body, Rice Cap, and Coral Filling.
The Rice Cap is sewn to the 30-stitch top edge of the Nori Body, and the Coral Filling is sewn to the center of the rice dome.
How much stuffing should I use?
Use moderate stuffing for the Nori Body and smaller amounts for the Rice Cap and Coral Filling.
The goal is to support the shape without overfilling the pieces.
Can I change the filling color?
Yes. The filling can be made in a different color while keeping the same stitch structure.
Has this crochet pattern been physically tested?
Not yet.
The design has been mathematically reviewed and constructionally checked, but it has not been physically crocheted and tested yet.
Final Notes
This sushi crochet pattern uses a three-piece construction to create a compact maki-style roll: a cylindrical nori body, a domed rice cap, and a small filling accent.
For the cleanest result, keep your stitch counts consistent, maintain the 30-stitch attachment edges, and check the alignment of each piece before sewing.
The pattern is mathematically reviewed and constructionally checked, but it has not been physically crocheted and tested yet. Finished size, shaping, and assembly should therefore be evaluated on a prototype before the design is described as fully tested.
