
Farmyard Sheep Crochet Pattern: A Sheep Amigurumi Project
This crochet sheep pattern creates a rounded sheep amigurumi with…

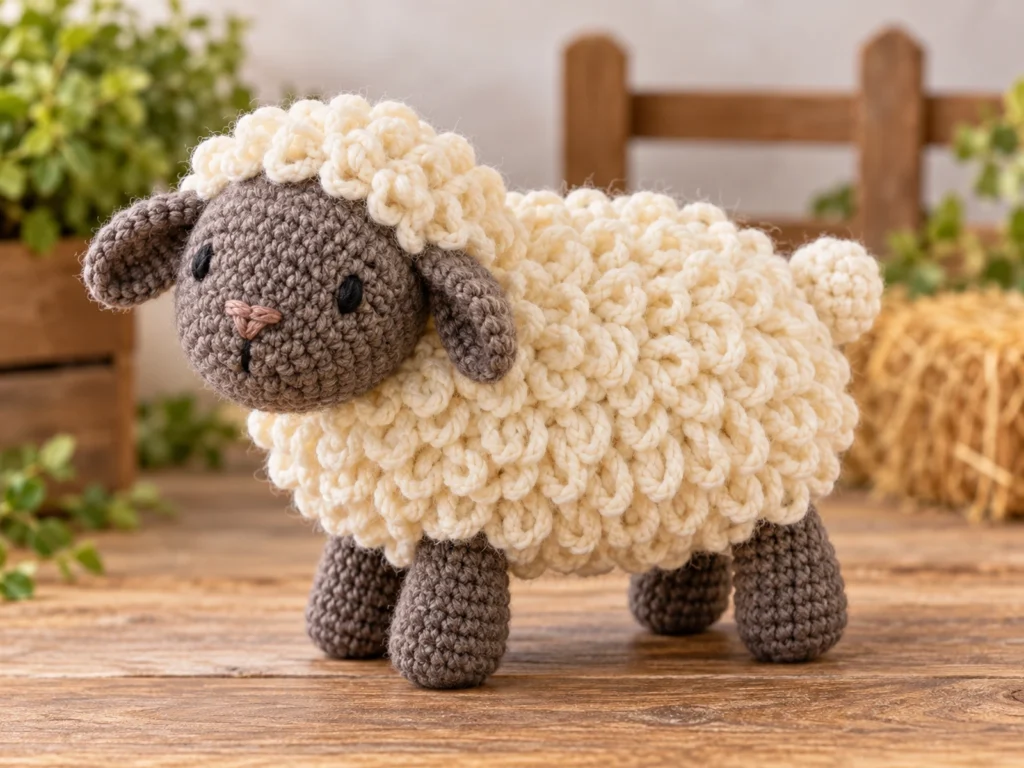
This crochet sheep pattern creates a rounded sheep amigurumi with a cream fleece-textured body, darker head and legs, small flattened ears, a little tail, and embroidered facial details. The project is made from separate crocheted components and assembled into a simple farmyard sheep silhouette.
The finished sheep is approximately 6–8 inches long, with the final size varying according to yarn, hook, tension, stuffing, and individual technique.
Pattern status: Mathematically reviewed and constructionally reasoned, but not physically crocheted and tested yet.
Project Overview
What You’ll Make
You’ll crochet:
- 1 body
- 1 head
- 4 legs
- 2 ears
- 1 tail
- embroidered facial details
- a decorative fleece texture for the body
The sheep uses a cream body with charcoal or dark taupe accents. The fleece effect is created with small decorative surface loops added after the main body is finished.
Project Details
| Detail | Information |
|---|---|
| Project | Sheep amigurumi |
| Yarn | #4 worsted-weight yarn |
| Main color | Warm cream or oatmeal |
| Accent color | Charcoal or dark taupe |
| Hook | 3.25 mm |
| Stuffing | Polyester fiberfill |
| Eyes | Embroidered |
| Approximate size | 6–8 inches long |
| Construction | Separate crocheted components |
| Special detail | Decorative loop-style fleece texture |
The exact yarn quantity and gauge have not been established for this design.
Materials & Tools
Yarn
Use #4 worsted-weight yarn in:
- Cream or oatmeal for the body and tail
- Charcoal or dark taupe for the head, legs, and ears
- Black for embroidered eyes
- Optional muted rose or dark taupe for the nose
Other Supplies
- 3.25 mm crochet hook
- Polyester fiberfill
- Tapestry needle
- Stitch marker
- Scissors
This pattern uses embroidered eyes rather than safety eyes.
Abbreviations
Standard US crochet terminology is used throughout.
- MR — magic ring
- sc — single crochet
- inc — increase; 2 sc in the same stitch
- dec — decrease
- sl st — slip stitch
- FO — fasten off
Numbers in parentheses show the stitch count at the end of the round.
Before You Start
Work in Continuous Rounds
The body, head, legs, ears, and tail are worked in continuous rounds unless otherwise noted. Use a stitch marker to keep track of the beginning of each round.
Count Your Stitches
Pay particular attention to increase and decrease rounds. Checking your stitch count at the end of those rounds can help catch mistakes before they affect later shaping.
Stuff Gradually
Add stuffing as the larger pieces take shape. Aim for a firm form without stretching the stitches or creating visible gaps.
Compare Paired Pieces
The four legs follow the same pattern, and the two ears are identical. Compare paired pieces before permanently sewing them into place.
Keep Attachment Areas Clear
The decorative fleece loops are added to the body after the main structure is finished. Keep the belly, leg attachment areas, neck area, and tail area relatively clear so they remain easy to sew.
Original Crochet Sheep Pattern
Body — Make 1
Use cream yarn.
Round 1: 6 sc in MR. (6)
Round 2: 6 inc. (12)
Round 3: (sc, inc) × 6. (18)
Round 4: (2 sc, inc) × 6. (24)
Round 5: (3 sc, inc) × 6. (30)
Round 6: (4 sc, inc) × 6. (36)
Round 7: (5 sc, inc) × 6. (42)
Round 8: 42 sc. (42)
Round 9: 42 sc. (42)
Round 10: 42 sc. (42)
Round 11: 42 sc. (42)
Round 12: (6 sc, inc) × 6. (48)
Round 13: 48 sc. (48)
Round 14: 48 sc. (48)
Round 15: 48 sc. (48)
Round 16: 48 sc. (48)
Round 17: 48 sc. (48)
Round 18: 48 sc. (48)
Round 19: (6 sc, dec) × 6. (42)
Round 20: 42 sc. (42)
Round 21: (5 sc, dec) × 6. (36)
Round 22: 36 sc. (36)
Round 23: (4 sc, dec) × 6. (30)
Round 24: 30 sc. (30)
Round 25: (3 sc, dec) × 6. (24)
Round 26: (2 sc, dec) × 6. (18)
Round 27: (sc, dec) × 6. (12)
Round 28: 6 dec. (6)
Round 29: 6 sc. (6)
Fasten off and close the remaining opening.
Stuffing the Body
Begin stuffing once the body has enough depth to hold its form. Add fiberfill gradually as you work through the shaping rounds.
The finished body should feel firm while still keeping its elongated, rounded shape.
Head — Make 1
Use charcoal or dark taupe yarn.
Round 1: 6 sc in MR. (6)
Round 2: 6 inc. (12)
Round 3: (sc, inc) × 6. (18)
Round 4: (2 sc, inc) × 6. (24)
Round 5: (3 sc, inc) × 6. (30)
Round 6: (4 sc, inc) × 6. (36)
Round 7: 36 sc. (36)
Round 8: 36 sc. (36)
Round 9: 36 sc. (36)
Round 10: 36 sc. (36)
Round 11: (5 sc, inc) × 6. (42)
Round 12: 42 sc. (42)
Round 13: 42 sc. (42)
Round 14: 42 sc. (42)
Round 15: (5 sc, dec) × 6. (36)
Round 16: 36 sc. (36)
Round 17: (4 sc, dec) × 6. (30)
Round 18: (3 sc, dec) × 6. (24)
Round 19: (2 sc, dec) × 6. (18)
Round 20: (sc, dec) × 6. (12)
Round 21: 6 dec. (6)
Fasten off and close the opening.
Stuff the head firmly enough to maintain its rounded shape while keeping the front surface smooth for the embroidered face.
Legs — Make 4
Use charcoal or dark taupe yarn.
Make four identical legs.
Round 1: 6 sc in MR. (6)
Round 2: (sc, inc) × 3. (9)
Round 3: (2 sc, inc) × 3. (12)
Round 4: 12 sc. (12)
Round 5: 12 sc. (12)
Round 6: 12 sc. (12)
Round 7: 12 sc. (12)
Round 8: 12 sc. (12)
Round 9: (sc, dec) × 4. (8)
Round 10: 8 sc. (8)
Fasten off, leaving a long sewing tail.
Stuff each leg lightly, then flatten the open end slightly before sewing it to the body.
Ears — Make 2
Use charcoal or dark taupe yarn.
Make two identical ears.
Round 1: 6 sc in MR. (6)
Round 2: 6 inc. (12)
Round 3: (sc, inc) × 6. (18)
Round 4: 18 sc. (18)
Round 5: (sc, dec) × 6. (12)
Round 6: 12 sc. (12)
Fasten off, leaving a long sewing tail.
Do not stuff the ears. Flatten them gently before attaching them to the head.
Tail — Make 1
Use cream yarn.
Round 1: 6 sc in MR. (6)
Round 2: (sc, inc) × 3. (9)
Round 3: 9 sc. (9)
Round 4: (sc, dec) × 3. (6)
Round 5: 6 sc. (6)
Fasten off, leaving a sewing tail.
Add a small amount of stuffing, then close the opening.
Add the Sheep’s Fleece Texture
The sheep’s wool-like texture is created with decorative surface loops.
Use cream yarn.
- Join the yarn to a selected body stitch with a slip stitch.
- Chain 3.
- Slip stitch back into the same surface stitch.
- Move to the next selected stitch.
- Repeat to create rows of small loops.
Work the loops in staggered rows across the upper and side areas of the body.
Keep the following areas relatively clear:
- Belly
- Leg attachment points
- Front head attachment area
- Rear tail attachment area
The fleece loops are decorative and do not change the underlying body stitch count.

Facial Details
The face is embroidered rather than made with safety eyes.
Eyes
Embroider two small black oval eyes on the front of the head.
Position them symmetrically and leave enough room below them for the nose.
Before permanently securing the embroidery, compare both sides and make sure the eyes sit at similar heights.
Nose
Embroider a small rounded or horizontal nose centered beneath the eyes.
A muted rose or dark taupe yarn can be used.
Optional Mouth
A small embroidered mouth can be added if you want a more expressive face.
Keep the facial details simple so they remain clearly visible against the darker head color.

Assembly
Take a little time to position each piece before sewing permanently.
Step 1: Attach the Head
Position the head at the front end of the body.
Center it along the body’s main axis and keep it slightly higher than the body centerline.
Sew it securely around the available attachment area.
Step 2: Attach the Ears
Attach one ear to each side of the upper head.
Compare both sides before permanently sewing the second ear so they sit at similar heights and angles.
Step 3: Attach the Legs
Attach two legs toward the front portion of the lower body and two toward the rear.
Check the sheep from the front and side before completing the sewing.
Step 4: Attach the Tail
Position the tail at the rear of the body.
Keep it centered or slightly raised for a simple silhouette.
Step 5: Add the Facial Details
Add the eyes first and check their symmetry.
Then embroider the nose beneath them.
Add the optional mouth only after checking the overall expression.
Step 6: Complete the Fleece
Finish any remaining decorative loops after the structural assembly is complete.
Keeping the attachment zones relatively clear helps preserve a clean finished silhouette.
Finishing
Check the completed sheep from several angles.
Make sure:
- The head is securely attached.
- Both ears are balanced.
- The four legs have a similar visual length.
- The tail is firmly sewn.
- The facial embroidery is centered.
- No stuffing is visible through obvious gaps.
- Loose yarn ends are secured and woven in.
Use a tapestry needle to weave away remaining yarn tails.
Give the body a final gentle shaping with your hands so the stuffing settles evenly.
Helpful Tips
Keep Your Tension Consistent
The body relies on gradual shaping, so uneven tension can change the finished silhouette. Aim for firm, even stitches.
Check Counts on Shaping Rounds
The increase and decrease rounds determine the body and head shape. Counting regularly can prevent a small mistake from carrying into later rounds.
Stuff in Small Amounts
Adding fiberfill gradually gives you more control and helps prevent lumps or excessive stretching.
Compare the Paired Pieces
Before sewing the ears and legs permanently, compare them side by side.
Keep the Fleece Away From Attachment Areas
The decorative loops look best when they don’t interfere with the sewing points for the head, legs, and tail.
Troubleshooting
My Stitch Count Is Off
Stop and recount before continuing.
Start by checking the previous increase or decrease round, where a missed or extra stitch is most likely to have occurred.
The Body Looks Too Loose
Check your tension. The crochet fabric should be firm enough that stuffing does not show through obvious gaps.
The Body Looks Overstuffed
Remove a small amount of stuffing and reshape the piece gradually.
The body should remain firm without becoming stretched or lumpy.
The Legs Look Uneven
Before sewing all four legs permanently, compare their placement from the front and side.
The legs use identical patterns, so differences are more likely to come from positioning or stuffing.
The Face Looks Off-Center
Position the embroidered features before fully securing them.
Compare both eyes first, then add the nose once the expression looks balanced.
The Fleece Looks Too Dense
The fleece loops are decorative. You can leave larger gaps between them or keep more of the lower body smooth.
Customization Ideas
Change the Body Color
Try a soft beige, warm white, light gray, or another neutral shade for a different sheep appearance.
Adjust the Expression
Small changes to the embroidered eyes, nose, and optional mouth can create a more playful, curious, or sleepy expression.
Change the Fleece Coverage
Use more or fewer surface loops for a smoother or fluffier visual effect.
Keep the structural attachment areas relatively clear regardless of the texture variation.
Frequently Asked Questions
What yarn is used for this crochet sheep pattern?
The design uses #4 worsted-weight yarn. The body and tail use a warm cream or oatmeal shade, while the head, legs, and ears use charcoal or dark taupe.
What crochet hook size is used?
Use a 3.25 mm crochet hook.
How large is the finished sheep?
The sheep is approximately 6–8 inches long. Final dimensions can vary with yarn, tension, stuffing, hook size, and individual technique.
Does the sheep use safety eyes?
No. The eyes are embroidered.
How is the fleece texture made?
The fleece effect is made with small decorative surface loops worked across the cream body after the main body is completed.
Should the ears be stuffed?
No. The ears are designed to remain unstuffed and should be flattened gently before attachment.
How much stuffing should I use?
Stuff the body and head firmly enough to hold their shape without stretching the stitches. The legs should be stuffed lightly, while the ears remain unstuffed.
Is this crochet sheep pattern physically tested?
Not yet. The pattern has been mathematically reviewed and constructionally reasoned, but it has not been physically crocheted and tested.
More Farm Animal Amigurumi
Explore other animal-focused crochet projects from Tiny Yarn Tales as you continue building a handmade farmyard collection.

Final Thoughts
This crochet sheep pattern combines a rounded amigurumi shape with a simple embroidered face and decorative fleece texture. Take your time with the shaping, compare paired pieces before sewing, and position the facial details carefully.
The fleece loops are the finishing touch that gives the completed project its sheep-like character while keeping the underlying crochet structure straightforward to follow.