
Ballerina Bear Amigurumi Crochet Pattern
Meet a sweet ballerina bear with a rounded plush-style shape,…

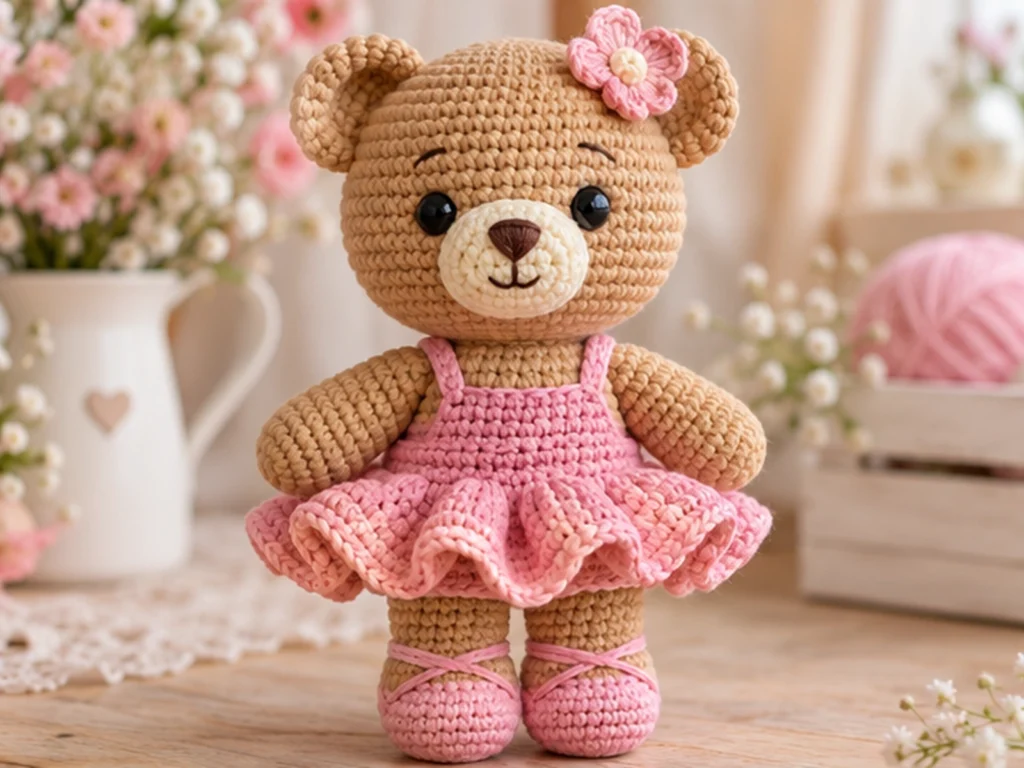
Meet a sweet ballerina bear with a rounded plush-style shape, a flared crochet dress, embroidered ballet-shoe details, and a tiny flower accent. This original crochet pattern walks you through each separate piece and the final assembly so you can create the complete bear from start to finish.
The finished bear is designed to be approximately 9–10 inches tall, although the final size will vary depending on your yarn, hook, tension, stuffing, and crochet technique.
Project Overview
What You’ll Make
This ballerina bear is made from separate crocheted components that are assembled into one finished character.
The project includes:
- A rounded head
- A compact body
- Two arms
- Two legs
- Two rounded ears
- A cream muzzle
- A flared ballerina dress
- Two dress straps
- A five-petal flower
- Embroidered facial and ballet-shoe details
The bear uses a warm tan or light-brown main color with a soft pink or dusty-rose dress.
Project Details
Project: Ballerina Bear Amigurumi
Technique: Crochet amigurumi
Approximate finished size: 9–10 inches tall
Yarn weight: Medium / worsted weight (#4)
Crochet hook: 3.5 mm
Main color: Warm tan or light brown
Dress: Dusty rose or soft pink
Muzzle: Cream
Eyes: 10 mm black safety eyes
Filling: Polyester fiberfill
Construction: Separate crocheted pieces with sewn assembly
The finished size is an approximate design target rather than a physically tested measurement.
This pattern has been mathematically reviewed and constructionally checked, but it has not yet been physically crocheted and tested.
Materials & Tools
Yarn
You will need medium-weight (#4) yarn in the following colors:
- Warm tan or light brown for the bear
- Cream for the muzzle
- Dusty rose or soft pink for the dress
- Cream, pink, or another accent color for the flower
- Black or dark brown embroidery yarn for the face and ballet-shoe details
Tools
- 3.5 mm crochet hook
- Polyester fiberfill
- 10 mm black safety eyes
- Yarn needle
- Stitch marker
- Scissors
Safety Note
This pattern uses small safety-eye components. Small parts can present a choking hazard for young children, and this project has not been safety-tested as a children’s toy.
For an alternative facial finish, you can embroider the eyes instead of using plastic safety eyes. This substitution does not by itself establish the finished item as a safety-tested children’s toy.
Crochet Abbreviations
This pattern uses standard US crochet terminology.
- MR — magic ring
- ch — chain
- sc — single crochet
- inc — increase, 2 sc in the same stitch
- dec — invisible single-crochet decrease
- dc — double crochet
- sl st — slip stitch
- FO — fasten off
Before You Start
Work in Continuous Rounds
The head, body, arms, legs, ears, and muzzle are worked in continuous rounds unless otherwise noted.
Use a stitch marker to identify the first stitch of each round.
Count Your Stitches
Check the stitch count at the end of every round, especially after rounds containing increases or decreases.
Catching a counting mistake early is much easier than trying to locate it several rounds later.
Stuff as You Go
Add stuffing gradually to the head, body, arms, and legs as indicated.
Aim for a smooth, even shape without overstuffing the pieces.
Construction Order
For the smoothest workflow:
- Crochet all the individual pieces.
- Stuff the applicable pieces.
- Make the dress, straps, and flower.
- Attach the legs and arms.
- Finish the head and facial details.
- Add the dress and accessories.
- Join the head and body.
- Complete the final shaping and embroidery.
Ballerina Bear Crochet Pattern
Head
Make 1 in the main bear color.
Work in continuous rounds.
Round 1
6 sc in MR. (6)
Round 2
6 inc. (12)
Round 3
(sc, inc) × 6. (18)
Round 4
(2 sc, inc) × 6. (24)
Round 5
(3 sc, inc) × 6. (30)
Round 6
(4 sc, inc) × 6. (36)
Round 7
sc around. (36)
Round 8
sc around. (36)
Round 9
sc around. (36)
Round 10
sc around. (36)
Insert the safety eyes on the front of the head, keeping them visually symmetrical.
Round 11
(4 sc, dec) × 6. (30)
Round 12
(3 sc, dec) × 6. (24)
Round 13
(2 sc, dec) × 6. (18)
Begin adding firm but even stuffing.
Round 14
(sc, dec) × 6. (12)
Round 15
6 dec. (6)
FO, leaving a yarn tail. Close the remaining opening and weave in the end.
Body
Make 1 in the main bear color.
Round 1
6 sc in MR. (6)
Round 2
6 inc. (12)
Round 3
(sc, inc) × 6. (18)
Round 4
(2 sc, inc) × 6. (24)
Round 5
(3 sc, inc) × 6. (30)
Round 6
sc around. (30)
Round 7
sc around. (30)
Round 8
sc around. (30)
Round 9
(3 sc, dec) × 6. (24)
Round 10
sc around. (24)
Round 11
sc around. (24)
Round 12
(2 sc, dec) × 6. (18)
Round 13
sc around. (18)
Round 14
sc around. (18)
Round 15
(sc, dec) × 6. (12)
Round 16
sc around. (12)
Leave the 12-stitch opening available for attaching the head.
Stuff the body moderately and evenly.
Arms
Make 2 in the main bear color.
Round 1
6 sc in MR. (6)
Round 2
6 inc. (12)
Round 3
sc around. (12)
Round 4
sc around. (12)
Round 5
(2 sc, dec) × 3. (9)
Round 6
sc around. (9)
Round 7
sc around. (9)
Round 8
sc around. (9)
Round 9
sc around. (9)
Round 10
sc around. (9)
Add light stuffing so the arms hold their shape while remaining soft.
FO and leave a long sewing tail.
Legs
Make 2 in the main bear color.
Round 1
6 sc in MR. (6)
Round 2
6 inc. (12)
Round 3
(sc, inc) × 6. (18)
Round 4
sc around. (18)
Round 5
(4 sc, dec) × 3. (15)
Round 6
sc around. (15)
Round 7
sc around. (15)
Round 8
sc around. (15)
Round 9
(3 sc, dec) × 3. (12)
Round 10
sc around. (12)
Round 11
sc around. (12)
Round 12
(2 sc, dec) × 3. (9)
Round 13
sc around. (9)
Round 14
sc around. (9)
Stuff the lower portion more firmly than the upper section.
FO and leave a long sewing tail.
Ears
Make 2 in the main bear color.
Round 1
6 sc in MR. (6)
Round 2
6 inc. (12)
Round 3
(sc, inc) × 6. (18)
Round 4
sc around. (18)
FO.
Do not heavily stuff the ears. Flatten each piece and fold it slightly to create a rounded bear-ear shape.
Leave a sewing tail.
Muzzle
Make 1 in cream yarn.
Round 1
6 sc in MR. (6)
Round 2
6 inc. (12)
Round 3
(sc, inc) × 6. (18)
Round 4
sc around. (18)
FO and leave a long sewing tail.
Add a small amount of stuffing if you want a little extra dimension.
Ballerina Dress
Make 1 in dusty rose or soft pink.
Round 1
Chain 32 and join with a sl st to form a ring.
Make sure the chain is not twisted. Sc around. (32)
Round 2
sc around. (32)
Round 3
(3 sc, inc) × 8. (40)
Round 4
sc around. (40)
Round 5
(4 sc, inc) × 8. (48)
Round 6
sc around. (48)
Round 7
(5 sc, inc) × 8. (56)
Round 8
sc around. (56)
Round 9
sc around. (56)
Round 10
(3 sc, 2 dc in next) × 14. (70)
FO and weave in the end.
The final round forms the flared ruffle of the skirt.
Dress Straps
Make 2.
Row 1
ch 11.
Row 2
Starting in the second chain from the hook, sc across. (10)
FO and leave a sewing tail.
Flower
Make 1.
Use cream, pink, or another accent color.
Create a small ring containing 5 sc.
For each petal, work:
sl st, ch 2, 3 dc, ch 2, sl st
Repeat around all 5 base stitches.
FO and weave in the end.
Facial Details
Nose
Once the muzzle is positioned, embroider a small rounded triangular nose near its upper-middle area using black or dark brown embroidery yarn.
Secure the yarn on the inside of the head.
Mouth
Add a short vertical line beneath the nose, followed by a small curved line underneath it.
Keep both details visually centered.
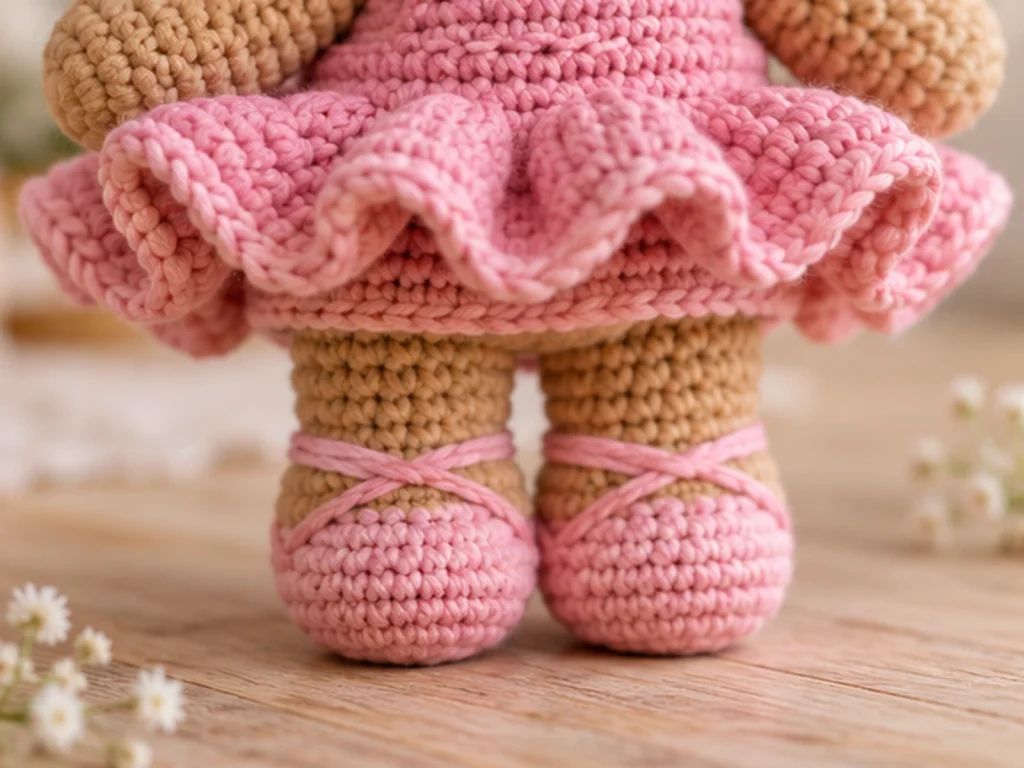
Ballet-Shoe Details
Use pink, dusty rose, or another coordinating color.
On each foot, embroider:
- A short curved line across the front
- A narrow line extending toward the side
- A second curved line to suggest the ballet-shoe strap
Keep the embroidery delicate rather than bulky.
Assembly
Step 1: Prepare the Body
Make sure the body is evenly stuffed while keeping the upper opening accessible.
Step 2: Attach the Legs
Place the legs symmetrically on the lower portion of the body.
Compare them from the front and side before sewing them permanently.
Sew the legs securely using the long yarn tails.
Step 3: Attach the Arms
Place one arm on each side of the upper body.
Compare both sides before sewing so the arms sit at similar heights and angles.
Step 4: Add the Dress
Slide the dress over the lower body.
Arrange the upper edge evenly around the torso.
Sew the two straps over the shoulders.
Step 5: Attach the Ears
Place the ears near the upper sides of the head.
Temporarily hold them in position before sewing so you can compare both sides.
Step 6: Attach the Muzzle
Center the muzzle beneath the eyes.
Sew around the edge, then add the embroidered nose and mouth.
Step 7: Attach the Head
Bring the head and body together at their openings.
Align the 12-stitch upper body opening with the lower portion of the head and sew around the connection securely.
Check the finished shape from several angles before weaving in the final yarn ends.
Step 8: Add the Flower
Sew the small flower securely to one ear.
Choose a position that gives the bear a balanced appearance from the front.
Step 9: Finish the Shape
Gently redistribute the stuffing where needed.
Smooth the head, body, limbs, ears, and dress so the finished bear has an even silhouette.

Finishing
Take a final look at the entire bear before trimming any remaining yarn ends.
Check that:
- Both ears are positioned evenly.
- The arms and legs sit at similar heights.
- The muzzle is centered.
- The dress sits evenly around the body.
- The flower is securely attached.
- The ballet-shoe embroidery is balanced.
- The stuffing is smooth and evenly distributed.
Helpful Tips
Keep the stuffing even
Adding fiberfill gradually makes it easier to control the final shape.
Check symmetry before sewing
Paired pieces are easiest to adjust before they are permanently attached.
Keep the face centered
The muzzle, nose, and mouth should remain visually aligned with the center of the head.
Avoid overstuffing
Too much stuffing can stretch the stitches and change the intended shape.
Troubleshooting
My stitch count is wrong
Stop at the end of the round and recount the stitches.
For increase and decrease rounds, check that every repeated group was completed the correct number of times.
The head looks uneven
Check the stuffing first. Uneven stuffing can change the appearance of an otherwise symmetrical crocheted shape.
The ears do not match
Place both ears next to each other before sewing. Compare their size and shape, then attach them at visually matching positions.
The arms are at different heights
Temporarily hold both arms against the body before sewing. View the bear from the front rather than relying only on stitch position.
The muzzle looks off-center
Leave the muzzle unattached until you have positioned it visually beneath both eyes. Adjust it before sewing around the final edge.
The dress does not sit evenly
Check that the starting chain was joined without twisting and that the straps are positioned evenly across the shoulders.
Customization Ideas
Change the Dress Color
Try soft lavender, pale blue, cream, or another pink shade for a different ballerina-inspired look.
Change the Flower
Use a contrasting flower color to make the small accessory stand out.
Change the Facial Expression
A different embroidered mouth can subtly change the bear’s expression without altering the main construction.
Embroidered Eyes
For an alternative to plastic safety eyes, embroider the eyes directly onto the head.
This changes the finishing method but does not establish the finished item as a safety-tested children’s toy.
Frequently Asked Questions
What size will the finished ballerina bear be?
The design target is approximately 9–10 inches tall. Actual size will vary with yarn, hook size, tension, stuffing, and individual crochet technique.
What yarn weight is used?
The design uses medium-weight (#4), worsted-weight yarn.
Can I substitute the yarn?
A yarn substitution may change the finished size, proportions, and fabric density. If you change yarn weight or hook size, expect the final dimensions and appearance to change.
Do I need a specific crochet hook?
The design uses a 3.5 mm crochet hook. Changing the hook can affect stitch density and finished size.
Is this pattern physically tested?
Not yet. The pattern has been mathematically reviewed and constructionally checked, but it has not yet been physically crocheted and tested.
Can I use embroidered eyes instead of safety eyes?
Yes. Embroidered eyes can be used as an alternative facial-finishing method. The safety characteristics of the finished item still depend on the materials, construction, intended use, and applicable safety requirements.
How should I attach the paired pieces?
Compare the left and right sides visually before making the permanent stitches. This is especially useful for the ears, arms, legs, and eyes.
More Animal Amigurumi
Explore more animal-inspired crochet projects from Tiny Yarn Tales for additional amigurumi ideas and character designs.
