
Black Cat Crochet Pattern: A Cute Amigurumi Cat Project
This black cat crochet pattern creates a compact amigurumi cat…

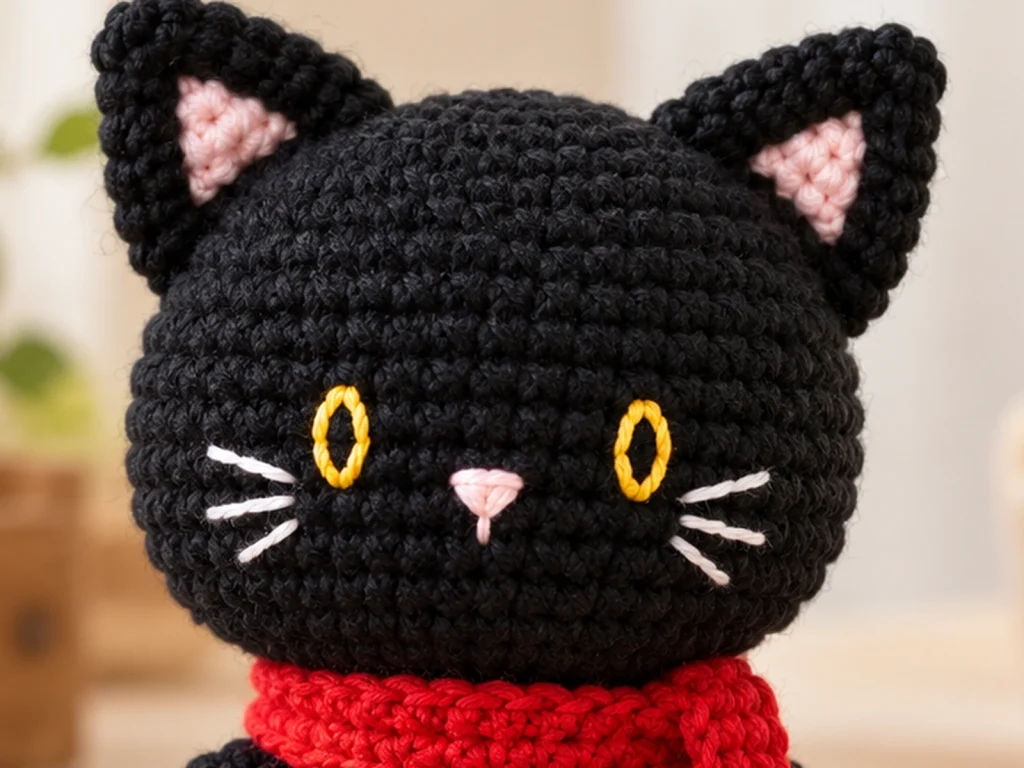
This black cat crochet pattern creates a compact amigurumi cat with a rounded head, small ears, embroidered facial details, a tapered tail, and a simple scarf. The project is worked in separate pieces and assembled with a yarn needle.
The finished cat is designed to be approximately 6–7 inches tall, excluding the scarf. Your final size may vary depending on yarn, hook, tension, stuffing, and individual crochet technique.
Pattern note: The stitch counts and construction have been mathematically reviewed and constructionally checked, but the pattern has not been physically crocheted and tested yet.

Project Overview
What You’ll Make
You’ll crochet a black cat amigurumi from separate pieces, including the body, head, legs, arms, ears, and tail. The face is embroidered after assembly, and a small scarf adds the finishing detail.
Project Details
- Technique: Crochet amigurumi
- Approximate finished size: 6–7 inches, excluding the scarf
- Main yarn: Medium/Worsted weight (#4)
- Main color: Black
- Hook: 3.25 mm
- Stuffing: Polyester fiberfill
- Eyes: Embroidered
- Construction: Separate crocheted pieces sewn together
- Scarf: Red
The finished dimensions are approximate and can change with yarn choice, hook size, tension, stuffing, and technique.
Materials & Tools
You’ll need:
- Medium/Worsted weight (#4) black yarn
- Small amounts of mustard or yellow yarn
- Small amount of soft pink yarn
- Small amount of white yarn
- Red yarn for the scarf
- 3.25 mm crochet hook
- Polyester fiberfill
- Yarn needle
- Stitch marker
- Scissors
No specific yarn brand or quantity is required by the pattern.
Abbreviations
This pattern uses standard US crochet terminology.
- MR — magic ring
- sc — single crochet
- inc — increase; work 2 sc in the same stitch
- dec — decrease; work 2 stitches together
- ch — chain
- sl st — slip stitch
- FO — fasten off
Before You Start
Work in Continuous Rounds
The body, head, legs, arms, and tail are worked in continuous rounds unless otherwise noted. Use a stitch marker to identify the first stitch of each round.
Count Your Stitches
Each round includes the expected stitch count in parentheses. Check your count before beginning the next round.
Stuff Gradually
Add stuffing as the rounded pieces develop. Aim for an even shape without stretching the stitches.
Compare Paired Pieces
The arms, legs, and ears are made in pairs. Before sewing them permanently, compare both sides so their placement is balanced.
Construction Order
The main body and head are crocheted first, followed by the limbs, ears, and tail. The facial details are embroidered after the pieces are assembled.
Black Cat Crochet Pattern
Body — Make 1
Work in continuous rounds with black yarn.
Round 1
6 sc in MR. (6)
Round 2
6 inc. (12)
Round 3
(2 sc, inc) × 6. (18)
Round 4
(3 sc, inc) × 6. (24)
Round 5
24 sc. (24)
Round 6
24 sc. (24)
Round 7
24 sc. (24)
Round 8
24 sc. (24)
Round 9
24 sc. (24)
Round 10
(2 sc, dec) × 6. (18)
Round 11
18 sc. (18)
Round 12
18 sc. (18)
Round 13
18 sc. (18)
Round 14
(sc, dec) × 6. (12)
Round 15
12 sc. (12)
Round 16
12 sc. (12)
Stuff the body firmly enough to hold its shape without stretching the stitches.
FO, leaving a long tail for sewing.
Keep the 12-stitch top opening available for attaching the head.
Head — Make 1
Work in continuous rounds with black yarn.
Round 1
6 sc in MR. (6)
Round 2
6 inc. (12)
Round 3
(sc, inc) × 6. (18)
Round 4
(2 sc, inc) × 6. (24)
Round 5
(3 sc, inc) × 6. (30)
Round 6
30 sc. (30)
Round 7
30 sc. (30)
Round 8
30 sc. (30)
Round 9
30 sc. (30)
Round 10
(3 sc, dec) × 6. (24)
Round 11
(2 sc, dec) × 6. (18)
Round 12
(sc, dec) × 6. (12)
Stuff the head evenly as you work and shape it into a rounded form.
FO, leaving a long sewing tail.
Keep the 12-stitch opening available for attaching the head to the body.
Legs — Make 2
Work in continuous rounds with black yarn.
Round 1
6 sc in MR. (6)
Round 2
6 inc. (12)
Round 3
12 sc. (12)
Round 4
12 sc. (12)
Round 5
12 sc. (12)
Round 6
12 sc. (12)
Round 7
(sc, dec) × 4. (8)
Round 8
8 sc. (8)
Stuff lightly, with a little more filling toward the lower part of the leg.
FO, leaving a sewing tail.
Make a second leg using the same instructions.
Arms — Make 2
Work in continuous rounds with black yarn.
Round 1
6 sc in MR. (6)
Round 2
(2 sc, inc) × 3. (9)
Round 3
9 sc. (9)
Round 4
9 sc. (9)
Round 5
9 sc. (9)
Round 6
9 sc. (9)
Round 7
(sc, dec) × 3. (6)
Round 8
6 sc. (6)
Round 9
6 sc. (6)
Stuff lightly so the arms remain flexible enough for positioning.
FO, leaving a sewing tail.
Make a second arm using the same instructions.
Ears — Make 2
Work the ears flat.
Row 1
Ch 2, sc in 2nd ch from hook. (1)
Row 2
Ch 1, inc. (2)
Row 3
Ch 1, sc across. (2)
Row 4
Ch 1, inc, sc, inc. (4)
Row 5
Ch 1, sc across. (4)
Row 6
Ch 1, inc, 2 sc, inc. (6)
Row 7
Ch 1, sc across. (6)
Row 8
Ch 1, dec, 2 sc, dec. (4)
Row 9
Ch 1, 2 dec. (2)
Row 10
Ch 1, dec. (1)
FO, leaving a sewing tail.
Make a second ear using the same instructions.
Tail — Make 1
Work in continuous rounds with black yarn.
Round 1
6 sc in MR. (6)
Round 2
6 sc. (6)
Round 3
6 sc. (6)
Round 4
6 sc. (6)
Round 5
6 sc. (6)
Round 6
dec, 4 sc. (5)
Round 7
5 sc. (5)
Round 8
dec, 3 sc. (4)
Round 9
4 sc. (4)
Round 10
dec, 2 sc. (3)
Round 11
3 sc. (3)
Add a small amount of stuffing as you work, keeping the tail flexible.
FO, leaving a sewing tail.
Scarf — Make 1
Use red yarn.
Foundation: Ch 36
Row 1
Sc in 2nd ch from hook and across. (35)
Row 2
Ch 1, turn, 35 sc. (35)
FO and weave in the ends.
To change the scarf length, adjust the number of chains in the foundation.
Facial Details
Once the head is attached, embroider the facial details.
Eyes
Use mustard or yellow yarn for two embroidered eyes.
Place the eyes symmetrically on the front of the head. Compare both sides before completing the second eye.
Nose
Use soft pink yarn to embroider a small nose centered below the eyes.
Whiskers
Add three short white whiskers on each side of the face.
Inner Ears
Add a small pink embroidered detail inside each ear.

Assembly
Step 1: Attach the Head
Align the 12-stitch opening at the bottom of the head with the 12-stitch opening at the top of the body.
Sew evenly around the opening and keep the head centered as you work.
Step 2: Attach the Legs
Position the two legs on the lower portion of the body.
Compare both sides from the front and side before sewing them permanently.
Step 3: Attach the Arms
Position the arms along the sides of the torso at matching heights.
Check the silhouette from the front before securing them.
Step 4: Attach the Ears
Place one ear on each side of the upper head.
Compare the two ears before sewing to keep their angles balanced.
Step 5: Attach the Tail
Sew the tail to the lower back of the body.
A gentle curve can be maintained during attachment.
Step 6: Add the Facial Details
Embroider the eyes, nose, inner-ear details, and whiskers after the major pieces have been attached.
Step 7: Add the Scarf
Wrap the red scarf around the neck and tie it loosely once the main assembly is complete.
Finishing
Secure the remaining yarn tails and weave in ends neatly.
Check that:
- the head is centered
- the paired limbs are balanced
- the ears sit evenly
- the tail is securely attached
- the facial details are balanced
- the stuffing is not visible
- the scarf sits comfortably around the neck
Helpful Tips
Count Before Moving On
If your stitch count is wrong, stop and correct it before continuing to the next round.
Stuff in Small Amounts
Gradual stuffing gives you better control over the shape of the head and body.
Compare Both Sides
Before sewing paired parts, place both pieces on the project and compare their height and angle.
Leave Sewing Tails
Keep the yarn tails long enough to sew each component securely to the body or head.
Troubleshooting
My Stitch Count Is Off
Recount the current round and check for a missed increase, decrease, or stitch before continuing.
The Head Looks Uneven
Redistribute the stuffing rather than adding a large amount at once.
The Ears Don’t Match
Temporarily position both ears before sewing and compare their angle and height.
The Arms or Legs Are Uneven
Hold both pieces in place and view the cat from the front and side before attaching them permanently.
The Tail Feels Too Stiff
Use less stuffing so the tail remains flexible enough to curve naturally.
The Face Looks Uneven
Position the eyes first and compare them visually before adding the nose and whiskers.
Customization Ideas
Change the Scarf Color
Use a different scarf color to create a new look while keeping the same construction.
Experiment With the Eye Expression
Slight changes in embroidered eye shapes can give the cat a different personality.
Adjust the Scarf Length
Change the foundation-chain length to make the scarf shorter or longer.
Try Another Main Color
The same construction can be made in a different yarn color, although changing yarn weight or hook size may affect the finished proportions.
Care
Handle the finished amigurumi gently and keep it away from excessive moisture or heat. Because the project has embroidered facial details and sewn components, avoid pulling on the facial embroidery or attached pieces.
Frequently Asked Questions
What size is the finished black cat?
The design target is approximately 6–7 inches tall, excluding the scarf. The final size may vary with yarn, hook size, tension, stuffing, and individual technique.
What yarn weight does this pattern use?
The pattern is designed for medium/worsted-weight (#4) yarn.
What crochet hook size is used?
The pattern uses a 3.25 mm crochet hook.
How is the cat assembled?
The head, legs, arms, ears, and tail are crocheted separately and then sewn together. Facial details are embroidered after assembly.
Are the eyes made with safety eyes?
No. This design uses embroidered eyes.
Can I change the scarf color?
Yes. The scarf can be made in another color without changing its basic construction.
Can I change the scarf length?
Yes. Adjust the foundation-chain length to change the scarf size.
Is the pattern physically tested?
No. The stitch counts and construction have been mathematically reviewed and constructionally checked, but the design has not yet been physically crocheted and tested.
More Animal Amigurumi
Tiny Yarn Tales features a growing collection of animal-inspired crochet projects. Browse the animal amigurumi collection for more projects to make and customize.
