
Crochet Calla Lily Pattern: A Step-by-Step Flower Tutorial
Create a graceful crochet Calla Lily with an ivory spathe,…

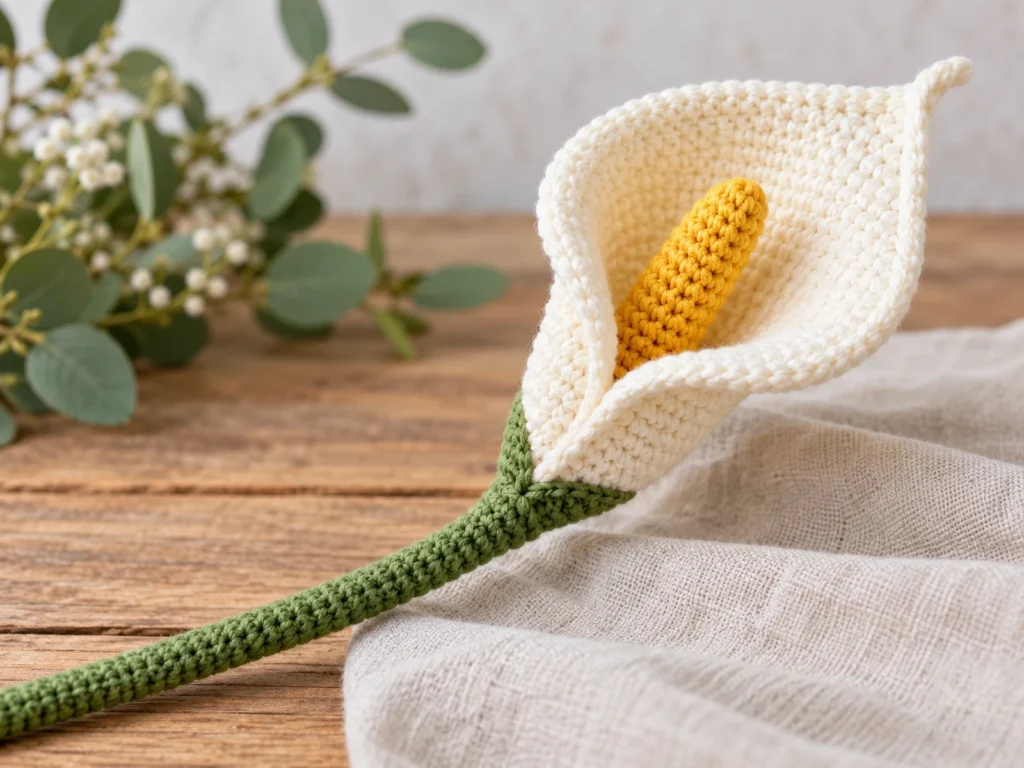
Create a graceful crochet Calla Lily with an ivory spathe, golden center, and green wire-supported stem. This original crochet calla lily pattern is worked in three main pieces and finished with simple assembly and hand shaping to create the flower’s distinctive trumpet-like form.
The finished flower is designed to measure approximately 7–9 inches tall, although the final size can vary with yarn, hook size, tension, and stuffing.
Project Overview
What You’ll Make
This crochet flower is built from three main components:
- One ivory or cream spathe
- One golden-yellow spadix
- One green crocheted stem supported by floral wire
The spathe begins with a narrow base and gradually widens toward the top. A separate pointed flap is added to create the asymmetrical front edge of the flower.
The spadix sits inside the open spathe, while the wire-supported stem provides structure.
Project Details
- Project: Crochet Calla Lily
- Technique: Crochet with sewn assembly
- Yarn: Worsted-weight yarn
- Hook: 3.5 mm crochet hook
- Main color: Ivory or cream
- Center color: Golden yellow
- Stem color: Green
- Stuffing: Small amount for the spadix
- Stem support: 24–26 gauge floral wire
- Approximate finished size: 7–9 inches tall
Pattern status: This pattern has been mathematically reviewed and constructionally checked, but it has not been physically crocheted and tested yet.
Materials & Tools
- Worsted-weight yarn in ivory or cream
- Worsted-weight yarn in golden yellow
- Worsted-weight yarn in green
- 3.5 mm crochet hook
- Small amount of fiberfill
- 24–26 gauge floral wire
- Yarn needle
- Scissors
- Stitch marker
Abbreviations
This pattern uses standard US crochet terminology.
- MR — magic ring
- ch — chain
- sc — single crochet
- inc — increase; 2 sc in the same stitch
- dec — decrease; sc2tog
- sl st — slip stitch
- FO — fasten off
- st/sts — stitch/stitches
The ch-1 used at the beginning of the pointed flap does not count as a stitch.
Before You Start
Work in Continuous Rounds
The spadix and stem are worked in continuous rounds. Use a stitch marker to keep track of the beginning of each round.
Count Your Stitches
Each round includes its expected stitch count in parentheses. Checking your count as you work can help prevent shaping problems later.
Shape Before Sewing
The spathe will develop its final flower shape during assembly. Gently curve it into position rather than forcing the crocheted fabric into a sharp fold.
Keep the Stem Centered
When crocheting around the floral wire, keep the wire centered inside the tube. Make sure the upper wire extends far enough to enter the spadix during assembly.
Construction Order
The flower is assembled in this order:
- Crochet the spadix.
- Crochet the spathe and pointed flap.
- Crochet the wire-supported stem.
- Attach the spadix to the stem.
- Position the spathe.
- Shape the finished flower.
Original Crochet Calla Lily Pattern
Spadix
The spadix forms the golden central structure inside the flower.
Work in continuous rounds.
Round 1
6 sc in MR. (6)
Round 2
6 sc. (6)
Round 3
6 inc. (12)
Round 4
12 sc. (12)
Round 5
12 sc. (12)
Round 6
12 sc. (12)
Round 7
12 sc. (12)
Round 8
12 sc. (12)
Round 9
12 sc. (12)
Round 10
12 sc. (12)
Round 11
12 sc. (12)
Round 12
12 sc. (12)
Round 13
12 sc. (12)
Round 14
12 sc. (12)
Round 15
12 sc. (12)
Round 16
(2 sc, dec) × 3. (9)
Round 17
9 sc. (9)
Round 18
(sc, dec) × 3. (6)
Round 19
6 sc. (6)
Fasten off, leaving a long yarn tail.
Lightly stuff the spadix so it keeps a firm cylindrical shape. Avoid overstuffing. Leave the final opening available for attaching the stem.
Spathe
The spathe is the main flower body. It starts narrow and expands toward the upper opening.
Work in continuous rounds.
Round 1
8 sc in MR. (8)
Round 2
8 sc. (8)
Round 3
(sc, inc) × 4. (12)
Round 4
12 sc. (12)
Round 5
(sc, inc) × 6. (18)
Round 6
18 sc. (18)
Round 7
(2 sc, inc) × 6. (24)
Round 8
24 sc. (24)
Round 9
(3 sc, inc) × 6. (30)
Round 10
30 sc. (30)
Round 11
(4 sc, inc) × 6. (36)
Round 12
36 sc. (36)
Round 13
36 sc. (36)
Round 14
36 sc. (36)
Fasten off and weave in the beginning tail.
Pointed Front Flap
Choose the side of the upper opening that will face the front of the finished flower.
Mark 18 consecutive stitches, representing approximately half of the opening.
Attach matching yarn to the first marked stitch with a sl st.
Ch 1. This does not count as a stitch.
Row 1
18 sc across the marked stitches. (18)
Turn.
Row 2
dec, 14 sc, dec. (16)
Row 3
dec, 12 sc, dec. (14)
Row 4
dec, 10 sc, dec. (12)
Row 5
dec, 8 sc, dec. (10)
Row 6
dec, 6 sc, dec. (8)
Row 7
dec, 4 sc, dec. (6)
Row 8
dec, 2 sc, dec. (4)
Row 9
2 dec. (2)
Row 10
dec. (1)
Fasten off and weave in the end.
This tapered flap creates the pointed overlapping front edge of the flower.
Stem
The stem is crocheted around floral wire to provide support.
Before beginning, bend one end of the wire into a small, smooth loop. Keep the loop centered inside the first round.
Work in continuous rounds.
Round 1
6 sc in MR. (6)
Round 2
6 sc. (6)
Round 3
6 sc. (6)
Round 4
6 sc. (6)
Round 5
6 sc. (6)
Round 6
6 sc. (6)
Round 7
6 sc. (6)
Round 8
6 sc. (6)
Round 9
6 sc. (6)
Round 10
6 sc. (6)
Round 11
6 sc. (6)
Round 12
6 sc. (6)
Round 13
6 sc. (6)
Round 14
6 sc. (6)
Round 15
6 sc. (6)
Round 16
6 sc. (6)
Round 17
6 sc. (6)
Round 18
6 sc. (6)
Round 19
6 sc. (6)
Round 20
6 sc. (6)
Round 21
6 sc. (6)
Round 22
6 sc. (6)
Round 23
6 sc. (6)
Round 24
6 sc. (6)
Round 25
6 sc. (6)
Round 26
6 sc. (6)
Round 27
6 sc. (6)
Round 28
6 sc. (6)
Round 29
6 sc. (6)
Round 30
6 sc. (6)
Fasten off, leaving a long yarn tail.
Keep enough wire extending from the top of the stem to enter the spadix.
Assembly
Step 1: Attach the Spadix to the Stem
Lightly fill the spadix.
Insert the exposed upper wire from the stem into the center of the spadix.
Guide the stem into the bottom opening of the spadix until the spadix sits securely.
Using the long spadix yarn tail, sew around the opening and through the upper stitches of the stem.
Make several secure passes so the spadix remains centered.
Fasten off and hide the yarn end inside the construction.
Step 2: Position the Spathe
Slide the spathe onto the stem from the bottom.
Guide the spadix through the large upper opening.
The narrow lower section of the spathe should sit around the stem and the base of the central flower structure.
Use the ivory yarn tail to tack the lower edge of the spathe to the stem at several evenly spaced points.
Do not sew the upper opening closed.
Step 3: Shape the Flower
Cup the spathe gently around the spadix.
Rotate the pointed flap toward the front.
Let one side of the spathe overlap the other slightly so the flower develops its curved silhouette.
Secure only the lower overlap when needed to hold the shape.
Step 4: Final Shaping
Gently curve the spathe outward with your fingers.
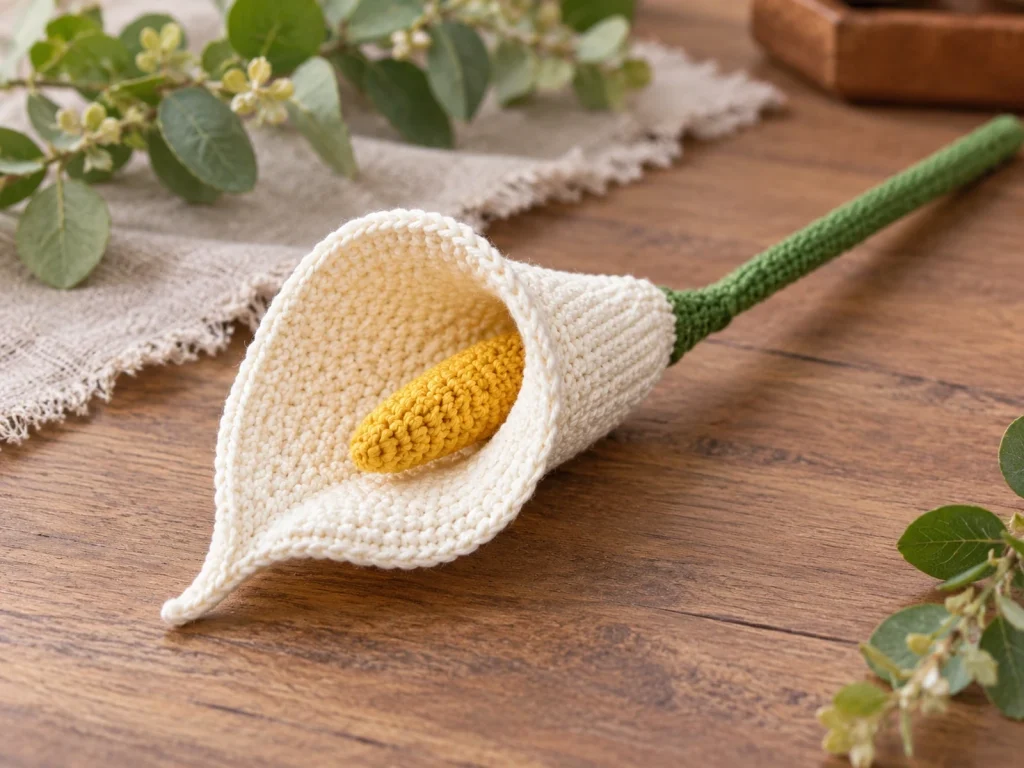
The lower portion should remain narrower around the stem while the upper section opens into a broad, trumpet-like shape.
Keep the spadix visible and upright.
Finishing
After the flower has been assembled, make any small shaping adjustments needed to create a balanced silhouette.
Keep the center upright and make sure the pointed front flap remains clearly visible.
Before hiding the final yarn ends, look at the flower from the front and side to check its overall shape.
Helpful Tips
- Keep the spadix centered when attaching it to the stem.
- Check the orientation of the pointed flap before making the final securing stitches.
- Shape the spathe gradually instead of forcing the fabric into position.
- Keep the stem straight while attaching the flower.
- Check the front and back of the flower before hiding the remaining yarn ends.
- When working around floral wire, keep the wire centered inside the crocheted tube.
Troubleshooting
The Spathe Looks Too Flat
Gently cup the spathe around the spadix and reshape the upper opening. Keep the lower section anchored around the stem while allowing the upper section to flare outward.
The Spadix Leans to One Side
Reposition the stem so the wire and spadix are centered before securing the attachment again.
The Pointed Flap Is Not Facing Forward
Rotate the spathe until the tapered flap reaches the desired front position. A few small securing stitches near the lower overlap can help maintain the orientation.
The Stem Feels Weak
Check that the floral wire is centered inside the crocheted tube and that the upper end extends securely into the spadix.
The Finished Flower Is Larger or Smaller Than Expected
The finished size can change with yarn, hook size, tension, and stuffing. Matching the stitch counts does not guarantee an exact finished measurement.
Customization Ideas
Change the Flower Color
Try another flower color while keeping the same basic construction.
Make a Multi-Flower Arrangement
Repeat the pattern to create several flowers for a larger decorative display.
Change the Stem Color
A lighter or darker green can change the overall look while keeping the same construction.
Experiment With Scale
Changing yarn weight and hook size can produce a different-sized flower, but it will also change the finished proportions.
Frequently Asked Questions
What is this crochet flower made from?
The flower consists of an ivory or cream spathe, a golden-yellow spadix, and a green crocheted stem supported by floral wire.
How large is the finished Calla Lily?
The design targets approximately 7–9 inches in height. The actual finished size varies with yarn, hook size, tension, and stuffing.
Does the Calla Lily use stuffing?
Only the spadix uses a small amount of fiberfill.
Is floral wire part of the pattern?
Yes. Floral wire is worked inside the crocheted stem and extends into the spadix during assembly.
Can I make the flower in different colors?
Yes. The flower colors can be changed while keeping the same basic stitch sequence and construction.
Can I make several flowers?
Yes. The pattern can be repeated to create multiple flowers for a decorative arrangement.
Why does the spathe have a pointed flap?
The tapered flap creates the pointed overlapping front edge that contributes to the recognizable Calla Lily silhouette.
More Crochet Flower Projects
Explore more botanical crochet projects and handmade flower patterns from Tiny Yarn Tales as they become available.