
Crochet Hamster Amigurumi Pattern
This crochet hamster amigurumi has a rounded head, a compact…
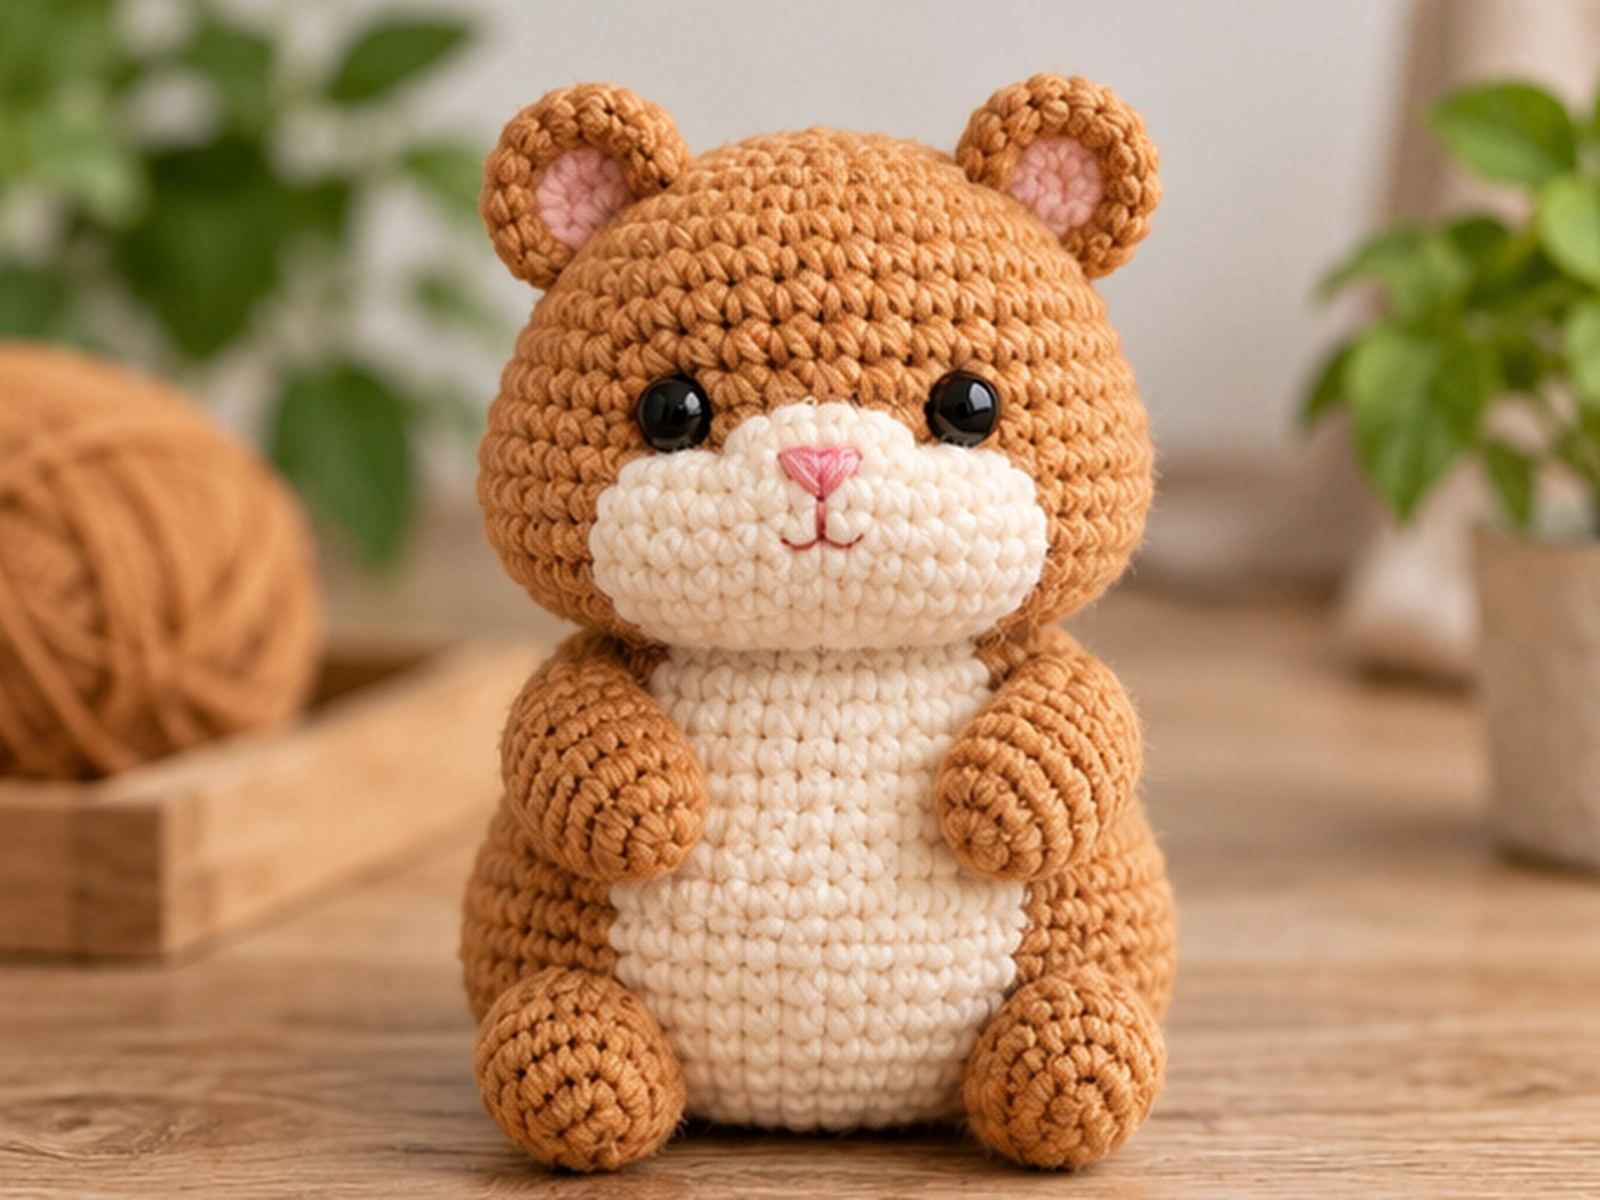
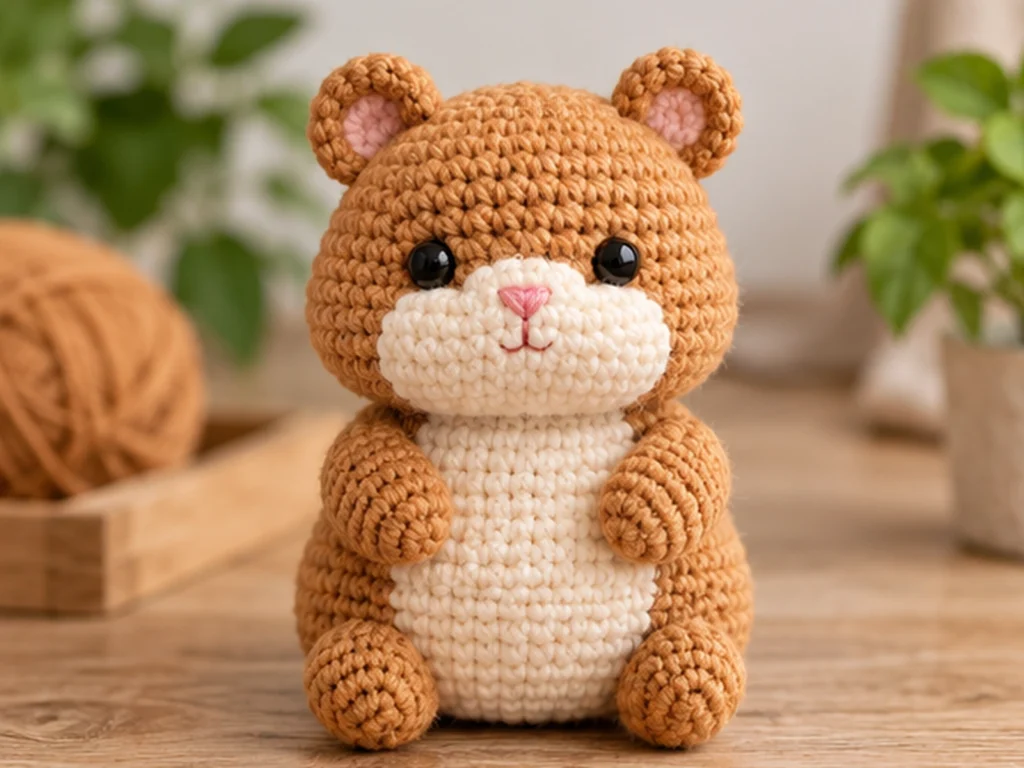
This crochet hamster amigurumi has a rounded head, a compact body, tiny folded ears, short arms and legs, and a soft cream muzzle that gives it a sweet little expression. The design is made in separate pieces and finished with sewn assembly and simple embroidered facial details.
The pattern has been mathematically reviewed and constructionally checked, but it has not been physically crocheted and tested yet. Finished size and shaping may vary with yarn, hook size, tension, stuffing, and individual technique.
Project Overview
Here’s what you’ll make:
- Finished size: Approximately 5–6 inches tall
- Yarn: Medium/worsted-weight (#4) yarn
- Main color: Warm honey brown
- Accent color: Cream or oatmeal
- Crochet hook: 3.5 mm
- Eyes: 8 mm black safety eyes
- Stuffing: Polyester fiberfill
- Construction: Separate crocheted pieces sewn together
- Main features: Rounded head and body, folded ears, small muzzle, short limbs, and a tapered tail
The finished size is approximate and can change depending on your yarn, hook, tension, stuffing, and crochet technique.
Materials and Tools
You’ll need:
- Medium/worsted-weight (#4) yarn in honey brown
- Medium/worsted-weight (#4) yarn in cream or oatmeal
- 3.5 mm crochet hook
- 8 mm black safety eyes
- Polyester fiberfill
- Yarn or tapestry needle
- Scissors
- Stitch marker, if desired
Safety Note
Safety eyes can present a choking hazard and are not appropriate for children under 3. The finished project should not be represented as baby-safe or child-safe.
Abbreviations
This pattern uses standard U.S. crochet terminology:
- MR — magic ring
- sc — single crochet
- inc — increase, 2 sc in the same stitch
- dec — single crochet decrease
- sl st — slip stitch
- FO — fasten off
Before You Start
Work in Continuous Rounds
The crocheted pieces are worked primarily in continuous rounds. A stitch marker can help you keep track of the beginning of each round.
Count Your Stitches
Check your stitch count at the end of each round, especially after increases and decreases. Keeping the counts accurate will make assembly much easier.
Stuff Gradually
Add stuffing gradually as you work rather than filling a piece all at once. This makes it easier to control the final shape.
Check Symmetry
For paired pieces such as the ears, arms, and legs, compare both sides before sewing them permanently into place.
Construction Order
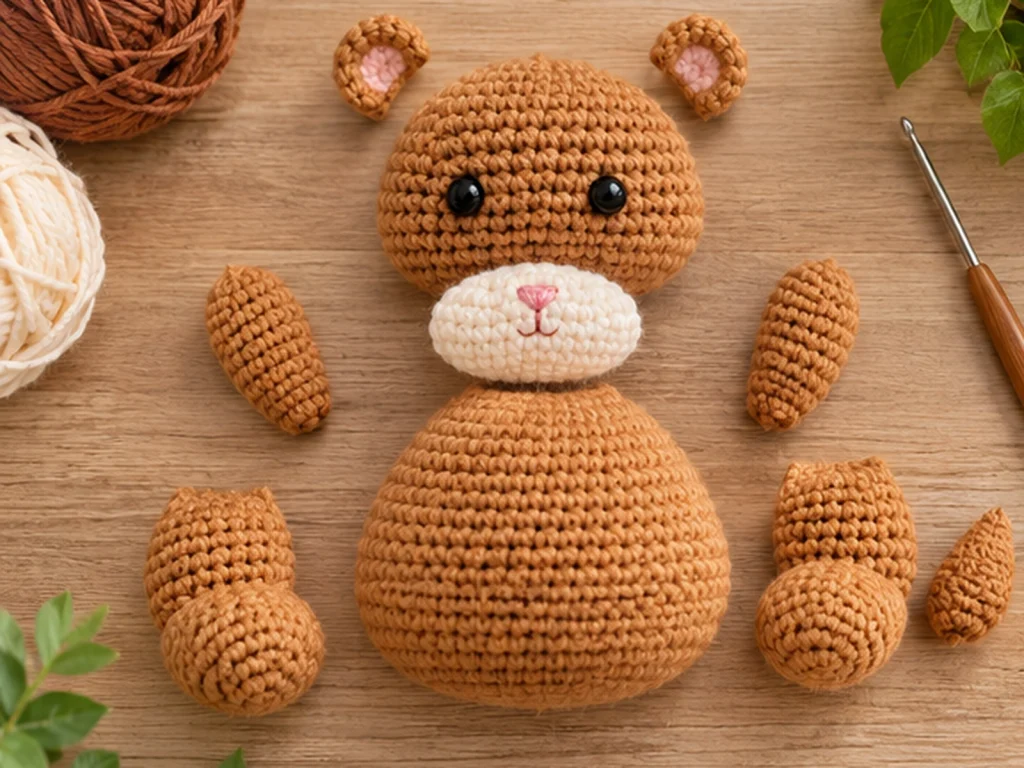
Finish all of the crocheted pieces before beginning the main assembly. The head and body are stuffed, while the ears remain unstuffed.
Crochet Hamster Pattern
Head — Make 1
Work in honey brown.
Round 1: 6 sc in MR. (6)
Round 2: 6 inc. (12)
Round 3: (sc, inc) × 6. (18)
Round 4: (2 sc, inc) × 6. (24)
Round 5: (3 sc, inc) × 6. (30)
Round 6: (4 sc, inc) × 6. (36)
Round 7: 36 sc. (36)
Round 8: 36 sc. (36)
Round 9: 36 sc. (36)
Round 10: 36 sc. (36)
Round 11: (4 sc, dec) × 6. (30)
Round 12: 30 sc. (30)
Round 13: (3 sc, dec) × 6. (24)
Round 14: 24 sc. (24)
Round 15: (2 sc, dec) × 6. (18)
Round 16: (sc, dec) × 6. (12)
Round 17: 6 dec. (6)
Insert the safety eyes before the head is completely closed. Position them symmetrically on the front of the head, leaving space underneath for the muzzle.
Begin stuffing the head after the facial placement has been established. Use firm, even stuffing without overfilling.
Fasten off, leaving a yarn tail for closing. Close the remaining opening and weave in the end.
Body — Make 1
Work in honey brown.
Round 1: 6 sc in MR. (6)
Round 2: 6 inc. (12)
Round 3: (sc, inc) × 6. (18)
Round 4: (2 sc, inc) × 6. (24)
Round 5: (3 sc, inc) × 6. (30)
Round 6: 30 sc. (30)
Round 7: 30 sc. (30)
Round 8: 30 sc. (30)
Round 9: (3 sc, dec) × 6. (24)
Round 10: 24 sc. (24)
Round 11: (2 sc, dec) × 6. (18)
Round 12: (sc, dec) × 6. (12)
Round 13: 6 dec. (6)
Begin stuffing after Round 10. Build a rounded, plump shape without packing it too tightly.
Fasten off and close the opening.
Ears — Make 2
Work in honey brown.
Round 1: 6 sc in MR. (6)
Round 2: 6 inc. (12)
Round 3: (sc, inc) × 6. (18)
Round 4: 18 sc. (18)
Fasten off, leaving a sewing tail.
Do not stuff the ears. Fold each circle gently in half to create a soft rounded ear shape.
Arms — Make 2
Work in honey brown.
Round 1: 6 sc in MR. (6)
Round 2: (2 sc, inc) × 2. (8)
Round 3: 8 sc. (8)
Round 4: 8 sc. (8)
Round 5: 8 sc. (8)
Round 6: 8 sc. (8)
Round 7: 8 sc. (8)
Round 8: 2 dec. (4)
Lightly stuff each arm so it remains flexible.
Fasten off and close. Leave a sewing tail for attachment.
Legs — Make 2
Work in honey brown.
Round 1: 6 sc in MR. (6)
Round 2: 6 inc. (12)
Round 3: 12 sc. (12)
Round 4: (2 sc, dec) × 3. (9)
Round 5: 9 sc. (9)
Round 6: 9 sc. (9)
Round 7: 3 dec. (6)
Lightly stuff each leg.
Fasten off and close, leaving a sewing tail.
Muzzle — Make 1
Work in cream.
Round 1: 6 sc in MR. (6)
Round 2: 6 inc. (12)
Round 3: (sc, inc) × 6. (18)
Round 4: 18 sc. (18)
Add a small amount of stuffing to the center of the muzzle to give it a gently raised shape.
Do not close the muzzle separately. Fasten off, leaving a sewing tail. During assembly, center the muzzle on the front of the head and sew around its outer edge, trapping the small amount of stuffing between the muzzle and the head.
Tail — Make 1
Work in honey brown.
Round 1: 5 sc in MR. (5)
Round 2: 5 sc. (5)
Round 3: 5 sc. (5)
Round 4: 5 sc. (5)
Round 5: 5 sc. (5)
Round 6: 5 sc. (5)
Round 7: sc, dec, 2 sc. (4)
Round 8: 2 dec. (2)
Fasten off and close.
Keep the tail unstuffed or only very lightly stuffed so it stays small and flexible.
Finish the Hamster’s Face
Use pink yarn for the nose.
The muzzle should sit centered beneath the eyes. Embroider a small rounded triangular nose near the upper center of the muzzle.
Add a short vertical stitch beneath the nose and, if desired, two small curved lines to create a simple smile.
Keep the facial embroidery light and centered so it complements the rounded muzzle and eyes.

Assemble the Hamster
Step 1: Attach the Legs
Position the two legs on the lower front portion of the body.
Compare both sides before sewing so the legs sit at similar heights and angles.
Sew around the upper portions securely.
Step 2: Attach the Arms
Place the arms on opposite sides of the body, slightly below the head-to-body connection.
Check the left and right sides for symmetry before completing the stitching.
Step 3: Attach the Tail
Center the tail on the lower back of the body.
Sew it securely while keeping the small tail relaxed rather than pulling it tightly against the body.
Step 4: Attach the Head
Center the head over the body.
Align the bottom of the head with the top of the body and sew around the joining area until the connection is secure.
Check the front and side views as you work so the head stays centered.
Step 5: Attach the Ears
Fold each ear in half.
Place the ears on the upper sides of the head and angle them slightly outward.
Compare both sides before permanently sewing them into place.
Step 6: Attach the Muzzle
Center the cream muzzle on the front of the head beneath the eyes.
Make sure the muzzle is sitting in the desired position before sewing.
Sew securely around the outer edge of the muzzle. As you sew, the small amount of stuffing remains enclosed between the muzzle and the head, creating the raised muzzle shape.
Step 7: Finish the Face
Complete the embroidered nose and mouth details.
Weave in the remaining yarn ends and trim them neatly.
Finishing
Before considering your hamster complete, check the following:
- Both eyes look balanced.
- The ears sit at similar angles.
- The arms and legs have similar placement from side to side.
- The head is securely attached.
- The muzzle is centered beneath the eyes.
- No stuffing is exposed.
- All yarn ends are woven in and trimmed.
The finished character should have a rounded, plump appearance rather than a tightly packed shape.
Helpful Tips
Count as You Go
If your stitch count changes unexpectedly, stop and correct the mistake before continuing. Carrying an incorrect stitch count into later rounds can make shaping much more difficult.
Add Stuffing Gradually
Small amounts of stuffing are easier to control than one large amount. This is especially helpful as the head and body openings become smaller.
Check Both Sides Before Sewing
For all paired pieces, place both components first and compare them from the front and side. Once they look balanced, finish the sewing.
Shape the Head Carefully
The head is the focal point of the project. Adjust the stuffing gently before the final decreases so the surface stays smooth.
Troubleshooting
My stitch count is off. What should I do?
Pause and count the stitches in the current round. Compare the result with the pattern before continuing. Fixing the mistake early is usually easier than carrying the wrong count through several rounds.
My head looks lopsided.
Check the stuffing first. Uneven fiberfill can affect the shape even when the stitch count is correct. Gently redistribute the stuffing before closing the piece.
My ears look uneven.
Place both ears on the head without sewing them first. Adjust their angles and compare them from the front and side before attaching them permanently.
My muzzle looks off-center.
Use the eyes as your visual reference. Position the muzzle directly beneath the center area of the eyes, then check the face from straight on before sewing.
The pieces are difficult to sew together.
Use the yarn tails left for assembly and work gradually around each attachment point. Avoid pulling the stitches too tightly, as excessive tension can distort the pieces.
Customization Ideas
Try Different Colors
The honey-brown and cream palette can be changed to create a different hamster character. Keep the same basic component structure while experimenting with your own color combinations.
Change the Expression
Small changes to the embroidered nose and mouth can create a softer, happier, or more curious expression.
Adjust the Ear Angle
The folded ears can be positioned more upright or slightly farther outward for a different character.
Create Your Own Color Character
A lighter body with darker ears or a darker body with a pale muzzle can give the same design a completely different personality.
Changes to yarn weight or hook size can also affect the final proportions and size.
Care
Keep the finished hamster in a clean, dry place and avoid harsh handling around the embroidered details and attached components.
Because the design uses safety eyes and sewn components, it should not be represented as a child-safe or baby-safe toy.
Frequently Asked Questions
What size is the finished hamster?
The design is intended to be approximately 5–6 inches tall. Actual size may vary depending on yarn, hook size, tension, stuffing, and individual crochet technique.
What yarn does this pattern use?
The design uses medium/worsted-weight (#4) yarn in honey brown, with cream or oatmeal yarn for the muzzle.
What crochet hook size is used?
The pattern uses a 3.5 mm crochet hook.
When should I add the safety eyes?
Add the safety eyes before the head is completely closed so you can adjust their placement while the head is still accessible.
Are the ears stuffed?
No. The ears are crocheted as flat circles and folded, so they remain unstuffed.
Can I use different yarn colors?
Yes. Changing the yarn colors is a simple way to personalize the hamster. Keep in mind that changing yarn weight or hook size can affect the finished size and proportions.
Does the pattern require sewing?
Yes. The design uses separate crocheted pieces that are sewn together during assembly.
How is the muzzle attached?
The muzzle is lightly stuffed but is not closed separately. Its outer edge is sewn directly to the head, which encloses the stuffing between the muzzle and the head and creates the raised shape.
Is this pattern physically tested?
Not yet. The design has been mathematically reviewed and constructionally checked, but it has not been physically crocheted and tested yet.
Are the safety eyes suitable for young children?
Safety eyes can present a choking hazard and are not appropriate for children under 3. The finished project should not be represented as child-safe or baby-safe.
Final Thoughts
This crochet hamster amigurumi combines a rounded head and body, folded ears, short limbs, a raised cream muzzle, and simple embroidered facial details into one sweet little character.
Take your time with the face and assembly stages. Careful placement of the ears, eyes, muzzle, and limbs will have a big effect on the final expression and overall shape.