Crochet Hedgehog Amigurumi Pattern
This crochet hedgehog amigurumi pattern creates a small woodland-inspired hedgehog…

This crochet hedgehog amigurumi pattern creates a small woodland-inspired hedgehog with a rounded oatmeal-colored body, a soft cream muzzle, and a textured dark-brown quill mantle. The head and body are crocheted as one piece, while the muzzle, ears, feet, and quill mantle are added separately.
The finished hedgehog is approximately 5–6 inches long, although the final size will vary with yarn, hook size, tension, stuffing, and individual technique.

Project Overview
What You’ll Make
You’ll crochet a compact hedgehog with:
- A one-piece rounded head and body
- A cream-colored muzzle
- Two small ears
- Four feet
- A separate textured quill mantle
- Embroidered black eyes and nose
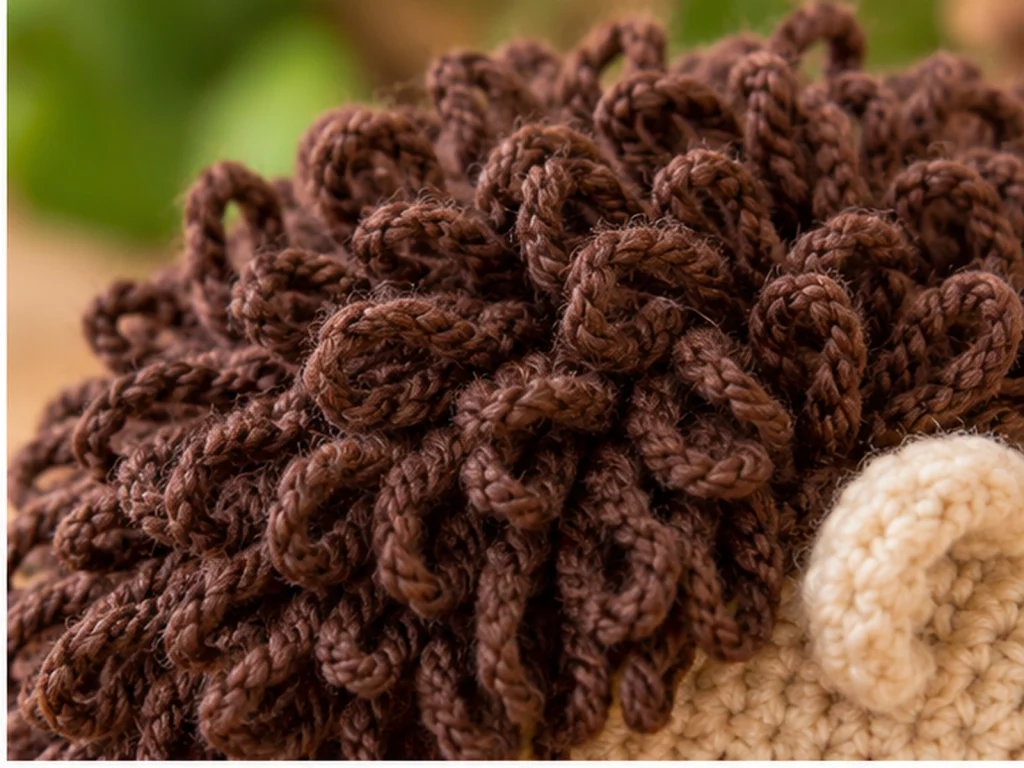
The defining feature is the dark-brown mantle worked with long-loop stitches. Once attached to the back, the raised loops create a quill-like texture.
Project Details
- Project: Crochet hedgehog amigurumi
- Approximate finished size: 5–6 inches long
- Yarn: Worsted-weight yarn
- Main color: Warm oatmeal or beige
- Accent color: Dark brown
- Muzzle: Cream or light beige
- Hook: 3.5 mm crochet hook
- Eyes: Embroidered black eyes
- Nose: Embroidered black nose
- Stuffing: Polyester fiberfill
- Construction: Head and body worked as one piece
The finished size is approximate and will depend on your yarn, hook, tension, stuffing, and crochet technique.
Materials & Tools
Yarn
Use worsted-weight yarn in the following colors:
- Warm oatmeal or beige for the head, body, ears, and feet
- Cream or light beige for the muzzle
- Dark brown for the quill mantle
- Black embroidery thread for the eyes and nose
Hook
- 3.5 mm crochet hook
Other Supplies
- Polyester fiberfill
- Yarn needle
- Stitch marker
No exact yarn quantity is specified because yarn usage varies with tension and individual technique.
Abbreviations
This pattern uses standard US crochet terminology.
| Abbreviation | Meaning |
|---|---|
| MR | Magic Ring |
| sc | Single crochet |
| inc | Increase |
| dec | Single crochet two together |
| LS | Long-Loop Stitch |
| FO | Fasten off |
Before You Start
Work in Continuous Rounds
The head and body are worked continuously rather than joined at the end of each round. Use a stitch marker to keep track of the beginning of each round.
Count Your Stitches
The stitch count appears in parentheses at the end of each round. Check your count before moving on, especially after rounds containing increases or decreases.
Stuff as You Go
Begin stuffing the main body after Round 20. Add the fiberfill gradually so the body stays rounded without becoming overly firm.
Compare Paired Pieces
The ears and feet are made as matching pieces. Before sewing them permanently, compare the two sides of the hedgehog from the front and side to check the placement.
Construction Order
The head and body are worked first. The muzzle, ears, feet, and quill mantle are made separately and attached during assembly. The facial details are embroidered after the main pieces are positioned.
This pattern has been mathematically reviewed and constructionally checked, but it has not been physically crocheted and tested on a prototype yet.
Crochet Hedgehog Pattern
Head + Body
Use the main oatmeal or beige yarn.
Work continuously from the front of the head toward the back of the body.
Round 1
6 sc in MR (6)
Round 2
6 inc (12)
Round 3
(sc, inc) × 6 (18)
Round 4
(2 sc, inc) × 6 (24)
Round 5
(3 sc, inc) × 6 (30)
Round 6
30 sc (30)
Round 7
30 sc (30)
Round 8
30 sc (30)
Round 9
(4 sc, inc) × 6 (36)
Round 10
36 sc (36)
Round 11
36 sc (36)
Round 12
36 sc (36)
Round 13
(5 sc, inc) × 6 (42)
Round 14
42 sc (42)
Round 15
42 sc (42)
Round 16
42 sc (42)
Round 17
(6 sc, inc) × 6 (48)
Round 18
48 sc (48)
Round 19
48 sc (48)
Round 20
48 sc (48)
Round 21
48 sc (48)
Begin stuffing after Round 20. Add the stuffing gradually and shape the body as you continue.
Round 22
(6 sc, dec) × 6 (42)
Round 23
(5 sc, dec) × 6 (36)
Round 24
(4 sc, dec) × 6 (30)
Round 25
(3 sc, dec) × 6 (24)
Round 26
(2 sc, dec) × 6 (18)
Round 27
(sc, dec) × 6 (12)
Add the final amount of stuffing before closing.
Round 28
6 dec (6)
Fasten off, leaving a long tail. Use a yarn needle to weave the tail through the front loops of the final 6 stitches and pull the opening closed. Weave in the end.
Muzzle
Use cream or light beige yarn.
Round 1
6 sc in MR (6)
Round 2
6 inc (12)
Round 3
(sc, inc) × 6 (18)
Round 4
18 sc (18)
Round 5
18 sc (18)
Round 6
(sc, dec) × 6 (12)
Fasten off, leaving a long sewing tail.
Do not heavily stuff the muzzle. Flatten it gently so it keeps a shallow shape.
Ears
Make 2 using the main oatmeal or beige yarn.
Round 1
6 sc in MR (6)
Round 2
6 inc (12)
Round 3
(sc, inc) × 6 (18)
Round 4
18 sc (18)
Round 5
(sc, dec) × 6 (12)
Fasten off, leaving a long sewing tail.
Flatten each ear slightly. Do not stuff.
Feet
Make 4 using the main oatmeal or beige yarn.
Round 1
6 sc in MR (6)
Round 2
6 inc (12)
Round 3
12 sc (12)
Round 4
(2 sc, dec) × 3 (9)
Round 5
(sc, dec) × 3 (6)
Fasten off, leaving a long sewing tail.
Keep the feet lightly shaped rather than heavily stuffed.
Textured Quill Mantle
Use the dark-brown yarn.
The quill mantle is worked flat and attached to the upper back. Its long-loop stitches create the raised texture that gives the hedgehog its characteristic quilled appearance.
Long-Loop Stitch
Insert the hook into the next stitch, yarn over, and pull up an elongated loop approximately 1 inch long. Yarn over and pull through both loops on the hook as you would for a single crochet, keeping the elongated loop visible on the outside of the work.
Chain 9 to begin.
Turn at the end of each row. The turning chain is not counted as a stitch.
Row 1
8 sc (8)
Row 2
inc, 6 sc, inc (10)
Row 3
10 LS (10)
Row 4
inc, 8 LS, inc (12)
Row 5
12 LS (12)
Row 6
inc, 10 LS, inc (14)
Row 7
14 LS (14)
Row 8
inc, 12 LS, inc (16)
Row 9
16 LS (16)
Row 10
dec, 12 LS, dec (14)
Row 11
14 LS (14)
Row 12
dec, 10 LS, dec (12)
Row 13
12 LS (12)
Row 14
dec, 8 LS, dec (10)
Row 15
10 LS (10)
Row 16
dec, 6 LS, dec (8)
Row 17
8 LS (8)
Row 18
dec, 4 LS, dec (6)
Row 19
6 LS (6)
Fasten off, leaving a long sewing tail.
The widest part of the mantle should sit across the middle of the back, with the narrower ends tapering toward the front and rear.
Facial Details
Eyes
Use black embroidery thread.
Embroider two small black eyes on either side of the muzzle. Compare both sides from the front so the eyes sit at matching heights.
Nose
Embroider a small rounded triangular nose near the center of the muzzle.
Keep the nose compact so it complements the muzzle without overpowering the face.

Assembly
Step 1: Attach the Muzzle
Center the cream muzzle on the front of the head.
Use the shape of the body as your visual guide rather than relying on a fixed stitch measurement.
Sew around the outer edge of the muzzle, keeping the attachment smooth and even.
Step 2: Add the Ears
Place one ear on each side of the head, slightly behind the upper portion of the muzzle.
Compare both sides from the front before sewing them permanently.
Step 3: Attach the Feet
Place two feet beneath the front half of the body and two beneath the rear half.
Keep the feet low enough that the hedgehog can rest naturally on a flat surface.
Check the silhouette from the front and side before securing them.
Step 4: Attach the Quill Mantle
Place the dark-brown mantle along the upper back.
Center the widest portion over the middle of the back, with the tapered ends pointing toward the front and rear.
Make sure the raised long-loop texture faces outward.
Pin the mantle first and check the silhouette from several angles. Once the placement looks balanced, sew it securely to the back.
Leave the belly area uncovered so the lighter body color remains visible.
Step 5: Add the Facial Details
Embroider the eyes and nose after the muzzle and ears have been positioned.
Check the face from the front before securing the embroidery.
Step 6: Shape the Finished Hedgehog
Gently redistribute the stuffing by massaging the body from the outside.
Check:
- Muzzle alignment
- Eye symmetry
- Ear symmetry
- Foot placement
- Mantle alignment
- Overall balance
Weave in and trim any remaining yarn tails.
Finishing
Take a final look at the finished hedgehog from the front, side, and top.
Make any small visual adjustments to the ears, feet, muzzle, or quill mantle before trimming the last loose ends.
The quill mantle should remain centered along the upper back, while the belly and lower sides stay uncovered.
Helpful Tips
Keep the Stuffing Even
Add small amounts of fiberfill rather than filling the body all at once. This makes it easier to maintain a rounded shape without making the body overly firm.
Use Visual Symmetry
For the ears, feet, and embroidered eyes, compare both sides before sewing or securing them permanently.
Check the Mantle Before Sewing
The textured mantle is the main visual feature of the hedgehog, so careful positioning makes a noticeable difference to the final silhouette.
Keep the Long Loops Consistent
Try to keep the height of the long-loop stitches reasonably similar throughout the mantle. Small differences are natural, but consistent loops help the textured surface look more uniform.
Count Before Moving On
A stitch-count mistake can affect every round that follows. Check your stitch count at the end of each round before continuing.
Troubleshooting
My Body Looks Too Firm
Reduce the amount of stuffing and redistribute it gently through the body. The finished shape should stay rounded without becoming excessively rigid.
I Have Gaps in the Body
Check your tension and make sure the stuffing is not pushing too forcefully against the stitches. Large gaps can also appear when the hook is too large for the yarn being used.
My Ears Look Uneven
Temporarily remove the ears and compare their positions from the front. Small adjustments before permanent sewing can make the face look much more balanced.
My Feet Do Not Look Symmetrical
Position all four feet before sewing. Check the hedgehog from both the front and side to compare their placement.
The Quill Mantle Looks Off-Center
Reposition the center of the mantle over the widest portion of the back and compare both sides before sewing it again.
Customization Ideas
Change the Body Color
Try another neutral shade for the main body while keeping the dark-brown mantle for contrast.
Change the Quill Color
Chocolate brown, medium brown, or another earthy shade can give the hedgehog a different look while keeping the same overall design.
Change the Facial Expression
Small changes to the embroidered eyes and nose can give the finished hedgehog a slightly different personality.
Build a Woodland Collection
Use coordinated natural colors to create a matching collection of woodland-inspired amigurumi.
Changing yarn weight or hook size can also change the final proportions, so a simple size substitution may affect more than the finished dimensions.
Care
Because this project contains embroidered details and is filled with polyester fiberfill, handle it gently during cleaning and storage.
Avoid aggressive washing or excessive handling that could distort the crocheted shape, embroidery, or textured mantle.
Frequently Asked Questions
What yarn is used for this crochet hedgehog?
The design uses worsted-weight yarn in a warm oatmeal or beige main color, dark brown for the quill mantle, cream or light beige for the muzzle, and black embroidery thread for the facial details.
What crochet hook size is used?
The pattern is designed with a 3.5 mm crochet hook.
How big is the finished crochet hedgehog?
The target size is approximately 5–6 inches long. The final size will vary with yarn, hook, tension, stuffing, and individual technique.
How are the hedgehog’s quills made?
The textured back is created with a separate dark-brown mantle worked using long-loop stitches. The mantle is then sewn onto the upper back.
Is the pattern worked in continuous rounds?
Yes. The head and body are worked in continuous rounds, so a stitch marker is useful for identifying the beginning of each round.
Are the eyes safety eyes?
No. This design uses embroidered black eyes.
Does the pattern require sewing?
The head and body are worked as one piece, but the muzzle, ears, feet, and quill mantle are separate components that are attached during assembly.
Has this pattern been physically tested?
Not yet. The stitch mathematics has been reviewed and the construction has been checked, but the pattern has not yet been physically crocheted and evaluated on a prototype.
More Crochet Animal Amigurumi
This hedgehog makes a natural addition to a collection of crochet animal and woodland-inspired amigurumi projects. Explore other animal designs as you build a coordinated handmade collection.
