
Crochet Squirrel Amigurumi Pattern: Step-by-Step Tutorial
This crochet squirrel amigurumi pattern creates a rounded little squirrel…

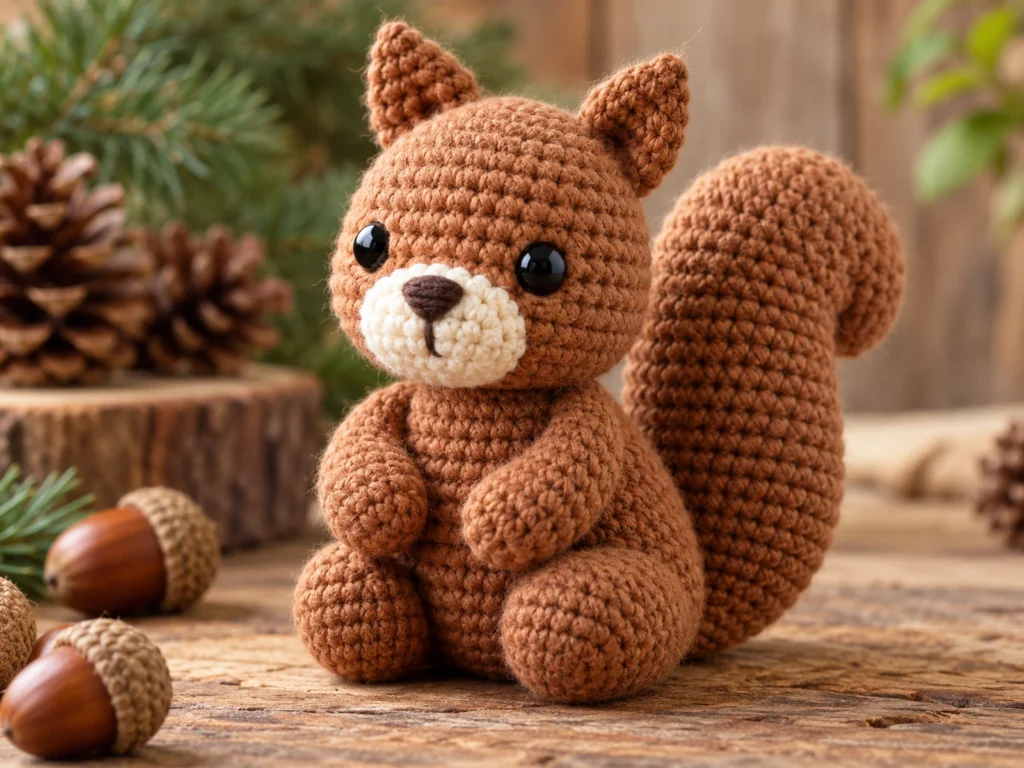
This crochet squirrel amigurumi pattern creates a rounded little squirrel with pointed ears, a cream muzzle, and a large tapered tail that gives the finished piece its woodland-inspired silhouette.
The squirrel is made in separate crocheted pieces and assembled at the end. The main components use continuous rounds with simple increases and decreases, while the ears are worked in rows.
Pattern note: This original design has been mathematically reviewed and constructionally checked, but it has not been physically crocheted and tested yet. Final size and shaping may vary with yarn, hook size, tension, stuffing, and individual technique.
Project Overview
What You’ll Make
You’ll make a brown squirrel amigurumi with:
- A rounded head and body
- Pointed ears
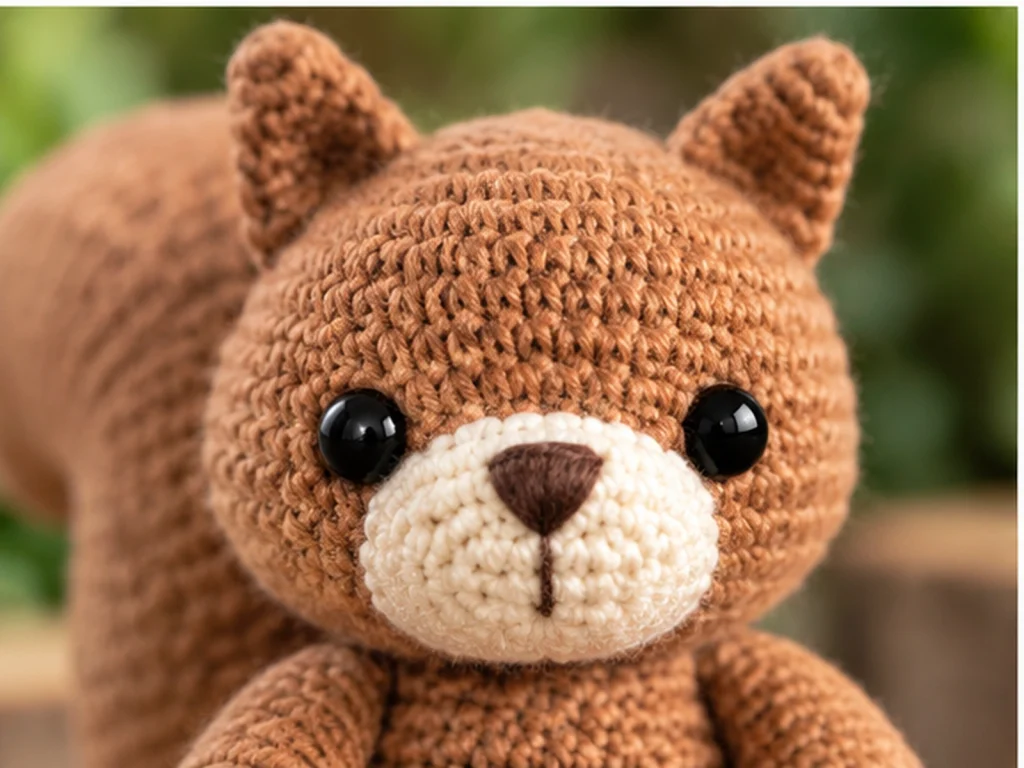
- A contrasting cream muzzle
- Separate arms and legs
- An oversized tapered tail
- Black safety eyes
- An embroidered nose and optional mouth
Project Details
- Project: Crochet squirrel amigurumi
- Technique: Amigurumi crochet
- Yarn: #4 worsted-weight yarn
- Main color: Warm medium brown
- Accent color: Cream
- Detail color: Dark brown or black
- Hook: 3.25 mm crochet hook
- Safety eyes: 8 mm black
- Filling: Polyester fiberfill
- Approximate finished size: 7–9 inches (18–23 cm), including the curved tail
The finished size is approximate. Changes in yarn, hook, crochet tension, stuffing, and technique can affect the final dimensions.
Materials & Tools
You’ll need:
- #4 worsted-weight yarn in warm medium brown
- Cream yarn for the muzzle
- Dark brown or black yarn for the nose and optional mouth
- 3.25 mm crochet hook
- 8 mm black safety eyes
- Polyester fiberfill
- Tapestry or yarn needle
- Scissors
- Stitch marker
Safety Note
Safety eyes can present a choking hazard and are not appropriate for children under 3. The finished amigurumi should not be described as baby-safe or child-safe.
Abbreviations
This pattern uses standard US crochet terminology.
- MR — magic ring
- ch — chain
- sc — single crochet
- inc — increase; work 2 sc in the same stitch
- dec — decrease
- st / sts — stitch / stitches
- FO — fasten off
Before You Start
Work in Continuous Rounds
Most of the squirrel is worked in continuous spiral rounds rather than joined rounds.
Place a stitch marker in the first stitch of each round and move it as you work.
Count Your Stitches
Keep an eye on the stitch count at the end of every round, especially on increase and decrease rounds. Accurate counting will help maintain the intended shape.
Stuff as You Go
Stuff the rounded pieces gradually instead of waiting until the very end. Add enough filling to support the shape without stretching the stitches.
The tail should be stuffed lightly so it remains flexible enough to curve during assembly.
Shape Before Sewing
For the muzzle, ears, and tail, take a moment to shape each piece before sewing it permanently in place.
Construction Order
Make all matching pieces before assembly whenever possible. For the ears, arms, and legs, comparing both pieces before sewing makes it easier to keep the finished squirrel balanced.
Original Crochet Squirrel Pattern
Head
Make 1 in brown yarn.
Round 1
6 sc in MR. (6)
Round 2
6 inc. (12)
Round 3
(sc, inc) × 6. (18)
Round 4
(2 sc, inc) × 6. (24)
Round 5
(3 sc, inc) × 6. (30)
Round 6
30 sc. (30)
Round 7
30 sc. (30)
Round 8
30 sc. (30)
Round 9
30 sc. (30)
Round 10
30 sc. (30)
Round 11
(3 sc, dec) × 6. (24)
Round 12
(2 sc, dec) × 6. (18)
Round 13
(sc, dec) × 6. (12)
Round 14
6 dec. (6)
Fasten off and leave a long yarn tail for sewing.
Begin stuffing around Round 6 and continue gradually. Add the final stuffing before completely closing the opening.
Install the safety eyes once the head has enough structure to judge the face placement.
Muzzle
Make 1 in cream yarn.
Round 1
6 sc in MR. (6)
Round 2
6 inc. (12)
Round 3
(sc, inc) × 6. (18)
Round 4
18 sc. (18)
Fasten off and leave a sewing tail.
Keep the muzzle lightly stuffed or unstuffed so it can be shaped into a soft oval.
Ears
Make 2 in brown yarn.
Work the ears in rows.
Row 1
Chain 2. Sc in 2nd ch from hook. (1)
Row 2
Ch 1, turn, inc. (2)
Row 3
Ch 1, turn, inc, sc. (3)
Row 4
Ch 1, turn, sc, inc, sc. (4)
Row 5
Ch 1, turn, inc, 2 sc, inc. (6)
Row 6
Ch 1, turn, 6 sc. (6)
Fasten off and leave a sewing tail.
Do not stuff the ears. Fold the lower edge slightly when positioning them to create a subtle curved shape.
Make the second ear the same way.
Body
Make 1 in brown yarn.
Round 1
6 sc in MR. (6)
Round 2
6 inc. (12)
Round 3
(sc, inc) × 6. (18)
Round 4
(2 sc, inc) × 6. (24)
Round 5
(3 sc, inc) × 6. (30)
Round 6
(4 sc, inc) × 6. (36)
Round 7
36 sc. (36)
Round 8
36 sc. (36)
Round 9
36 sc. (36)
Round 10
36 sc. (36)
Round 11
(4 sc, dec) × 6. (30)
Round 12
30 sc. (30)
Round 13
(3 sc, dec) × 6. (24)
Round 14
(2 sc, dec) × 6. (18)
Round 15
18 sc. (18)
Round 16
(sc, dec) × 6. (12)
Round 17
6 dec. (6)
Fasten off and leave a long sewing tail.
Begin stuffing around Round 7. Keep the body rounded without overstuffing it.
Arms
Make 2 in brown yarn.
Round 1
6 sc in MR. (6)
Round 2
(sc, inc) × 3. (9)
Round 3
9 sc. (9)
Round 4
9 sc. (9)
Round 5
9 sc. (9)
Round 6
9 sc. (9)
Round 7
9 sc. (9)
Round 8
(sc, dec) × 3. (6)
Round 9
6 sc. (6)
Round 10
6 sc. (6)
Fasten off and leave a long sewing tail.
Lightly stuff the lower portion of each arm and keep the upper area flexible for sewing.
Make the second arm the same way.
Legs
Make 2 in brown yarn.
Round 1
6 sc in MR. (6)
Round 2
6 inc. (12)
Round 3
(sc, inc) × 6. (18)
Round 4
18 sc. (18)
Round 5
(4 sc, dec) × 3. (15)
Round 6
15 sc. (15)
Round 7
(3 sc, dec) × 3. (12)
Round 8
12 sc. (12)
Round 9
12 sc. (12)
Round 10
(2 sc, dec) × 3. (9)
Round 11
9 sc. (9)
Round 12
(sc, dec) × 3. (6)
Round 13
6 sc. (6)
Fasten off and leave a long sewing tail.
Stuff lightly, with more filling toward the lower portion.
Make the second leg the same way.
Large Curved Tail
Make 1 in brown yarn.
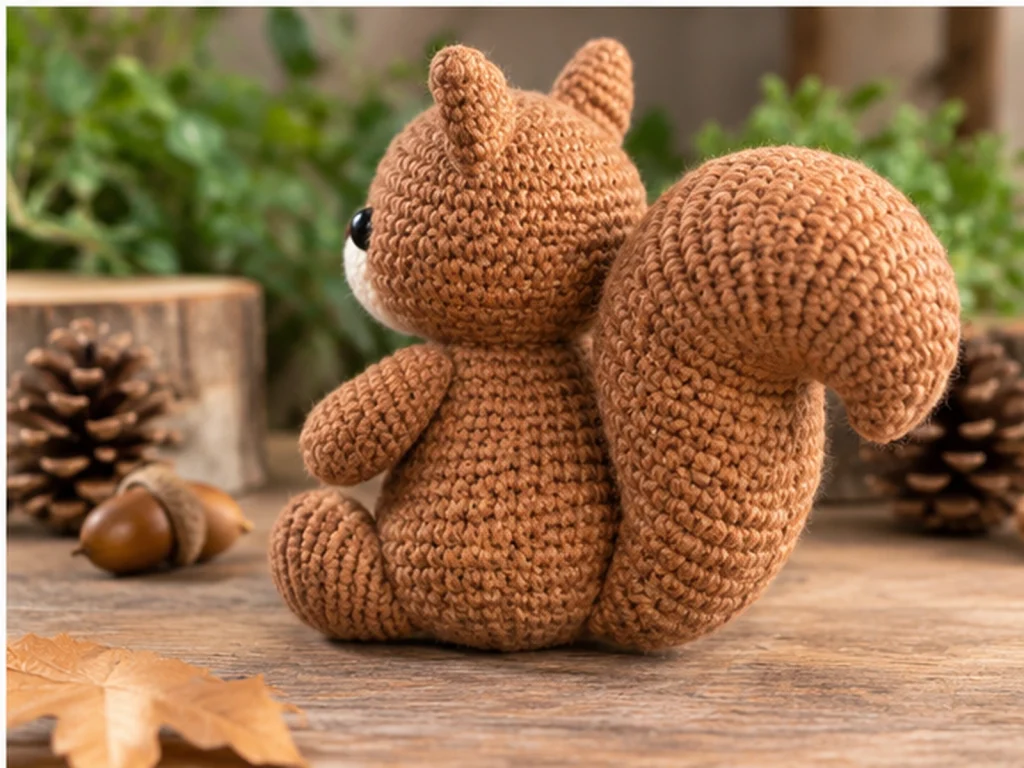
The tail is the squirrel’s defining feature, with a broad base that gradually narrows toward the tip.
Round 1
6 sc in MR. (6)
Round 2
6 inc. (12)
Round 3
(sc, inc) × 6. (18)
Round 4
(2 sc, inc) × 6. (24)
Round 5
24 sc. (24)
Round 6
24 sc. (24)
Round 7
24 sc. (24)
Round 8
24 sc. (24)
Round 9
(6 sc, dec) × 3. (21)
Round 10
21 sc. (21)
Round 11
(5 sc, dec) × 3. (18)
Round 12
18 sc. (18)
Round 13
18 sc. (18)
Round 14
18 sc. (18)
Round 15
18 sc. (18)
Round 16
(4 sc, dec) × 3. (15)
Round 17
15 sc. (15)
Round 18
15 sc. (15)
Round 19
15 sc. (15)
Round 20
(3 sc, dec) × 3. (12)
Round 21
12 sc. (12)
Round 22
12 sc. (12)
Round 23
12 sc. (12)
Round 24
12 sc. (12)
Round 25
(2 sc, dec) × 3. (9)
Round 26
9 sc. (9)
Round 27
9 sc. (9)
Round 28
9 sc. (9)
Round 29
(sc, dec) × 3. (6)
Round 30
6 sc. (6)
Round 31
3 dec. (3)
Fasten off and close the tip neatly.
Stuff the tail lightly so it stays flexible enough to curve during assembly.

Facial Details
Attach the Muzzle
Center the cream muzzle on the lower-middle front of the head.
Hold it in place first and check the face from straight on before sewing it securely.
Add the Eyes
Use the 8 mm black safety eyes.
Position them symmetrically above the muzzle and compare both sides before permanently securing them.
Embroider the Nose
Using dark brown or black yarn, embroider a small rounded triangular nose in the center of the muzzle.
A short vertical mouth line may be added below the nose for a slightly more expressive look.
Assembly
Step 1: Prepare the Finished Pieces
Make sure all the components are complete and that the sewing tails are available where needed.
Lay out the ears, arms, legs, head, body, muzzle, and tail before beginning assembly.
Step 2: Attach the Legs
Sew the two legs to the lower portion of the body.
Compare both sides before permanently securing the second leg.
Step 3: Attach the Head
Position the head on top of the body and sew around the connection gradually.
Check the squirrel from both the front and side as you work.
Step 4: Attach the Arms
Sew one arm to each side of the upper body.
Compare the arm height and angle before completing the second side.
Step 5: Attach the Tail
Position the broad base of the tail on the lower back of the body.
Sew the base securely, then curve the tail upward and around the body to create the final silhouette.
Step 6: Attach the Ears
Position the two ears near the top sides of the head.
Compare their height and angle from the front and side before completing the stitching.
Step 7: Attach the Muzzle
Sew the cream muzzle securely to the front of the head.
Check that it remains centered as you sew.
Step 8: Add the Facial Features
Install the safety eyes and embroider the nose and optional mouth.
Step 9: Hide the Yarn Ends
Weave the remaining yarn ends into the crocheted fabric and trim away the excess.
Finishing
Once the main assembly is complete, give the squirrel a final shaping pass.
Check the following areas carefully:
- Head shape
- Body shape
- Ear symmetry
- Arm placement
- Leg placement
- Muzzle position
- Eye balance
- Tail curve
Make any small visual adjustments before trimming the final sewing tails.
Helpful Tips
Keep Your Stitch Tension Consistent
A firm, even fabric helps maintain the shape of amigurumi pieces and reduces visible gaps around the stuffing.
Check Counts Often
If a round does not end with the listed stitch count, stop and find the error before continuing.
Add Stuffing Gradually
Small additions of stuffing are easier to control than trying to reshape an overfilled piece later.
Compare Paired Pieces
For ears, arms, and legs, make both pieces before assembly so you can compare their size and shape side by side.
Shape the Tail Gently
The tail is designed to remain flexible. Use a smooth curve rather than forcing it into a sharp bend.
Troubleshooting
My stitches have gaps and I can see the stuffing.
Your tension may be too loose for the yarn and hook combination. A firmer crochet fabric will help reduce visible openings.
My piece has the wrong shape.
Check the stitch count from the most recent increase or decrease round. A missed stitch can change the shape of an entire section.
My stuffing looks lumpy.
Remove or redistribute some filling and add it back in smaller amounts.
My ears or limbs are uneven.
Before permanently sewing paired pieces, compare their placement from the front and side. Small positional adjustments can make a noticeable difference.
My tail does not hold the shape I want.
Avoid overstuffing it. The tail is intended to remain flexible so it can be shaped during assembly.
Customization Ideas
Change the Color Combination
Keep the same construction while experimenting with lighter, darker, or different shades of brown.
Create Different Expressions
Small changes in eye placement or the embroidered mouth can give the squirrel a different expression.
Change the Tail Pose
The tail can be curved upward, angled slightly to one side, or wrapped closer around the body depending on the look you prefer.
Experiment With Scale
Changing yarn weight and hook size can change the finished size, although it may also affect the fabric and proportions. Test the resulting fabric before making the entire project.
Frequently Asked Questions
What yarn is used for this crochet squirrel?
The design uses #4 worsted-weight yarn, with warm medium brown as the main color and cream for the muzzle.
What crochet hook size is needed?
Use a 3.25 mm crochet hook.
How large is the finished squirrel?
The squirrel is approximately 7–9 inches (18–23 cm), including the curved tail. The final size varies with yarn, hook, tension, stuffing, and individual technique.
Is the squirrel worked in continuous rounds?
Most of the main pieces are worked in continuous rounds. The ears are worked in rows.
Does the squirrel need stuffing?
Yes. The head and body are stuffed, the arms and legs are lightly stuffed, the ears are not stuffed, and the tail is lightly stuffed.
Can I change the colors?
Yes. Changing yarn colors is a simple way to personalize the finished squirrel without changing the basic construction.
Has this crochet squirrel pattern been physically tested?
Not yet. The design has been mathematically reviewed and constructionally checked, but it has not yet been physically crocheted and tested.
More Animal Amigurumi
Looking for another animal crochet project? Continue exploring the Tiny Yarn Tales collection of animal amigurumi patterns and woodland-inspired crochet projects.
Final Thoughts
This crochet squirrel amigurumi combines a rounded body, pointed ears, a soft contrasting muzzle, and a large tapered tail for a distinctive squirrel silhouette.
Take your time with stitch counts and assembly, especially when positioning the facial features, ears, limbs, and tail. Those final placement decisions have a big effect on the finished character.
Enjoy making your own little crochet squirrel and shaping the final details to give it a personality of its own.