Crochet Taco Amigurumi Pattern
Make a cute crochet taco with a golden-brown shell, ruffled…

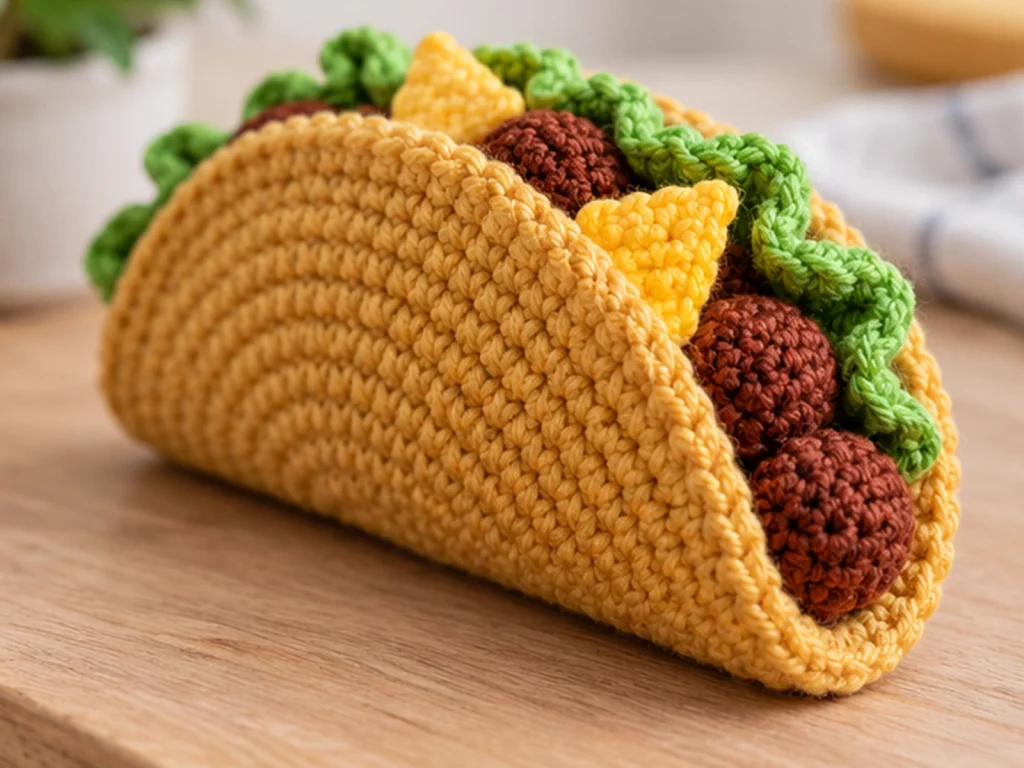
Make a cute crochet taco with a golden-brown shell, ruffled lettuce, little cheese triangles, and bite-sized filling pieces. This original taco amigurumi is built from a flat crochet shell and several simple components, then assembled into a folded taco shape.
The finished design is intended to be approximately 5–6 inches wide when made with the listed materials. Actual size may vary depending on yarn, hook size, tension, stuffing, and individual technique.

Project Overview
What You’ll Make
This crochet taco is made in four main parts:
- A flat circular taco shell
- One ruffled lettuce strip
- Two cheese triangles
- Four small filling nuggets
The shell is folded to create the taco pocket, while the fillings are attached inside before the curved outer edge is secured.
Project Details
- Project: Crochet taco amigurumi
- Technique: Crochet
- Yarn: Medium/worsted weight (#4)
- Hook: 3.5 mm crochet hook
- Main colors: Golden brown, green, yellow, and reddish brown
- Safety eyes: None
- Stuffing: Polyester fiberfill for the filling nuggets
- Approximate finished size: 5–6 inches wide
This pattern has been mathematically reviewed and constructionally checked, but it has not been physically crocheted and tested yet.
Materials & Tools
Yarn
Use medium/worsted weight (#4) yarn in:
- Golden brown for the taco shell
- Green for the lettuce
- Yellow for the cheese
- Reddish brown for the filling
Other Supplies
- 3.5 mm crochet hook
- Small amount of polyester fiberfill
- Yarn needle
- Scissors
- Stitch marker
Safety Note
No safety eyes are used in this design.
Crochet Abbreviations
US crochet terminology is used throughout.
- MR — magic ring
- ch — chain
- sc — single crochet
- inc — increase; work 2 single crochets in the same stitch
- dec — decrease; single crochet two stitches together
- FO — fasten off
Before You Start
The taco shell is crocheted as a flat circle and is not stuffed. Once complete, it is folded evenly to create the taco pocket.
The lettuce, cheese, and filling pieces are made separately and attached to the inside of the shell before the shell is folded and sewn along its curved outer edge.
For the shell and filling nuggets, work in continuous rounds and use a stitch marker to keep track of the beginning of each round.
For the filling nuggets, use only a small amount of stuffing so they remain compact and easy to close.
Keep your stitch count consistent as you work. If your count is incorrect at the end of a round, correct it before continuing.
Original Crochet Taco Pattern
Taco Shell — Make 1
Use golden-brown yarn.
Work in continuous rounds.
Round 1
6 sc in MR. (6)
Round 2
6 inc. (12)
Round 3
(sc, inc) × 6. (18)
Round 4
(2 sc, inc) × 6. (24)
Round 5
(3 sc, inc) × 6. (30)
Round 6
(4 sc, inc) × 6. (36)
Round 7
(5 sc, inc) × 6. (42)
Round 8
(6 sc, inc) × 6. (48)
Round 9
(7 sc, inc) × 6. (54)
Round 10
(8 sc, inc) × 6. (60)
Round 11
60 sc BLO. (60)
Fasten off and weave in the end.
Do not stuff the taco shell.
Lettuce — Make 1
Use green yarn.
Work in rows.
Foundation
Ch 33.
Row 1
Sc in the 2nd ch from hook and across. (32)
Row 2
Ch 1, turn. (sc, inc) × 16. (48)
Fasten off, leaving a yarn tail for sewing.
The increased second row creates the ruffled edge that will sit along the taco opening.
Cheese — Make 2
Use yellow yarn.
Work in rows.
Foundation
Ch 2.
Row 1
Sc in the 2nd ch from hook. (1)
Row 2
Ch 1, turn. Inc. (2)
Row 3
Ch 1, turn. Inc, sc. (3)
Row 4
Ch 1, turn. Inc, 2 sc. (4)
Row 5
Ch 1, turn. Inc, 3 sc. (5)
Row 6
Ch 1, turn. Inc, 4 sc. (6)
Row 7
Ch 1, turn. Inc, 5 sc. (7)
Row 8
Ch 1, turn. Inc, 6 sc. (8)
Row 9
Ch 1, turn. Inc, 7 sc. (9)
Row 10
Ch 1, turn. Inc, 8 sc. (10)
Fasten off, leaving a yarn tail for sewing.
Make a second identical cheese triangle.
When assembled, the wider edge sits near the taco opening while the pointed end extends inward.
Filling Nuggets — Make 4
Use reddish-brown yarn.
Work in continuous rounds.
Round 1
6 sc in MR. (6)
Round 2
6 inc. (12)
Round 3
12 sc. (12)
Add a small amount of polyester fiberfill.
Round 4
6 dec. (6)
Round 5
6 sc. (6)
Cut the yarn, leaving a tail.
Thread the tail through the front loops of the remaining stitches and pull gently to close the opening. Secure the yarn and weave in the end.
Repeat until you have four filling nuggets.
Assemble the Crochet Taco
Step 1: Prepare the Shell
Lay the completed shell flat.
Identify the two opposite points of the circular shell and use them as the fold line. Fold the circle evenly across this diameter to create the taco shape.
Do not sew the opening shut.
Step 2: Attach the Lettuce
Position the lettuce along the inside of the taco opening.
Place the ruffled edge toward the opening so the green layer is visible from the front.
Use the sewing tail to secure the lettuce at several points along the shell.
Step 3: Add the Cheese
Place the two yellow cheese triangles beneath the lettuce.
Keep the wider edge near the taco opening and let the pointed end extend inward.
Compare both sides before sewing them permanently so the placement feels balanced.
Step 4: Arrange the Filling Nuggets
Place the four reddish-brown filling nuggets inside the taco, slightly behind the lettuce and cheese.
A staggered arrangement helps create a fuller filling without placing every piece in a straight row.
Secure each piece with small stitches so the filling stays in place when the taco is folded.
Step 5: Fold the Taco
Bring the back half of the shell over the fillings.
Check that:
- The lettuce remains visible.
- The cheese can still be seen.
- The filling pieces stay positioned.
- The taco opening remains open.
Step 6: Join the Curved Edge
Starting at one end, sew the two shell layers together around the curved outer edge.
Work through the corresponding stitch positions on both layers.
The folded shell provides approximately 30 stitch positions along the curved half of the circle.
Do not sew across the taco opening.
Secure both ends of the seam carefully.

Finishing
Once the taco is assembled:
- Weave in all remaining yarn ends.
- Trim excess yarn neatly.
- Check that the curved seam is secure.
- Gently reshape the shell if needed.
- Make sure the fillings remain visible and evenly distributed.
The finished taco should have a clear folded-shell silhouette with the colorful fillings visible through the opening.

Helpful Tips
Keep Your Stitch Counts Consistent
For the shell, the stitch count progresses from 6 to 12, 18, 24, 30, 36, 42, 48, 54, and finally 60 stitches.
For each filling nugget, the sequence is 6, 12, 12, 6, and 6.
Correcting a count early is much easier than trying to recover several rounds later.
Keep the Shell Flexible
The shell is not stuffed. Maintaining even tension helps it remain flexible enough to fold into the taco shape.
Use Light Stuffing
The filling nuggets need only a small amount of fiberfill. Overstuffing can make them harder to close neatly.
Compare Both Sides Before Sewing
When placing the cheese and fillings, compare both sides before making the attachment permanent. This helps create a balanced finished taco.
Troubleshooting
My Stitch Count Is Off
Stop before continuing to the next round or row.
For the shell, check the expected stitch counts for the current round and correct the mistake before moving on.
For the filling nuggets, verify that the count follows 6, 12, 12, 6, and 6.
My Taco Shell Looks Uneven
Check your tension before changing the pattern.
Loose or inconsistent tension can affect how evenly the circular shell grows. Use a stitch marker and try to keep your tension consistent throughout the rounds.
The Lettuce Looks Too Flat
The second lettuce row increases from 32 stitches to 48 stitches to create the ruffled effect.
Check that all 16 increases were worked correctly.
The Filling Pieces Move Around
Before closing the taco, add a few small securing stitches to the filling pieces.
The goal is to anchor the pieces without creating bulky stitching.
The Taco Is Difficult to Fold
Avoid overstuffing the filling nuggets and check that the shell has not been stretched unevenly.
The shell should remain flexible enough to fold into the taco shape.
The Seam Looks Bulky
Use small, even sewing stitches and avoid pulling the yarn excessively tight.
The two shell layers should come together without distorting the outer curve.
Customization Ideas
Change the Shell Color
Try a lighter or darker shade of golden brown for a different finished look.
Change the Filling Color
The filling nuggets can be worked in another color while keeping the same construction.
Rearrange the Cheese
Position the two cheese triangles slightly differently along the taco opening for a more irregular handmade appearance.
Create a Custom Color Palette
Coordinate the shell, lettuce, cheese, and filling colors to create your own version of the taco while keeping the original construction.
Frequently Asked Questions
How big is the finished crochet taco?
The design is intended to be approximately 5–6 inches wide when made with the listed materials. Actual dimensions can vary depending on yarn, hook size, tension, stuffing, and individual technique.
Does the taco shell need stuffing?
No. The shell is crocheted as a flat piece and folded into shape, so it does not need to be stuffed.
Which parts are stuffed?
Only the four small filling nuggets receive a light amount of polyester fiberfill.
How many filling nuggets do I need?
The pattern calls for four filling nuggets.
Does this pattern use safety eyes?
No. This design does not use safety eyes or other facial features.
How do I keep the taco fillings in place?
Attach the lettuce, cheese, and filling nuggets to the inside of the shell before completing the curved outer seam. Add small securing stitches where needed so the pieces stay in position.
Can I change the filling color?
Yes. The filling pieces are made separately, so changing their yarn color is a simple way to personalize the finished taco.
Is the pattern physically tested?
Not yet. The pattern has been mathematically reviewed and constructionally checked, but it has not been physically crocheted and tested yet.
More Crochet Amigurumi Projects
Explore more handmade amigurumi projects and crochet patterns from Tiny Yarn Tales for your next project.
Final Thoughts
This crochet taco combines a flat circular shell with a few colorful components to create a recognizable food-themed amigurumi. The folded shell creates the taco shape, while the lettuce, cheese, and filling pieces add texture and dimension.
The finished design also gives you plenty of room to experiment with your own color combinations and filling arrangements.
Enjoy crocheting your taco!