Crochet Watermelon Amigurumi Pattern
This crochet watermelon amigurumi is a small stuffed fruit wedge…

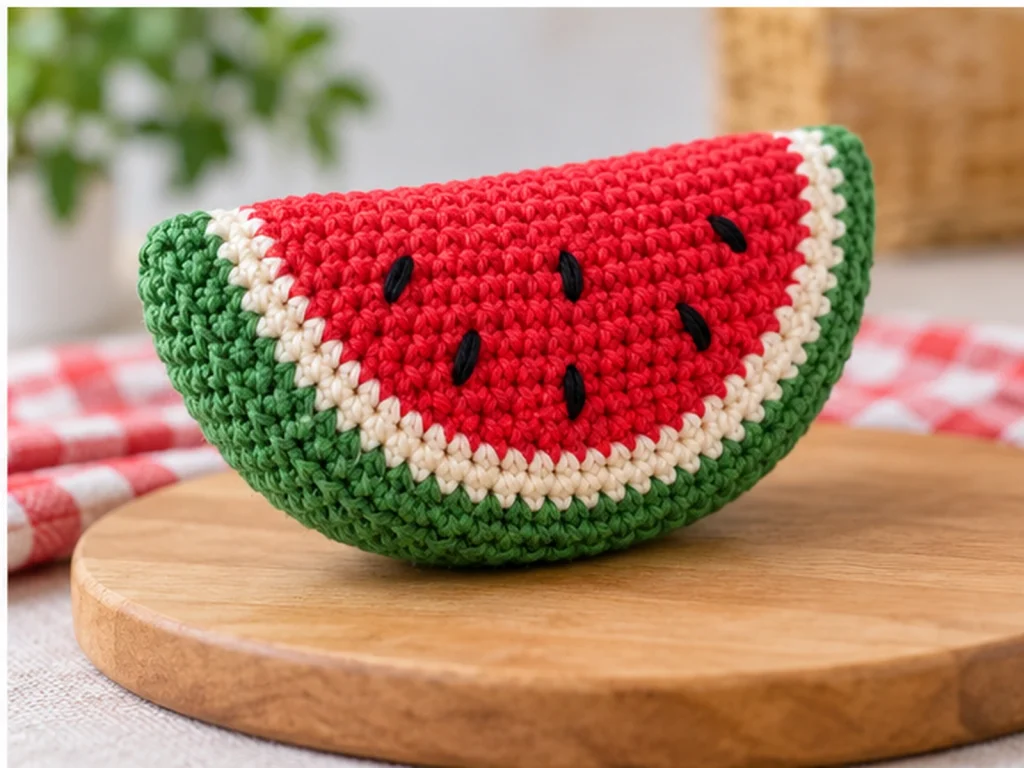
This crochet watermelon amigurumi is a small stuffed fruit wedge made from two matching crocheted panels. With a green rind, pale pith, bright red flesh, and embroidered black seeds, it has the classic look of a watermelon slice while using a simple flat-panel construction.
The finished wedge is designed to be approximately 4.5–5.5 inches wide, 2.5–3.25 inches tall, and 0.75–1.5 inches thick. Final dimensions can vary with yarn, hook size, tension, stuffing, and individual crochet technique.

Project Overview
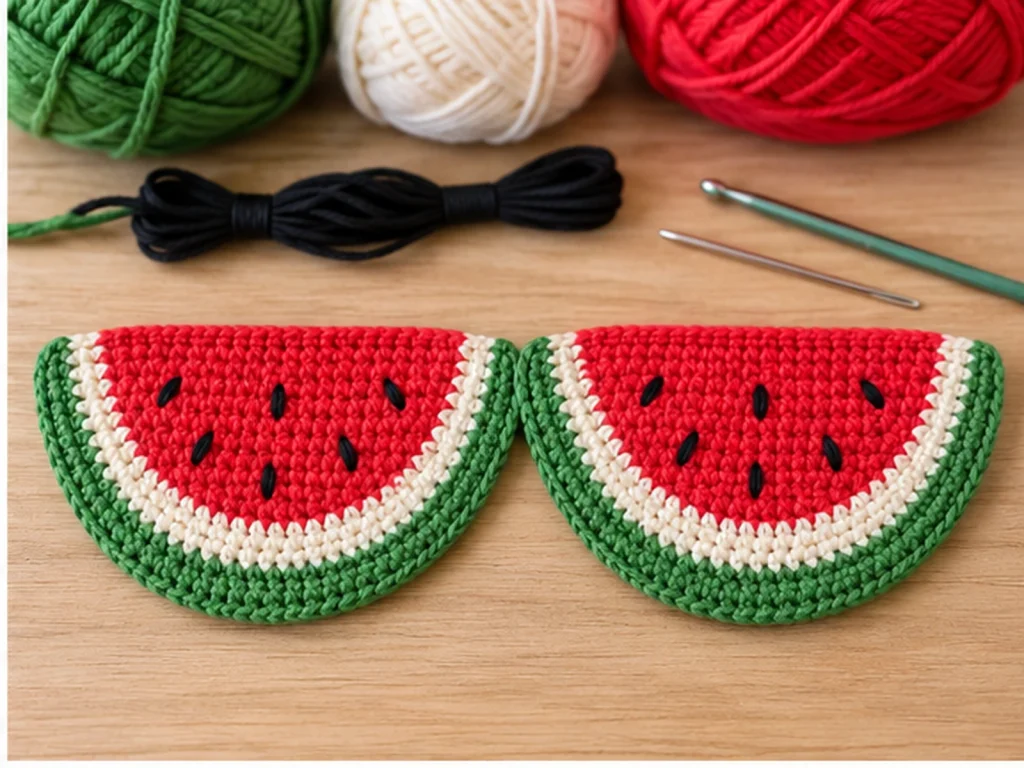
This watermelon amigurumi is worked flat in rows rather than in continuous rounds. You’ll crochet two identical fan-shaped panels, add the embroidered seed details, join the panels around the edge, and add fiberfill before closing the final opening.
The finished construction creates a softly stuffed watermelon wedge with a broad rind edge and a tapered point.
Pattern Status
This pattern has been mathematically reviewed and constructionally checked, but it has not been physically crocheted and tested yet. A physical sample should be made before treating the finished measurements or physical fit as confirmed.
Materials & Tools
- Medium/Worsted weight #4 yarn in:
- Green
- White or cream
- Watermelon red
- Black embroidery floss
- 3.25 mm crochet hook
- Polyester fiberfill
- Tapestry needle
- Scissors
- Stitch marker, optional
Safety Note
This design does not use safety eyes or other small plastic facial components. Avoid presenting the finished item as baby-safe, child-safe, or certified for use by young children.
Crochet Abbreviations
- ch — chain
- sc — single crochet
- dec — single crochet decrease
- FO — fasten off
Before You Start
The watermelon panels are worked back and forth in rows.
The chain 1 at the beginning of a row does not count as a stitch. Turn after every row.
Make both panels with the same yarn and hook whenever possible. Consistent tension will help the two pieces line up during assembly.
The color sequence is:
- Green rind
- White or cream pith
- Red watermelon flesh
The black seeds are embroidered onto each panel before the panels are joined.
Crochet the Watermelon Panels
Make 2 identical panels.
Green Rind
With green yarn:
Row 1: Ch 25. Sc in 2nd ch from hook and across. (24)
Row 2: Ch 1, turn. Dec, sc 20, dec. (22)
FO green.
White or Cream Pith
Join white or cream yarn at the beginning of the next row.
Row 3: Ch 1, turn. Dec, dec, sc 14, dec, dec. (18)
Row 4: Ch 1, turn. Dec, sc 14, dec. (16)
FO white or cream.
Red Watermelon Flesh
Join watermelon-red yarn.
Row 5: Ch 1, turn. Dec, dec, sc 8, dec, dec. (12)
Row 6: Ch 1, turn. Dec, sc 8, dec. (10)
Row 7: Ch 1, turn. Dec, sc 6, dec. (8)
Row 8: Ch 1, turn. Dec, sc 4, dec. (6)
Row 9: Ch 1, turn. Dec, sc 2, dec. (4)
Row 10: Ch 1, turn. Dec, dec. (2)
Row 11: Ch 1, turn. Dec. (1)
FO, leaving a yarn tail for weaving in.
Repeat the complete panel instructions once more to make the second panel.
Add the Watermelon Seeds
Embroider 7 black seeds on each panel before assembly.
Keep the seeds within the red section and spread them into a loose, balanced arrangement. One simple layout is:
- 1 seed near the center
- 2 seeds slightly below the center
- 2 seeds above the center
- 2 seeds toward the wider outer portion of the red section
Use small tapered embroidery stitches so the seeds sit relatively flat against the crochet.
Because the panel dimensions can vary with tension, exact seed spacing is intentionally not specified.
Assemble the Watermelon
Place the two completed panels together with their outer faces showing.
Before sewing, compare the two pieces and align the straight edges and tapered sides.
Step 1: Begin the Seam
Using green yarn and a tapestry needle, start sewing at one lower corner.
Work a neat whip stitch through corresponding edge loops.
Step 2: Sew Around the Wedge
Continue sewing up one sloping side, across the pointed end, and down the opposite side.
Then sew across most of the straight bottom edge, leaving an opening for stuffing.
Step 3: Add the Stuffing
Add polyester fiberfill gradually through the opening.
Shape the stuffing so the watermelon wedge feels softly rounded without becoming overly firm.
Avoid overstuffing, since too much filling can distort the edges and place excess pressure on the seam.
Step 4: Close the Opening
Once the shape looks even, sew the remaining opening closed with green yarn.
Secure the yarn and weave in the remaining tail.

Finishing
Give the finished watermelon a gentle final shaping with your fingers.
Check for:
- even stuffing
- a fully closed seam
- secure yarn ends
- balanced seed placement
- clean color transitions
- a clear watermelon-wedge silhouette
Keep the joining stitches even and avoid pulling the seam excessively tight.
Helpful Tips
Keep Both Panels Consistent
The two panels should be as similar as possible before assembly. If one looks noticeably different, check the stitch counts and your tension before sewing them together.
Stuff Gradually
Add small amounts of fiberfill and shape as you go. This makes it easier to control the final thickness.
Embroider Before Assembly
Adding the seeds while the panels are still flat gives you better access and makes placement easier to control.
Compare the Two Sides
Before making the final stitches, look at both faces together. This makes it easier to spot uneven seed placement or differences in shaping.
Troubleshooting
The Panels Do Not Line Up
Check your stitch counts first. Differences in tension can also change the shape of a flat panel.
The Watermelon Looks Too Flat
Add a little more fiberfill through the opening and gently redistribute it before closing the seam.
The Seam Looks Bulky
Use less stuffing near the outer edge and keep the joining stitches evenly spaced.
The Shape Looks Uneven
Gently redistribute the stuffing instead of pulling on the crochet. Repeated stretching can change the shape of the edge.
The Seeds Look Crowded
Since the seed placement is decorative rather than counted crochet, you can remove and reposition the embroidery before securing it permanently.
Customization Ideas
Change the Rind Shades
Try a deeper green for a stronger rind or a softer green for a lighter look.
Adjust the Seed Shapes
Make the embroidered seeds slightly longer, shorter, narrower, or rounder while keeping them securely stitched to the surface.
Try Different Flesh Colors
A different shade of red can change the overall look while preserving the watermelon design.
Experiment With Size
A larger or smaller watermelon would require changes to the panel dimensions rather than simply swapping yarn. Any resized version should be treated as a separate variation and physically tested before exact measurements are given.
Care
The best care method depends on the actual yarn used. Avoid treating the finished piece as machine-washable unless the yarn manufacturer’s care instructions support that method.
For routine care, gently remove dust and keep the amigurumi stored in a clean, dry place.
Frequently Asked Questions
What yarn is used for this watermelon amigurumi?
The pattern is designed for medium/worsted weight #4 yarn in green, white or cream, and watermelon red, plus black embroidery floss for the seeds.
What crochet hook size is used?
Use a 3.25 mm crochet hook for this design.
How is the watermelon made?
The watermelon is constructed from two matching flat panels. The panels are decorated with embroidered seeds, joined around the perimeter, stuffed with polyester fiberfill, and closed.
Does this pattern use safety eyes?
No. The design does not use eyes or other facial components.
How big is the finished watermelon?
The designed size is approximately 4.5–5.5 inches wide, 2.5–3.25 inches tall, and 0.75–1.5 inches thick. Actual dimensions can vary with yarn, hook, tension, stuffing, and individual technique.
Can I change the colors?
Yes. The main color sections can be changed while keeping the same panel construction.
Has the pattern been physically tested?
Not yet. The stitch mathematics and construction have been reviewed, but the pattern has not yet been physically crocheted and tested.
More Crochet Amigurumi
Explore more fruit-inspired and small amigurumi projects throughout Tiny Yarn Tales for additional crochet ideas.