
Tiny Octopus Amigurumi Crochet Pattern
This tiny octopus amigurumi crochet pattern creates a compact little…

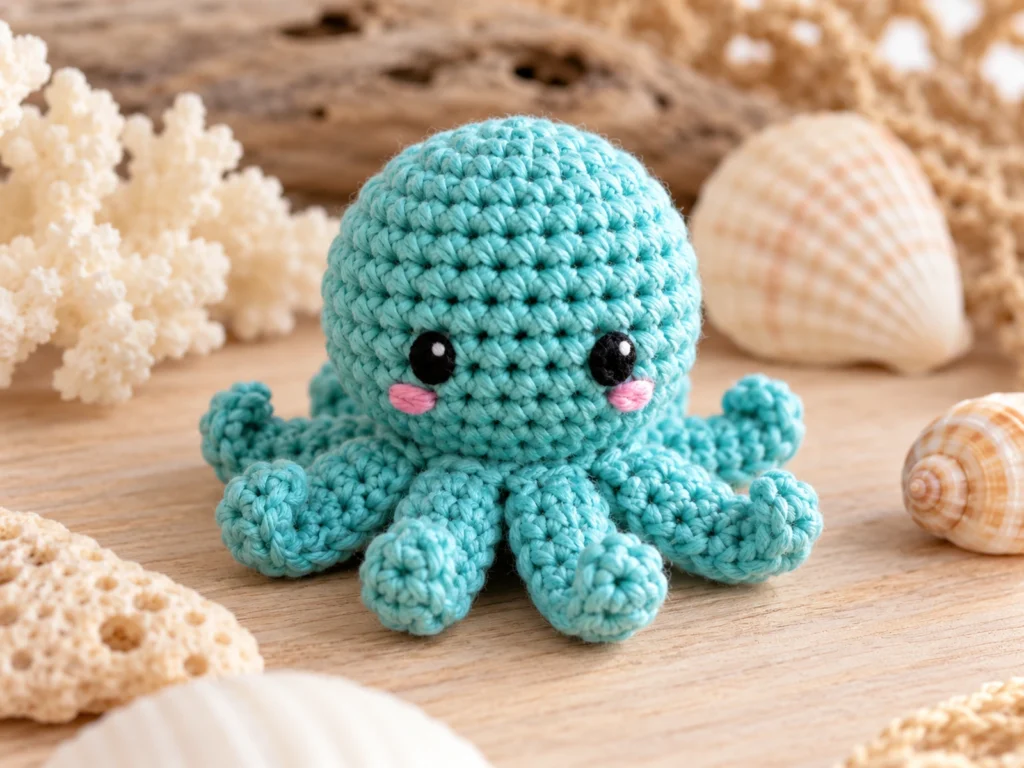
This tiny octopus amigurumi crochet pattern creates a compact little sea creature with a rounded body and eight short, tapered tentacles. The design uses fine cotton crochet thread and a small steel hook for a miniature crochet project.
The finished octopus is designed to measure approximately 1.5–2 inches tall. Actual size can vary depending on yarn, hook, tension, stuffing, and individual crochet technique.
The pattern has been mathematically reviewed and constructionally checked, but it has not been physically crocheted and tested yet.
Project Overview
This Tiny Octopus is made from four main components:
- 1 rounded body
- 8 separate tentacles
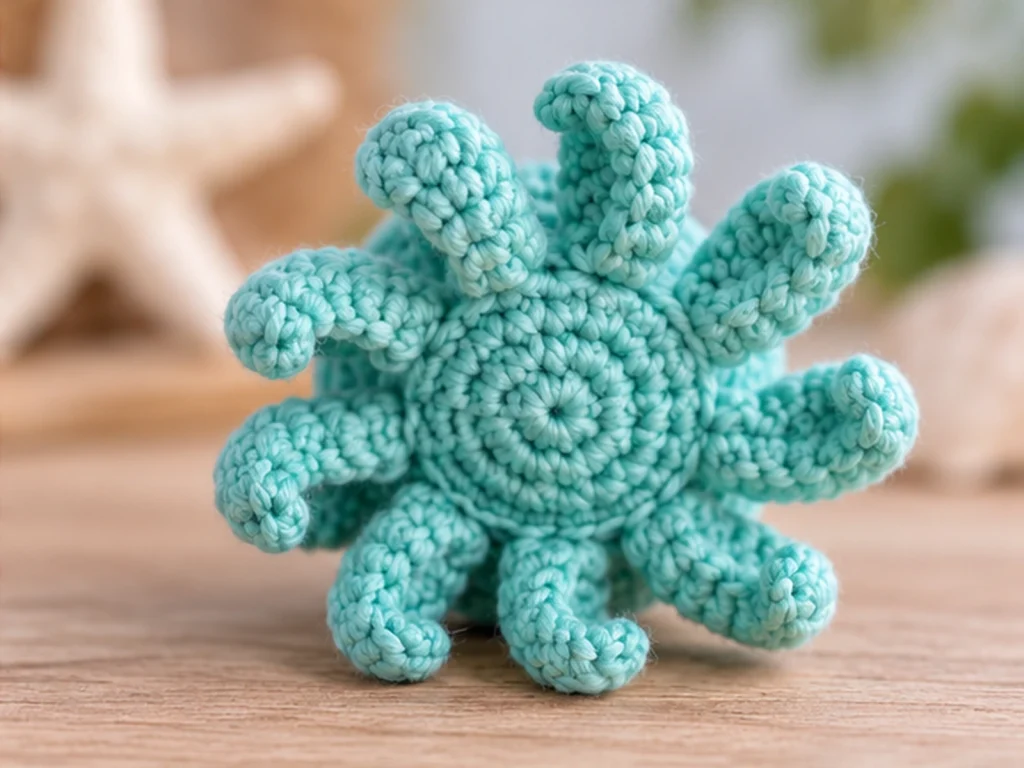
- 1 circular belly disc
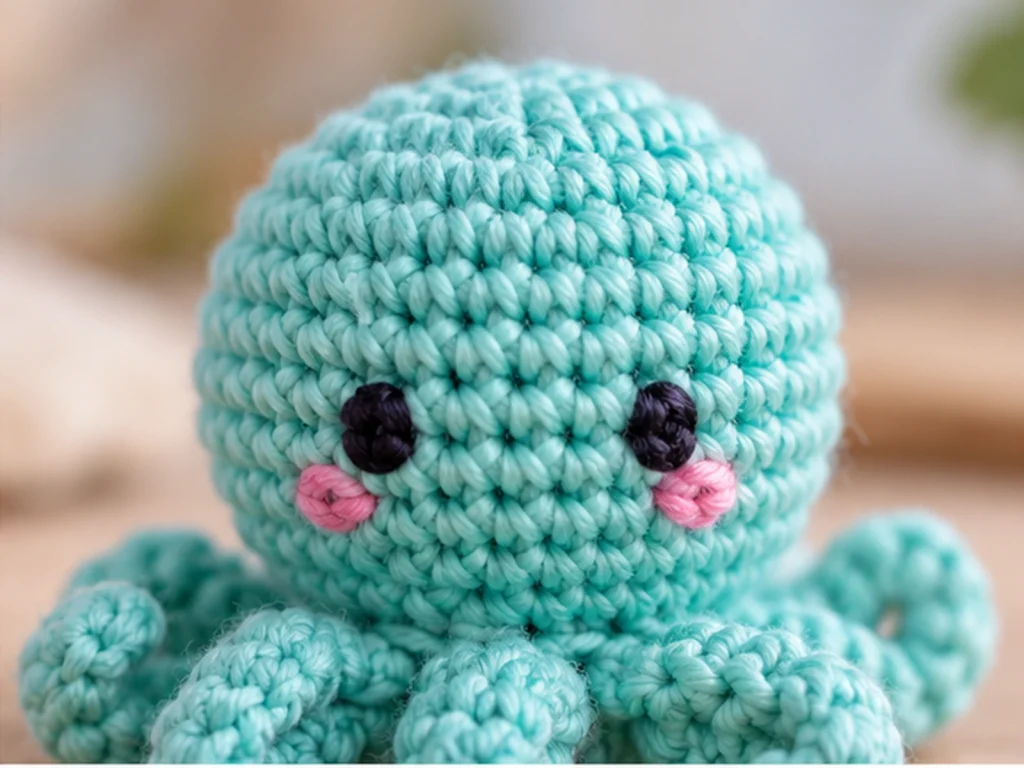
- 2 embroidered eyes
The body is crocheted as one rounded piece and stuffed before closing. The tentacles are made separately and attached to the belly disc before the entire underside assembly is sewn to the body.
A key part of the construction is the eight-way tentacle arrangement. The belly disc has 24 stitches around its edge, while each tentacle has a 3-stitch attachment base.
8 tentacles × 3 stitches = 24 stitches
This gives the underside a balanced attachment system.
Materials & Tools
Yarn
Use fine cotton crochet thread, approximately size 10 crochet cotton, in the main color of your choice.
Possible colors include:
- Seafoam green
- Turquoise
- Lavender
- Coral
- Any other solid color you prefer
No exact yarn quantity is specified.
Crochet Hook
- 0.9 mm steel crochet hook
Other Supplies
- Small amount of polyester fiberfill
- Black embroidery thread for the eyes
- Optional pink embroidery thread for cheeks
- Yarn needle
- Scissors
- Stitch marker
Abbreviations
This pattern uses standard U.S. crochet terminology.
- MR — magic ring
- ch — chain
- sc — single crochet
- inc — increase; work 2 sc in the same stitch
- dec / sc2tog — single crochet 2 stitches together
- sl st — slip stitch
- FO — fasten off
Before You Start
Work in Continuous Rounds
The body and belly disc are worked in continuous rounds rather than joined rounds.
Use a stitch marker to identify the beginning of each round.
Count Your Stitches
The body changes shape through several increase and decrease rounds, so keep track of the stitch count at the end of every round.
Stuff Gradually
The body should be stuffed gradually as you work toward the final decrease rounds. Add enough fiberfill to create a rounded shape without forcing the stuffing through the stitches.
Shape Before Sewing
The tentacles are not stuffed. Their final appearance comes from their crocheted shape and how they are positioned during assembly.
Construction Order
For the cleanest assembly:
- Crochet and finish the body.
- Make all 8 tentacles.
- Crochet the belly disc.
- Attach the tentacles to the belly disc.
- Shape and attach the belly assembly to the body.
- Add the embroidered facial details.
Original Tiny Octopus Crochet Pattern
Main Body
Make 1 in the main color.
Work in continuous rounds.
Round 1
8 sc in MR. (8)
Round 2
8 inc. (16)
Round 3
(sc, inc) × 8. (24)
Round 4
(2 sc, inc) × 8. (32)
Round 5
32 sc. (32)
Round 6
32 sc. (32)
Round 7
32 sc. (32)
Round 8
(2 sc, dec) × 8. (24)
Round 9
24 sc. (24)
Round 10
(sc, dec) × 8. (16)
Begin adding stuffing gradually after Round 10.
Round 11
16 sc. (16)
Add a little more stuffing if needed. Keep the body rounded without packing it too firmly.
Round 12
8 dec. (8)
Fasten off, leaving a yarn tail.
Weave the tail through the front loops of the remaining 8 stitches and gently pull to close the opening. Secure the yarn and hide the end inside the body.
Tentacles
Make 8 in the main color.
Each tentacle is worked as a small flat piece.
Foundation
Ch 4.
Row 1
Starting in the 2nd chain from the hook, sc in the next 3 sts. (3)
Row 2
3 sc. (3)
Row 3
sc, inc, sc. (4)
Row 4
sc2tog, sc, sc. (3)
Fasten off, leaving a sewing tail.
Repeat until you have 8 matching tentacles.
Belly Disc
Make 1 in the main color.
Work in continuous rounds.
Round 1
8 sc in MR. (8)
Round 2
8 inc. (16)
Round 3
(sc, inc) × 8. (24)
Fasten off, leaving a long sewing tail.
The finished disc has 24 stitches around the outer edge.
Facial Details
Choose the front of the completed body before adding the face.
Embroider two small black eyes on the front surface. Compare both sides before tightening the stitches completely so the eyes look balanced.
You can also add two tiny pink cheek accents if you’d like a softer expression.
Because the face is small, visual placement is more practical than using a fixed measurement.
Assemble the Tentacles
Step 1: Arrange the Tentacles
Place the belly disc flat and arrange the 8 tentacles evenly around its outer edge.
Think of the disc as having eight sections, one for each tentacle.
Step 2: Attach the Tentacles
Each tentacle has a 3-stitch base.
Sew one tentacle to each section of the disc.
The attachment relationship is:
8 tentacles × 3 stitches = 24 belly-disc stitches
Make sure the spacing looks balanced before securing all the sewing.
Step 3: Shape the Tentacles
Once attached, gently curve each tentacle outward and slightly back toward its tip.
Do not force a tight curl. The goal is a soft, rounded octopus silhouette.

Attach the Belly Assembly
Place the finished belly-and-tentacle assembly against the underside of the body.
The body narrows to a 24-stitch section at Round 8, creating the main lower area for attaching the belly disc.
Sew around the perimeter with small, even stitches.
Check the tentacle positions from the outside as you sew so the finished octopus stays balanced.
Once the disc is secure, fasten off and hide the remaining yarn tail.
Finishing
Take a final look at the completed octopus.
Check that:
- All 8 tentacles are securely attached.
- The tentacles are evenly distributed.
- The body keeps its rounded shape.
- No stuffing is visible.
- The eyes look balanced.
- All loose yarn ends are hidden.
Gently shape the tentacles with your fingers rather than pulling sharply on them.
Helpful Tips
Keep Your Tension Consistent
Small crochet projects show tension differences quickly. Try to keep your stitches even throughout the body and tentacles.
Check Stitch Counts Frequently
The body has several shaping transitions. Confirm the stitch count before moving to the next round.
Add Stuffing Gradually
A small amount of fiberfill at a time gives you better control over the final body shape.
Arrange Before Sewing
Lay out all 8 tentacles before permanently attaching them. This makes it easier to correct uneven spacing.
Take Your Time With the Face
The available facial surface is small, so even minor changes in eye placement can affect the expression.
Troubleshooting
Why does my body look uneven?
Check the stitch count for each round. A missed increase or decrease can change the shape noticeably.
Why does the body look lumpy?
Remove a little stuffing and redistribute it evenly. Avoid packing the body too firmly.
Why are my tentacles unevenly spaced?
Place all 8 tentacles around the belly disc before sewing them permanently. Adjust their positions until the spacing looks balanced.
Why do my eyes look uneven?
Compare both sides before fully tightening the embroidery. Small adjustments can make a noticeable difference on such a small face.
Why is my finished octopus a different size?
Finished size can change with thread thickness, hook size, tension, stuffing, and individual crochet technique.
Customization Ideas
Change the Main Color
Try turquoise, lavender, coral, seafoam, or any other color combination you enjoy.
Create Different Expressions
Small changes to embroidered eyes and optional cheek details can create different personalities.
Experiment With Thread Thickness
Changing the thread thickness can change the final size. If you make a yarn or thread substitution, pair it with an appropriate hook and expect the finished dimensions to vary.
Make a Mini Collection
Crochet several octopuses in different colors while keeping the same basic construction.
Frequently Asked Questions
How big is this tiny octopus?
The design target is approximately 1.5–2 inches tall. Actual size varies according to yarn, hook, tension, stuffing, and technique.
What yarn should I use?
The design uses fine cotton crochet thread, approximately size 10 crochet cotton.
What hook size is needed?
Use a 0.9 mm steel crochet hook.
Does the octopus need stuffing?
The main body is stuffed before closing. The tentacles and belly disc are not stuffed.
How many tentacles does it have?
The design uses 8 separate tentacles.
How are the tentacles attached?
Each tentacle has a 3-stitch base, and the eight tentacles attach around the 24-stitch belly disc.
Can I change the colors?
Yes. The same construction can be worked in different main colors, with optional embroidered cheeks for additional character.
Has this pattern been physically tested?
No. The pattern has been mathematically reviewed and constructionally checked, but it has not yet been physically crocheted and tested.
Final Thoughts
This tiny octopus is built around a simple miniature structure: a rounded body, eight tapered tentacles, and a circular underside that organizes the assembly.
For the best result, focus on consistent tension, accurate stitch counting, gentle stuffing, and careful tentacle placement. Small details make a big difference in a project this size.