
Teddy Bear Crochet Pattern: A Step-by-Step Amigurumi Tutorial
This teddy bear crochet pattern creates a sweet, classic-style amigurumi…
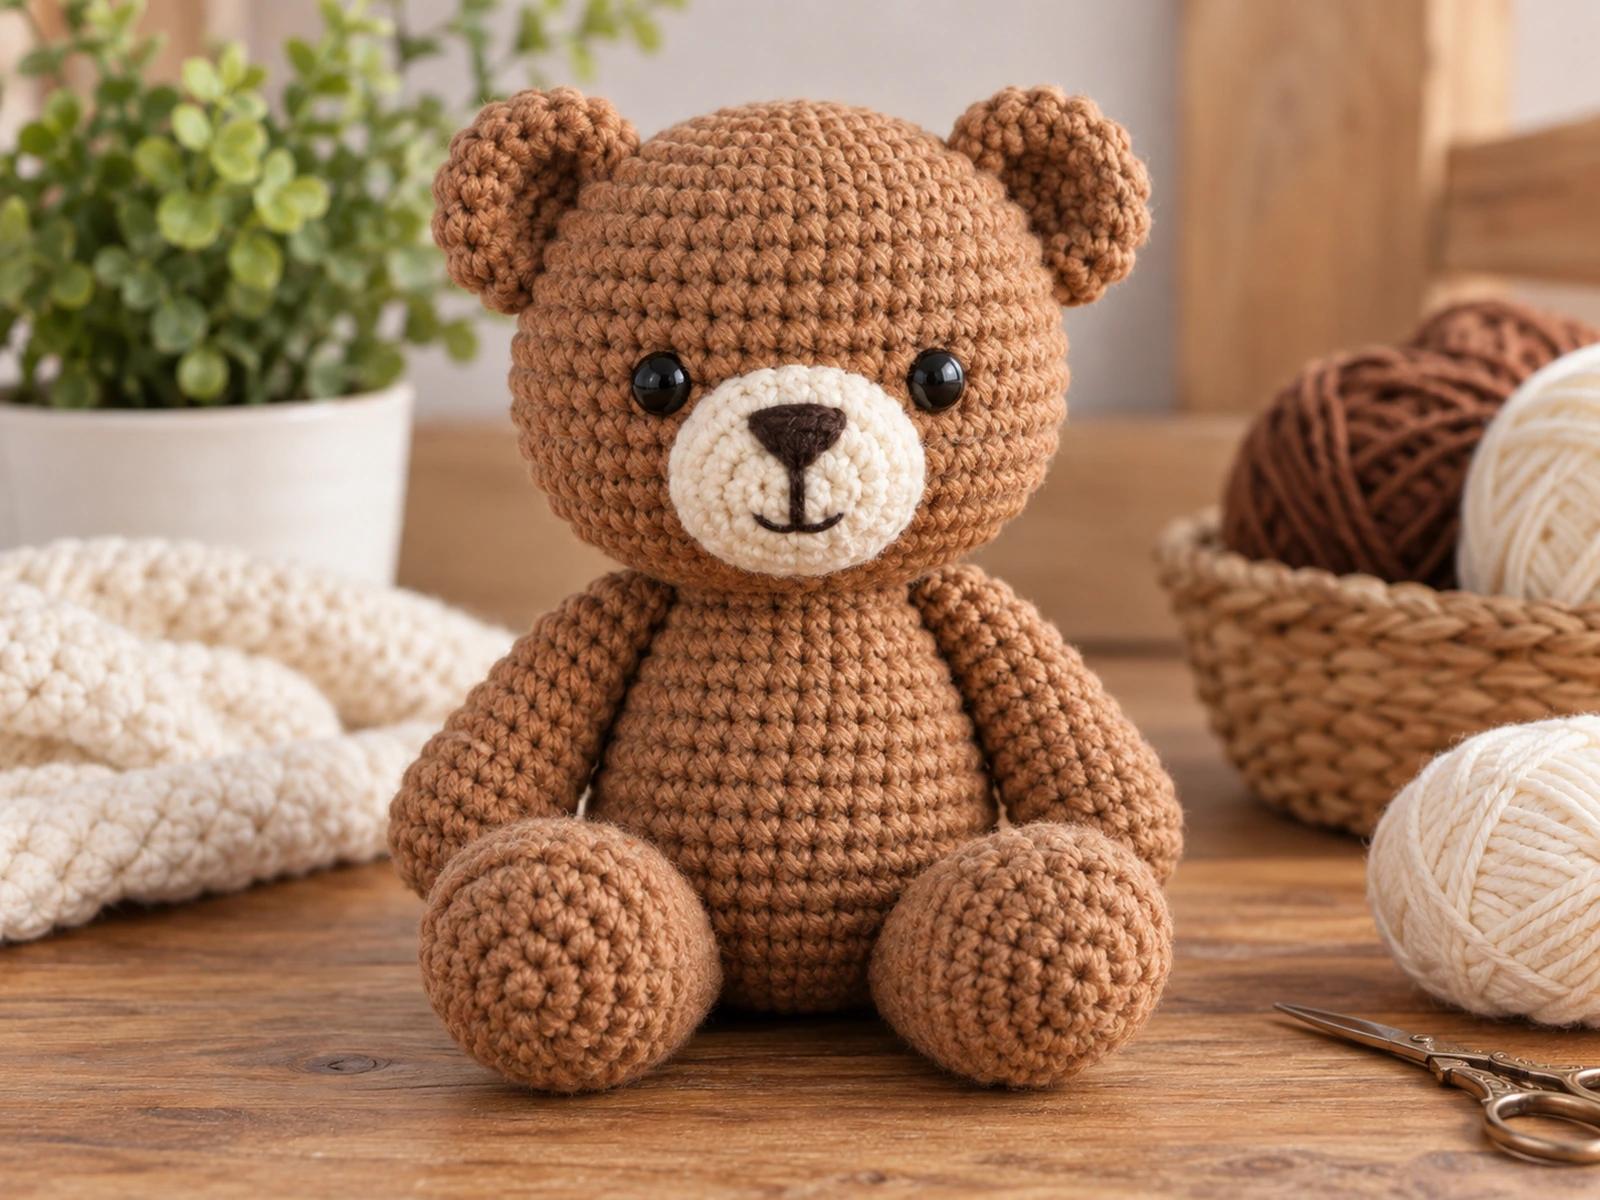
This teddy bear crochet pattern creates a sweet, classic-style amigurumi bear with a rounded head, small ears, compact body, soft-looking limbs, and a contrasting cream muzzle. The bear is crocheted in separate pieces and sewn together, giving you a clear path from the first round to the finished face.
The design is approximately 6–7 inches tall, although the finished size can vary with yarn choice, hook size, tension, stuffing, and individual crochet technique.
Project Overview
What You’ll Make
This teddy bear amigurumi is built from individually crocheted pieces that are assembled at the end.
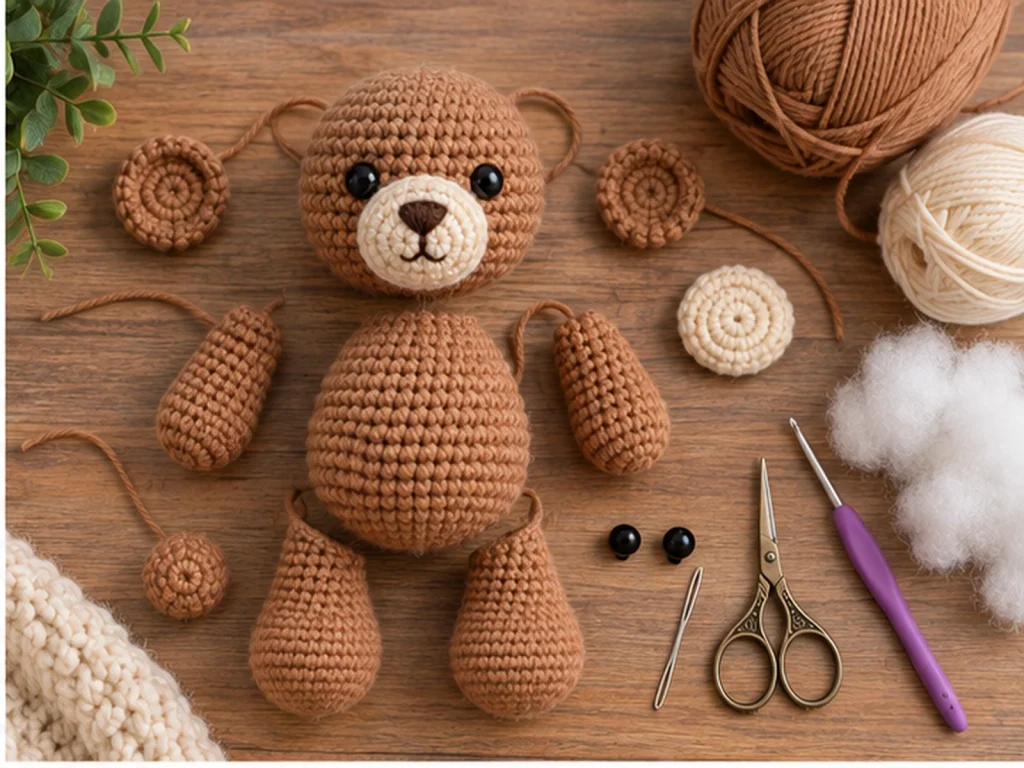
The finished design includes:
- One rounded brown head
- One compact brown body
- Two rounded ears
- Two arms
- Two legs
- One small tail
- One cream oval muzzle
- Two safety eyes
- Embroidered facial details
The head is slightly larger than the body to create a soft teddy bear silhouette.
Project Details
Approximate finished size: 6–7 inches tall
Technique: Amigurumi crochet worked primarily in continuous rounds
Construction: Separate crocheted pieces sewn together
Yarn: Medium/worsted-weight yarn
Main color: Warm brown
Accent color: Cream or light beige
Hook: 3.25 mm crochet hook
Eyes: 8 mm safety eyes
Filling: Polyester fiberfill
This pattern has been mathematically reviewed and constructionally checked, but it has not been physically crocheted and tested with a prototype yet. The final size and proportions may therefore vary in actual use.
Materials & Tools
Gather the following supplies before starting:
- Medium/worsted-weight brown yarn
- A small amount of cream or light beige yarn
- 3.25 mm crochet hook
- 8 mm safety eyes
- Polyester fiberfill
- Tapestry needle
- Scissors
- Stitch marker
- A small amount of black yarn for the nose and optional mouth
No specific yarn brand or yardage is specified for this design.
Safety Note
Safety eyes can pose a choking hazard and are not appropriate for children under 3.
Do not treat the finished project as baby-safe or child-safe.
Abbreviations
The pattern uses standard US crochet terminology:
- MR — Magic Ring
- sc — Single Crochet
- inc — Increase; work 2 single crochets in the same stitch
- dec — Single Crochet Decrease
- sl st — Slip Stitch
- FO — Fasten Off
Before You Start
Work in Continuous Rounds
Most of the teddy bear pieces are worked in continuous rounds rather than joined rounds.
Use a stitch marker to identify the beginning of each round.
Count Your Stitches
The stitch count in parentheses shows how many stitches you should have at the end of that round.
Check your count before moving to the next round, especially after increases and decreases.
Stuff as You Go
Stuff the head and body gradually as they take shape.
Aim for a firm shape without packing the stuffing so tightly that it stretches the crochet fabric.
The ears and tail need much less stuffing than the main body pieces.
Shape Before Sewing
For paired parts such as the ears, arms, and legs, compare both sides before sewing them permanently.
Small adjustments are much easier before the pieces are securely attached.
Construction Order
Complete all of the crocheted pieces first, then assemble the bear.
The general order is:
- Crochet the pieces.
- Stuff and finish the appropriate pieces.
- Attach the legs and arms.
- Attach the head.
- Attach the ears and tail.
- Add the muzzle and facial embroidery.
- Check the final shape and symmetry.
Original Teddy Bear Crochet Pattern
Head — Make 1
Work in brown yarn.
Round 1
6 sc in MR. (6)
Round 2
6 inc. (12)
Round 3
(sc, inc) × 6. (18)
Round 4
(2 sc, inc) × 6. (24)
Round 5
(3 sc, inc) × 6. (30)
Rounds 6–10
sc around. (30)
Place the 8 mm safety eyes symmetrically around Rounds 8–9, leaving enough space between them for the muzzle.
Begin stuffing gradually.
Round 11
(3 sc, dec) × 6. (24)
Round 12
(2 sc, dec) × 6. (18)
Round 13
(sc, dec) × 6. (12)
Add the remaining stuffing while keeping the head evenly rounded.
Round 14
6 dec. (6)
FO and close the remaining opening securely.
Body — Make 1
Work in brown yarn.
Round 1
6 sc in MR. (6)
Round 2
6 inc. (12)
Round 3
(sc, inc) × 6. (18)
Round 4
(2 sc, inc) × 6. (24)
Rounds 5–8
sc around. (24)
Begin stuffing gradually.
Round 9
(2 sc, dec) × 6. (18)
Rounds 10–11
sc around. (18)
Round 12
(sc, dec) × 6. (12)
Rounds 13–14
sc around. (12)
Add the final stuffing while keeping the upper opening compact enough for the head attachment.
Round 15
6 dec. (6)
FO and close the opening.
Ears — Make 2
Work in brown yarn.
Round 1
6 sc in MR. (6)
Round 2
6 inc. (12)
Rounds 3–4
sc around. (12)
Round 5
(sc, dec) × 4. (8)
Round 6
sc around. (8)
Do not heavily stuff the ears.
Flatten each ear gently and leave a yarn tail for sewing.
FO.
Repeat for the second ear.
Arms — Make 2
Work in brown yarn.
Round 1
6 sc in MR. (6)
Round 2
6 inc. (12)
Rounds 3–8
sc around. (12)
Stuff lightly.
Round 9
6 dec. (6)
Add a small amount of final stuffing if needed, then close the opening.
FO.
Repeat for the second arm.
Legs — Make 2
Work in brown yarn.
Round 1
6 sc in MR. (6)
Round 2
6 inc. (12)
Round 3
(sc, inc) × 6. (18)
Rounds 4–5
sc around. (18)
Round 6
(sc, dec) × 6. (12)
Round 7
sc around. (12)
Round 8
6 dec. (6)
Stuff the lower portion moderately while keeping the upper attachment area manageable for sewing.
FO and close.
Repeat for the second leg.
Tail — Make 1
Work in brown yarn.
Round 1
6 sc in MR. (6)
Round 2
6 inc. (12)
Rounds 3–4
sc around. (12)
Round 5
6 dec. (6)
Stuff very lightly.
FO and close.
Muzzle — Make 1
Work in cream yarn.
Round 1
6 sc in MR. (6)
Round 2
6 inc. (12)
Round 3
(sc, inc) × 6. (18)
Round 4
sc around. (18)
FO, leaving a yarn tail for sewing.
Position the muzzle beneath the eyes and sew it securely around the outer edge.
Use black yarn to embroider a small nose and, if desired, a short mouth line.
Assembly
Step 1: Attach the Legs
Place the two legs on the lower portion of the body.
Compare both sides from the front before sewing so the legs sit at a similar height and angle.
Sew each leg securely to the body.
Step 2: Attach the Arms
Place one arm on each side of the body.
Check both sides for symmetry before sewing permanently.
Secure the arms through their attachment areas.
Step 3: Attach the Head
Center the head over the top of the body.
Check the bear from both the front and side before sewing.
Sew the head securely to the body.
Step 4: Attach the Ears
Position one ear on each upper side of the head.
Use the eyes and muzzle as visual references to keep the ears balanced.
Sew both ears firmly in place.
Step 5: Attach the Tail
Position the tail on the back of the body.
Center it visually before sewing it securely.
Step 6: Finish the Face
Center the cream muzzle beneath the eyes.
Sew around the outside edge of the muzzle, then embroider the nose and optional mouth.
Take a final look at the face from the front and make any small visual adjustments before trimming and weaving in loose ends.
Finishing
Give the finished bear a final inspection before calling the project complete.
Check that:
- The head is securely attached.
- Both ears are balanced.
- The arms and legs are securely sewn.
- No stuffing is exposed.
- The safety eyes are firmly installed.
- The muzzle is centered.
- Loose yarn ends are woven in securely.
- The embroidered facial details look balanced.
Gently reshape the stuffed sections with your fingers if needed.
Helpful Tips
Keep Your Tension Consistent
Consistent tension helps the individual pieces keep their intended shape.
Check Paired Pieces Together
Before sewing two ears, arms, or legs into place, compare them side by side.
Stuff Gradually
Adding small amounts of stuffing as you go makes it easier to control the shape and avoid overfilling.
Check the Silhouette
Look at the bear from the front and side during assembly. A small placement adjustment can make a noticeable difference in the finished silhouette.
Troubleshooting
My Stitch Count Is Off. What Should I Do?
Stop at the end of the round and recount your stitches before continuing.
An incorrect stitch count can affect the shape of later rounds, especially during increase and decrease sections.
My Stuffing Is Showing Through the Stitches
Try using slightly less stuffing and distribute it more evenly.
The goal is a firm shape without stretching the crochet fabric.
My Ears or Limbs Look Uneven
Before sewing permanently, place both pieces on the bear and compare them from the front.
Small positioning adjustments are much easier before the pieces are sewn down.
The Head Feels Loose on the Body
Check that the head is centered over the body opening and that the sewing passes securely through both pieces.
Use several secure stitches around the attachment area rather than relying on a single connection point.
My Teddy Bear Looks Lopsided
Check the placement of the ears, arms, legs, muzzle, and head.
Amigurumi pieces can look different depending on tension and stuffing, so compare the complete silhouette before making final adjustments.
Customization Ideas
Change the Yarn Color
Try different shades of brown or use another main color for a playful variation.
Change the Muzzle
A cream muzzle gives the bear a classic look, but another light neutral shade can create a different character.
Adjust the Face
You can change the embroidered mouth shape to create a different expression.
Create a Character
A simple color change or small handmade accessory can turn the same base bear into a unique character.
Changing yarn weight or hook size can also change the finished size and proportions, so expect the result to vary.
Care
Because the finished piece has not been physically tested, specific care instructions have not been established for this design.
Handle the finished amigurumi gently and keep all sewn and embroidered details secure.
Frequently Asked Questions
How Big Is the Finished Teddy Bear?
The design target is approximately 6–7 inches tall. Actual finished size can vary based on yarn, hook size, tension, stuffing, and individual crochet technique.
What Yarn Is Used for This Teddy Bear?
The design uses medium/worsted-weight yarn, with brown as the main color and cream or light beige for the muzzle.
What Crochet Hook Size Do I Need?
This pattern was designed around a 3.25 mm crochet hook.
What Size Safety Eyes Are Used?
The design uses 8 mm safety eyes.
Safety eyes can pose a choking hazard and are not appropriate for children under 3.
Do I Need to Stuff Every Piece?
No. The head and body are stuffed more firmly, while the ears and tail use little stuffing and the arms and legs are stuffed more lightly.
How Should I Assemble the Teddy Bear?
Attach the legs and arms to the body, sew the head onto the body, attach the ears and tail, and finish with the muzzle and facial embroidery.
Compare paired pieces for symmetry before sewing them permanently.
Can I Make the Teddy Bear in Another Color?
Yes. Changing the yarn color is one of the simplest ways to create a different version while keeping the same basic construction.
More Animal Amigurumi
Explore more animal-inspired crochet projects from Tiny Yarn Tales as new patterns become available.
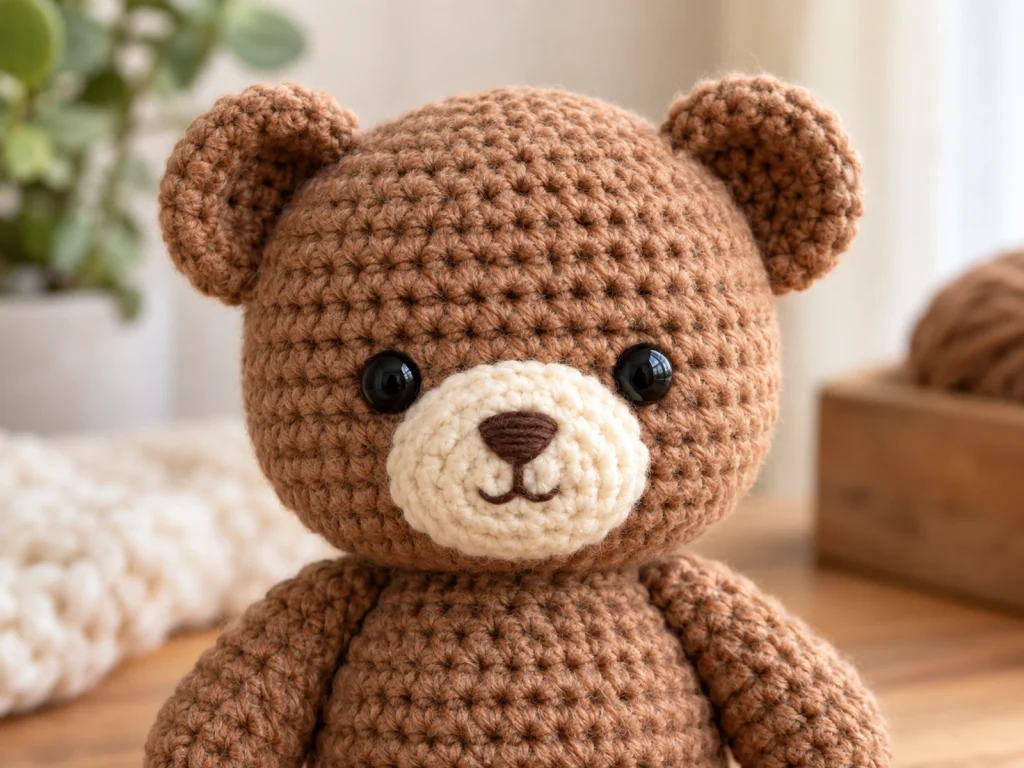
A teddy bear like this comes together through a series of small, manageable pieces. Take your time with the stitch counts, stuffing, and final assembly, especially when positioning the paired parts and facial details.
The most important finishing step is to pause before the final sewing and check the bear from the front and side. A few careful adjustments can help create a balanced finished shape.